
Introduction
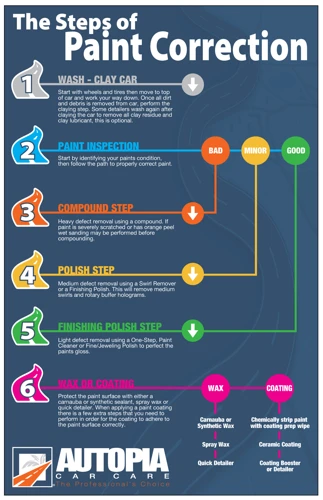
When it comes to maintaining the appearance of your car, machine polishing can be a highly useful technique. Using a machine polisher can save you time and effort compared to polishing by hand, and can achieve a better result. However, machine polishing can also be intimidating for those who are new to the process. In this guide, we will take you through the step-by-step process of machine polishing your car, from preparing your vehicle to applying finishing touches. By the end, you’ll be equipped with the knowledge you need to achieve professional-grade results. So, let’s get started.
Benefits of Machine Polishing
Machine polishing your car can provide a plethora of benefits, making it a worthwhile investment of your time and resources. Some key benefits of machine polishing include:
- Removing Swirl Marks: One of the most significant benefits of machine polishing is its ability to remove swirl marks from your car’s surface. Swirl marks occur when small scratches in the clear coat reflect light in different directions, resulting in a dull, hazy appearance.
- Correcting Paint Defects: Machine polishing can also correct other paint defects such as water spots, oxidation, and light scratches. These defects can create an unsightly appearance or even lead to further paint damage if left untreated.
- Improving Gloss and Shine: With regular machine polishing, you can achieve a high level of gloss and shine on your car’s surface. This is because the process of machine polishing removes a thin layer of clear coat and creates a smooth, even surface, which reflects light better.
- Increasing Resale Value: If you plan on selling your car in the future, machine polishing can help increase its resale value. A well-maintained and glossy car will usually fetch a higher price than a dull or scratched one.
However, it’s important to note that machine polishing should be done with caution, especially for beginners. Using the wrong techniques or products can lead to further damage to your car’s paintwork. It’s important to follow the correct procedures and use the right equipment to achieve the best possible results. Researching and investing in quality products such as a polishing machine, polishing pads, and dual-action polisher can also make the process much easier and effective.
Preparing Your Car For Machine Polishing
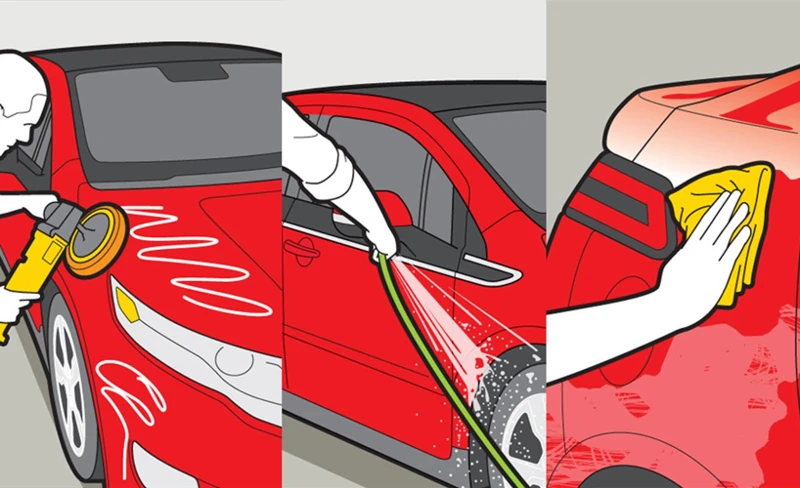
Before you start machine polishing your car, it is critical to spend some time on preparing it for the process. Proper preparation is key to achieving the desired outcome and avoiding potential damage to your vehicle’s paint. In this section, we will cover the crucial steps you need to take to ensure that your car is well-prepared for machine polishing. From cleaning and decontaminating your car to taping off areas that require protection, each step will be outlined in detail to make sure you are ready to move on to the next stage. So, let’s dive into it and get your car ready for machine polishing!
Cleaning Your Car
Cleaning Your Car: Before you start machine polishing your car, you need to make sure that it is clean. Any dirt or debris on the surface can cause scratches or swirl marks when you start polishing. Here is a step-by-step guide on how to clean your car before machine polishing:
- Wash: Start by washing your car with a good quality car shampoo and a soft wash mitt. Use a pressure washer to rinse off any loose dirt or debris before you start washing. Wash your car one panel at a time, starting from the top and working your way down.
- Dry: Use a microfiber towel or a chamois to dry your car thoroughly. Do not let the car air dry as water spots can form and be difficult to remove later.
- Clay bar: After washing and drying, you may need to use a clay bar to remove any contaminants that are stuck on the paint. Apply a clay bar lubricant and gently glide the clay bar over the surface of the paint. Wipe off any residue with a microfiber towel.
By following these steps, you can ensure that your car is clean and free of contaminants before starting the machine polishing process. Having a clean car will also help you achieve the best possible results with your machine polisher.
Decontaminating Your Car
Decontaminating Your Car is an essential step before machine polishing. This step allows you to remove any contaminants that may be stuck on the surface of your car’s paint. These contaminants can include tree sap, bird droppings, and other environmental fallout. If you fail to remove these contaminants before polishing, it can cause more damage to your car’s paint.
Here’s how to decontaminate your car:
| Step | Action |
|---|---|
| Step 1 | Wash your car |
| Step 2 | Apply a clay bar to the surface of your car’s paint |
| Step 3 | Glide the clay bar over the surface of your car’s paint using a lubricant such as quick detailing spray or clay lubricant |
| Step 4 | Check the clay bar as you work to ensure it’s not picking up large amounts of debris or dirt. If it becomes dirty, fold it over to expose a clean side. |
| Step 5 | Continue working on different sections of the car until the entire car is decontaminated |
| Step 6 | Rinse your car thoroughly and dry it with a microfiber towel |
Using a clay bar will help get rid of any fallout that may not have been removed during the washing process. If you’re unsure of how to properly use a clay bar, check out our top 5 machine polishing techniques article for a step-by-step guide on how to use it.
Remember, decontaminating your car is a crucial step to ensure the best possible outcome when it comes to machine polishing. Skipping this step can lead to unnecessary damage to your car’s paint, ultimately costing you more in the long run. Additionally, if you fail to properly clean and decontaminate your machine polisher, it can cause swirls and scratches on your car’s paint. Check out our article on polishing machine maintenance tips to ensure your machine polisher is always in top condition.
Taping Off Areas
Taping Off Areas is an essential step in machine polishing your car as it can help prevent any accidental damage to the parts of the car that you don’t want to polish. It is also one of the easiest steps to overlook. Before you start polishing, prepare the areas around the part that you want to polish by taping them off with painter’s tape. Here’s a step-by-step guide on how to do it:
- Clean the area where you want to apply the tape. Make sure it is free of any dirt, dust, or debris.
- Apply the tape along the edge of the area to be polished, making sure to get the tape as close to the edge as possible without touching the area you want to polish. The tape will create a barrier that will protect the surrounding areas from accidental contact with the polisher.
- Make sure the tape is smooth and secure. Use a plastic squeegee or your fingers to smooth out any bubbles or wrinkles in the tape. If you need to use multiple strips of tape, overlap them slightly to create a continuous barrier.
- Once you have finished polishing the area, carefully remove the tape to reveal a straight, clean edge. Be careful not to accidentally touch any freshly polished areas with the tape.
Don’t forget to double-check and make sure you have taped off all the areas you want to protect before starting the polishing process. Taking a little extra time to prepare your car for polishing can save a lot of time and money in the long run. And make sure to check out our article on furniture polishing mistakes to avoid common errors when polishing your car.
Choosing the Right Polishing Compound
One of the most crucial steps in machine polishing your car is selecting the right polishing compound. The sheer number of options available on the market can be overwhelming, leaving car owners perplexed and unsure of which product to choose. However, with a little understanding of your car’s paint type and the different types of polishing compounds available, you can make an informed decision and achieve the perfect finish for your vehicle. Let’s dive into the world of polishing compounds and figure out which one is best suited for your car’s needs.
Determining Your Car’s Paint Type
Determining your car’s paint type is an essential part of the machine polishing process. Using the wrong polishing compound can result in damage to your car’s paintwork. Here are some steps to determine your car’s paint type:
- Research the make and model of your car: Some cars have specific paint types, so research the make and model of your car to see if there are any specifications you should consider.
- Check your owner’s manual: Your owner’s manual may have information about your car’s paint type, so check it to be sure.
- Perform a baggie test: Take a plastic baggie and place it over your hand. Rub your hand over a small area of your car’s paintwork. If you feel bumps or if the paint feels rough, it means you have a clear coat finish. If it feels smooth, you have a single stage paint system.
- Check for color transfer: Another way to determine your car’s paint type is to check for color transfer when you rub a microfiber towel over the paintwork. If you see paint transfer onto the towel, you have a single stage paint system. If you do not see any color transfer, you have a clear coat finish.
Determining your car’s paint type may seem like a small detail, but it is crucial to ensure that you use the correct polishing compound for optimal results.
Understanding the Different Types of Polishing Compounds
When selecting a polishing compound for your car, it’s important to choose the right one to achieve the best results. There are several different types of polishing compounds available, each with their own unique characteristics.
Rubbing Compounds: These are the most aggressive type of polishing compound and are typically used to remove heavy scratches, oxidation, and other severe defects from the paint surface. They contain large, abrasive particles that remove a lot of material, making them ideal for deep scratches and defects.
Polishing Compounds: These are less aggressive than rubbing compounds and are designed to remove minor scratches and swirl marks. They contain smaller abrasive particles that are more gentle on the paint surface, making them a better choice for maintaining your car’s finish.
Finishing Compounds: These are the least aggressive type of polishing compound and are designed to remove any remaining defects and leave behind a high-gloss finish. They contain very small abrasive particles that are non-diminishing, meaning they will not break down over time.
All-in-One Compounds: These are convenient products that combine a polishing compound and wax or sealant in one. They are ideal if you want to save time and effort and achieve both polishing and protection in one step.
Nano Compounds: These are newer polishing compounds that use nano-particles to achieve a high-gloss finish. They are known for their ability to fill in minor scratches and defects and leave behind a smooth, glossy finish.
Knowing the different types of polishing compounds available can help you choose the right product for your car’s needs, whether you need to remove heavy defects or simply maintain your car’s finish.
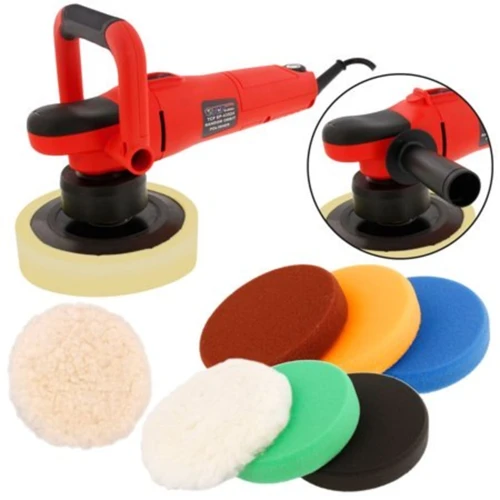
Choosing the Right Polishing Pad
When it comes to machine polishing your car, choosing the right polishing pad is just as important as selecting the right polishing compound. With so many different types of polishing pads available, each with unique features and benefits, the process of choosing the right one can be overwhelming. However, by understanding the different types of polishing pads and how they interact with your chosen compound, you can achieve the best results for your car’s specific needs. Let’s dive into the world of polishing pads and explore the options available to you.
Understanding the Different Types of Polishing Pads
When it comes to machine polishing your car, choosing the right polishing pad is just as important as selecting the right polishing compound. With different types of pads available, each with varying levels of abrasiveness, it’s crucial to understand the differences and choose the one that is appropriate for your particular car and for the task at hand.
Here are four common types of polishing pads:
- Foam cutting pad: This pad is the most abrasive and should only be used for removing heavy scratches or swirl marks. It is made from an extremely dense foam and is often colored red or orange.
- Foam polishing pad: This pad is less abrasive than a cutting pad and is used for removing lighter scratches or swirl marks. It is made from a less dense foam and is typically colored white or blue.
- Foam finishing pad: This pad is the least abrasive of the three foam pads and is used for applying finishing polish to the paint. It is made from a soft foam and is often colored black or gray.
- Microfiber pad: This pad is an alternative to foam pads and is typically used for heavy cutting jobs. It is made from a blend of microfiber and foam and is characterized by its short and dense fibers.
It’s important to note that:
- Abrasive pads should never be used in combination with a finishing polish, as it will leave behind swirl marks.
- The more aggressive the pad, the more heat it generates, which can cause paint burn if used for too long or with too much pressure.
Understanding the different polishing pad options available and their purposes is crucial to achieving the desired results without damaging the paint. Taking the time to choose the right pad for the job can make all the difference in creating a flawless finish.
Matching the Right Pad to Your Polishing Compound
Matching the right pad to your polishing compound is crucial in achieving the best results. Here are some tips to help you choose the right pad for your particular polish:
- Consider the abrasive level of the polish: Different polishing compounds have different levels of abrasiveness. Heavy abrasive compounds require a more aggressive pad to achieve the desired level of correction, while lighter abrasive compounds can be paired with a less aggressive pad.
- Choose the right pad material: Polishing pads come in various materials, such as foam, wool, and microfiber. Wool pads are great for heavy cutting while foam and microfiber pads are more versatile and can be used for a broader range of polishing compounds.
- Keep in mind the color of the pad: The color of the pad is used as a guide to determine its aggressiveness. Typically, the darker the color, the more aggressive the pad. For instance, a black pad is the most aggressive, while a white pad is the least aggressive.
- Match the pad size to your backing plate: Ensure that the size of your pad matches your backing plate. A pad that is too big or too small may cause uneven polishing, resulting in swirl marks or scratches.
- Test the combination: Before you start polishing the entire car, test the combination of the polish and pad on a small section. This step ensures that you have the right pad, and it also gives you an idea of how much correction you can achieve.
By following these guidelines, you can confidently select the appropriate polishing pad for your particular polishing compound, ensuring that you achieve the best possible results.
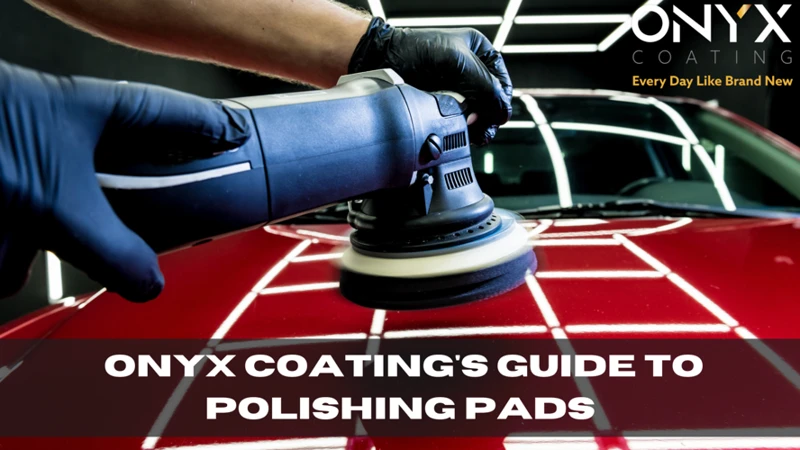
Using Your Machine Polisher
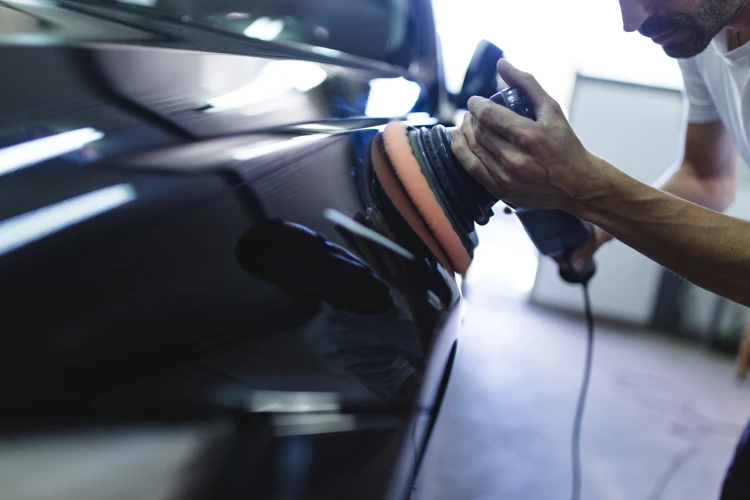
As you approach the step of using your machine polisher, you may start to feel a mix of excitement and uncertainty. After all, this powerful tool can achieve impressive results, but it also requires careful handling to avoid damaging your car’s paintwork. In this section, we will guide you through the process of setting up your machine polisher, using the correct techniques to polish your car, and ensuring a flawless finish. So let’s dive in and explore the world of machine polishing!
Setting Up Your Machine Polisher
Step 1: Before you start setting up your machine polisher, make sure that it’s clean and free from any debris that can damage your car’s paint.
Step 2: Take note of the size of your machine polisher’s backing plate as it’s important to match it with the size of your polishing pad. Most machines come with a 5 to 6 inch backing plate, but larger sizes are also available.
Step 3: Choose the right polishing pad for your machine polisher. The type of pad you use will depend on the polishing compound you’ve selected and the type of paint on your car.
Step 4: Attach your chosen polishing pad to your machine polisher. Make sure that it’s securely in place and lined up with the backing plate.
Step 5: Apply a small amount of polishing compound onto the pad. It’s important not to overdo it as this can cause splatter while you’re working.
Step 6: Spread the polishing compound evenly onto your car’s paint using your machine polisher’s lowest setting.
Step 7: Once the polishing compound is evenly applied, increase the speed of your machine polisher to the recommended setting for your pad and polishing compound.
Step 8: Begin polishing your car’s paint using a side-to-side or up-and-down motion, using light to medium pressure. Avoid applying too much pressure as this can cause damage to your car’s paint.
Step 9: Keep polishing until the polishing compound is evenly distributed and you’ve achieved the desired finish.
Machine Polishing Techniques
When it comes to machine polishing, there are several techniques that can help you get the best results possible. Here are some of the most important techniques to use:
| Technique | Description |
|---|---|
| Crosshatch Technique | This technique involves moving the polisher back and forth in a crosshatch pattern to ensure that all areas of the paint are covered. This is especially important when working on large flat surfaces, such as hoods or roofs. |
| Pressure Control | It is important to maintain consistent pressure when using a polisher. Too much pressure can result in paint damage, while too little pressure won’t be effective in removing imperfections. Maintain a steady, even pressure as you move the polisher over the surface. |
| Speed Control | The speed at which you operate the polisher can also affect the results you get. For example, slower speeds are better when working on curved surfaces, while faster speeds are better for flat areas. Additionally, higher speeds can help remove deeper imperfections, while lower speeds are better for final finishing passes. |
| Overlapping Passes | To ensure complete coverage of the paint surface, it’s important to overlap your passes. This means going over the same area multiple times from different angles so that any missed spots are covered. |
| Working Small Areas | When machine polishing, it’s important to work on small areas at a time. This helps to ensure that you don’t miss any spots and also prevents the polishing compound from drying out before you can properly buff it away. |
| Keeping the Pad Clean | The pad on your machine polisher can become caked with polishing compound over time, which can reduce its effectiveness. Be sure to clean the pad regularly by wiping it down with a pad cleaning solution, and replacing it when it becomes too dirty. |
By following these machine polishing techniques, you can ensure that your car’s paint is restored to a like-new appearance. Just remember to work carefully and methodically, and to take your time to get the best results possible.
Working on One Section at a Time
When machine polishing your car, it’s important to work on one section at a time. This allows you to focus your efforts and achieve the best results possible. To work on one section at a time, you should divide your car into manageable sections, such as the hood, roof, doors, and fenders.
Step 1: Start with the hood or roof and work your way around the car, section by section.
Step 2: Apply a small amount of polishing compound to the polishing pad and spread it evenly over the section you’re working on.
Step 3: Use your machine polisher to work the polishing compound into the paint, moving the polisher in a back-and-forth motion and applying moderate pressure.
Step 4: Once you’ve worked the polishing compound into the paint, inspect your work. If you’re happy with the results, move on to the next section. If there are still imperfections or scratches, repeat the polishing process on that section.
Step 5: After you’ve finished polishing all the sections, wipe off any residual polishing compound with a microfiber towel.
Step 6: Finally, inspect your car one last time to make sure you haven’t missed any spots. If you’re satisfied with the results, apply a coat of wax or sealant to protect the paint and give it a glossy finish.
By working on one section at a time, you’ll be able to achieve a consistent, high-quality finish on your car’s paint.
Finishing Your Car

After putting in the effort to properly machine polish your car, it’s important to finish the job with some final touches to ensure your vehicle looks its absolute best. Whether you’re preparing your car for a show or simply want to impress your neighbors, the finishing stage is critical. In this section, we’ll walk you through the steps needed to bring out the ultimate shine in your car, from wiping off residual polishing compound to applying a wax or sealant. So, grab your microfiber towels and let’s get started.
Wiping Off Residual Polishing Compound
After you have completed the machine polishing process, the next step is to wipe off any residual polishing compound left on your car’s surface. This is an important step to ensure that your car’s surface is clean and free of any leftover polishing compound.
To wipe off the residual polishing compound, you will need a clean microfiber towel. Do not use paper towels or any rough materials as this can scratch the surface of your car. Fold the towel into fourths to create multiple clean sides. Start wiping off the compound in a gentle and circular motion. Be sure to apply light pressure and work in small sections at a time.
Check the towel periodically to make sure it is clean before proceeding to the next section of your car. If you find that the towel is dirty, you can either flip it over to use a clean side or switch to a new towel entirely.
Once you have wiped off all the residual polishing compound on your car’s surface, give it a final wipe down with a clean microfiber towel to ensure that there are no streaks or smudges left behind. This will leave your car’s surface looking shiny and new!
Checking Your Work
After completing the machine polishing process, it is important to check your work to ensure that the desired results have been achieved. Here are some steps to follow when checking your work:
- Inspect the surface: Take a good look at the polished surface to see if there are any visible defects, scratches, or swirl marks. If any imperfections are visible, you may need to repeat the polishing process.
- Check for hazing: Look for any hazing on the surface of the car, which can occur if there is residual polishing compound left on the surface. Use a microfiber towel to wipe down the surface and check if the hazing disappears.
- Assess the shine: Evaluate the overall shine of your car to see if it meets your expectations. If the shine is not what you were hoping for, you may need to polish the car again with a more aggressive compound or pad.
- Check the color: Look at the color of the paint to ensure that it is consistent and free of any dull spots.
- Check for residue: Inspect the painted surfaces for any leftover polishing compound or debris. Use a small brush to clean out tight corners and crevices.
By carefully inspecting your work, you can ensure that your car looks its best and that the polishing process was successful. If you are happy with the results, you can move on to the next step of finishing your car.
Applying a Wax or Sealant
After completing the machine polishing process, it’s crucial to protect your car’s new shine by applying a layer of wax or sealant. Wax and sealant provide a protective barrier that shields your car’s paint from harmful UV rays, dust, dirt, and other environmental contaminants.
Wax is a natural product that consists of carnauba wax derived from palm leaves. Wax provides a deep, glossy shine that enhances the color of your car’s paint. Wax is easy to apply and remove, but it requires more frequent reapplication than sealants.
Sealant is an engineered product that often includes polymers, resins, and synthetic ingredients. Sealant provides a more durable protection than wax and lasts longer. It requires less reapplication than wax, but it doesn’t provide the same level of gloss as wax.
Choosing the Right Product depends on your personal preference and the level of protection you’re looking for. You can also use both wax and sealant together for maximum protection.
To apply a wax or sealant, follow these steps:
| Step | Action |
|---|---|
| 1 | Choose a clean, dry applicator pad or microfiber towel. |
| 2 | Apply a small amount of wax or sealant on the applicator pad or towel. |
| 3 | Apply the product in a circular motion, working on one section at a time. |
| 4 | Let the product sit on the paint for a few minutes, following the product’s instructions. |
| 5 | Buff off the product with a clean, dry microfiber towel, using a back-and-forth motion. |
| 6 | Inspect for any missed spots or areas that require reapplication. |
Remember, always use a clean applicator pad or towel and work on one section at a time. Applying too much product or spreading it too thin can result in streaks, so find the right balance for your car’s specific needs. Once you’ve finished applying the wax or sealant, you’ll be left with a stunning, protected finish that will last for months.
Maintenance Tips
Ensuring that your car maintains its polished look requires some maintenance tips that you should follow. Proper maintenance can help extend the lifespan of the polishing job and protect your car’s paint from potential harm.
Clean Your Car Regularly
To maintain your car’s polished look, it’s essential to clean your car regularly. Washing your car should be done at least once a week to keep it clean and free from debris. This will prevent dirt, dust, and grime from damaging your car’s paint and ruining your machine polishing work.
Avoid Automatic Car Washes
While going through a car wash is convenient, it’s not recommended after machine polishing your car. Automatic car washes can cause swirl marks, scratches, and other damage to your car’s paint job. If you must use a car wash, choose one with touchless technology that does not come in contact with your car’s paint.
Use Only High-Quality Car Care Products
Using high-quality car care products is essential to keeping your car looking its best. It’s recommended to use pH-neutral car shampoo and microfiber towels during the washing process. Avoid using harsh detergents that contain harmful chemicals and can damage your car’s paint.
Avoid Direct Sunlight
Direct sunlight can cause your car’s paint to fade and eventually lose its shine. It’s best to park your car in a garage or under a shade to avoid direct sunlight exposure. If you must park your car outside, consider using a car cover for additional protection.
Wax Your Car Regularly
Waxing your car is an essential maintenance step to keep your car looking its best. It helps protect your car’s paint from environmental factors such as dirt, grime, and UV rays. It’s recommended to wax your car every three to six months.
Inspect Your Car Regularly
Regularly inspecting your car can help you detect any issues with the paint job before they become severe. Look out for scratches, chips, or any other damage that could affect your car’s appearance.
Following these maintenance tips will help you maintain your car’s polished look and extend the lifespan of your machine polishing job. By keeping your car clean, avoiding automatic car washes, using high-quality car care products, avoiding direct sunlight, waxing your car regularly, and inspecting your car regularly, you’ll be able to enjoy your car’s polished finish for years to come.
Conclusion
In conclusion, machine polishing your car can be a time-consuming process, but the results are well worth it. By carefully choosing the right polishing compound and pad, as well as following proper techniques, you can reveal your car’s true shine and enhance its overall appearance. Preparing your car for machine polishing is a crucial step, so be sure to clean and decontaminate it before beginning. Taping off areas that you don’t wish to polish will save you time and effort in the long run.
When it comes to choosing the right polishing compound, it’s important to determine your car’s paint type and understand the various types of polishing compounds available. Matching the right pad to your polishing compound will ensure that you achieve the desired level of correction and finish.
Using your machine polisher correctly is essential to achieving the best results. Be sure to set up your machine correctly and use proper techniques, such as working on one section at a time. This will help prevent damage to your car’s paint and give you the best possible finish.
Once you have finished polishing, be sure to wipe off any residual polishing compound and check your work before applying a wax or sealant. This will protect your car’s paint and help maintain the shine.
As with any aspect of car care, regular maintenance is key. Properly cleaning and maintaining your machine polisher will ensure that it continues to work properly and provide the best possible results.
Overall, machine polishing your car is a great way to rejuvenate and protect your car’s paint. With the right tools, techniques, and maintenance, you can achieve a beautiful, long-lasting finish that will keep your car looking like new for years to come.
Frequently Asked Questions
How often should I machine polish my car?
It depends on the condition of your car’s paint. If it has a lot of scratches or swirl marks, you may need to do it more often. Otherwise, once or twice a year should suffice.
Can I machine polish a new car?
Yes, but make sure to check with your car’s manufacturer to ensure it won’t void any warranties. Also, be careful not to remove too much clear coat from the paint.
Do I need to wash my car before machine polishing?
Yes, it’s important to start with a clean car to avoid grinding dirt and debris into your paint. Use a gentle car shampoo and rinse thoroughly before beginning.
What is the difference between polishing and waxing a car?
Polishing is the process of removing imperfections from the paint, while waxing is the application of a protective layer to the surface of the paint.
What should I do if I notice swirl marks after machine polishing?
You may need to use a finer polishing compound or a different pad to remove the swirls. Be patient and work slowly to avoid making the problem worse.
Can I machine polish a single panel of my car?
Yes, but keep in mind that it may be difficult to match the level of shine and finish with the surrounding panels if they haven’t been polished as well. It’s best to work on the entire car if possible.
What is the benefit of using a dual-action machine polisher?
A dual-action polisher won’t generate as much heat as a rotary polisher, which can reduce the risk of burning through the clear coat of your car’s paint. It’s also easier to use, especially for beginners.
How long should I wait before applying wax or sealant after machine polishing?
It depends on the type of product you’re using, but generally, a few hours or even overnight should be enough time for the paint to cool and the residue from the polishing compound to fully wipe away.
Can I machine polish a matte finish car?
No, machine polishing can damage the unique finish on a matte paint job. It’s best to use only products specifically designed for matte paint or to leave the polishing to the professionals.
Can I use a machine polisher on plastic parts of my car?
It depends on the type of plastic and its condition. Before using a machine polisher, check with your car’s manufacturer to ensure it won’t damage the plastic. Additionally, some plastic parts may not be able to tolerate the heat generated by the polisher and may warp or melt.