Introduction
Brass is a beautiful and versatile metal that has adorned homes for centuries. Whether you have brass candlesticks, doorknobs, or decorative accents, keeping them clean and polished is essential to maintain their lustrous shine. However, if you’re unsure of how to go about this task, it can be a daunting challenge. But fear not! With a few simple steps and the right tools, you can easily clean and polish your brass at home. In this article, we’ll provide expert tips and tricks to help you bring out the beauty in your brass.
Why Clean and Polish Brass?
Brass is a beautiful metal that has been popular throughout history for its durability and its rich, warm hue. Whether you have brass decor, fixtures, or musical instruments, it’s important to keep them clean and polished to maintain their appearance and prevent damage. Cleaning and polishing brass removes dirt, grime, and tarnish that can make it look dull and faded. Without proper care, brass can become discolored over time, and it may even corrode, leading to permanent damage. That’s why it’s crucial to know how to clean and polish brass at home with the right tools and techniques.
By keeping your brass objects in pristine condition, you can extend their lifespan and enhance their aesthetic appeal. Plus, you’ll save money by not having to replace them as often. Regular cleaning and polishing brass can also prevent the build-up of harmful bacteria and germs from everyday use. Whether you’re polishing your brass kitchen utensils or your beloved vintage trumpet, you should take the time to care for them properly to ensure that they’ll last for years to come.
If you’re new to brass cleaning, don’t worry! We’re here to help. In the following sections, we’ll go over everything you need to know to clean and polish brass at home, including a list of necessary supplies, preparation steps, cleaning methods, and polishing techniques. We’ll also provide tips for caring for your brass objects to keep them looking their best.
Gather Your Supplies
Now that you understand the importance of cleaning and polishing brass, it’s time to gather the necessary supplies. Proper supplies are essential for effective cleaning and polishing. If you do not know what you need, have no worries. We have gathered all the necessary items for you to make your brass shine. However, if you want to learn more about metal polishing, different types of metal polish, or the difference between metal polish and cleaner, etc., check out our links for more information: DIY Metal Polishing Tips for Beginners, Types of Metal Polish, Remove Tarnish from Metal Household Items, Metal Polish for Kitchen Utensils, Metal Polish vs Cleaner: What’s the Difference?, How Often Should You Polish Metal?, The Best Metal Polish: A Comprehensive Guide, The Do’s and Don’ts of Polishing Silverware.
What You’ll Need:
Before you can start cleaning and polishing your brass, you will need to gather the necessary supplies. Here is a list of everything you will need:
- Soft cloths: You will need clean, soft cloths to wipe down and buff the brass.
- Bowl or bucket: You will need a container to hold the soaking solution.
- Lemon juice: Lemon juice is a natural acid that can help remove tarnish from brass.
- Baking soda: Baking soda can be used with lemon juice to make a paste that helps clean and polish the brass.
- Vinegar: Vinegar is another acidic solution that can help remove tarnish from brass.
- Salt: Salt can be mixed with vinegar to make a paste that also helps clean and polish brass.
- Commercial brass cleaner: If you prefer to use a commercial product, you can purchase a brass cleaner at a hardware or home goods store.
- Brass polish: After cleaning the brass, you can apply a brass polish to give it a shiny finish.
Having all of these supplies on hand will make the cleaning and polishing process much easier and more effective.
Prep Your Brass
Before you can begin the process of cleaning and polishing your brass, it is important to properly prep the surface. This will ensure that the cleaning solutions are able to penetrate the tarnish and grime, ultimately leading to a gleaming result. By following these steps, you can ensure that your brass will look its best for years to come. Let’s take a closer look at how to properly prep your brass for cleaning and polishing.
Remove Dust and Debris
Before cleaning and polishing your brass, it’s important to make sure it’s free of dust and debris to avoid scratching the surface. Follow these steps to remove any buildup on your brass:
- Gather a soft-bristled brush: Start by grabbing a soft-bristled brush, such as a toothbrush, to gently remove any dust or debris from the surface of your brass.
- Brush off the dirt: Use the brush to gently remove any dirt or particles from the surface of the brass. Be sure to get into all the crevices and hard-to-reach areas to ensure a thorough cleaning.
- Use a microfiber cloth: Next, use a clean, dry microfiber cloth to wipe down the entire surface of the brass. This will help remove any remaining dust or debris and prep it for the soaking solution.
It’s important not to use any harsh abrasives or cleaning brushes that can scratch or damage the surface of your brass. A soft-bristled brush and microfiber cloth are gentle enough to remove any buildup without damaging the surface. By taking the time to properly prep your brass, you can ensure a clean and polished finish.
Apply a Soaking Solution
Before starting to clean the brass, it’s important to prepare it properly to remove all dust and debris. One way to do this is by applying a soaking solution. This is especially true if the brass is heavily tarnished or hasn’t been cleaned in a while. Here’s how to apply a soaking solution to your brass:
Gather Your Supplies
First, you’ll need to gather the necessary supplies for the soaking solution. These include:
| – Large container | – Warm water |
| – 1 tablespoon of salt (for Method 2) | – 1/2 cup of lemon juice (for Method 1) |
| – Baking soda (for Method 1) | – Commercial brass cleaner (for Method 3) |
Prepare the Soaking Solution
Once you have all of your supplies, it’s time to prepare the soaking solution. Here’s how to do it based on the method you’ve chosen:
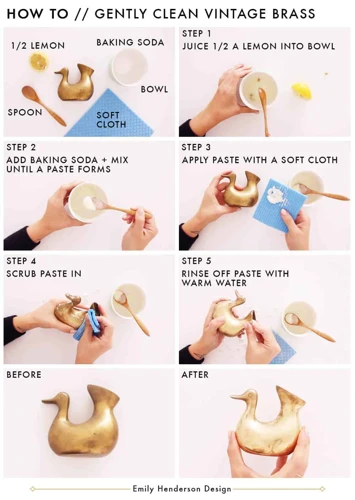
Method 1: Lemon and Baking Soda
For this method, mix 1/2 cup of lemon juice with enough warm water to fill your container. Then, add 3 tablespoons of baking soda and stir until the baking soda is dissolved.
Method 2: Vinegar and Salt
For this method, mix warm water with 1 tablespoon of salt until it is completely dissolved. Add enough vinegar to cover the brass items.
Method 3: Commercial Brass Cleaner
If you’re using a commercial brass cleaner, follow the instructions on the packaging to prepare the soaking solution. Typically, this will involve mixing the cleaner with warm water in a container.
Apply the Soaking Solution
Once your soaking solution is prepared, it’s time to apply it to your brass. Place the brass items in the container and ensure that they are fully submerged in the solution. Let them soak for 5-10 minutes, depending on how tarnished they are.
After the soaking time is up, remove the brass items from the solution and rinse them thoroughly with clean water to remove any residue. Pat them dry with a clean cloth and proceed to the cleaning and polishing steps to restore the shine and beauty of your brass items.
Cleaning and Polishing Methods
Now that you’ve prepped your brass, it’s time to start the cleaning and polishing process. There are several methods you can use, each with its own advantages and disadvantages. Depending on the type and amount of tarnish on your brass, one method may work better than another. Below we’ll cover three popular and effective methods for cleaning and polishing brass at home using common household ingredients. Follow along to find the method that works best for you and your brass.
Method 1: Lemon and Baking Soda
Method 1: Using Lemon and Baking Soda can be an effective way to clean and polish brass at home. This method is particularly useful for tough stains and grime buildup on your brass items.
To start this method, gather the following supplies:
| Supplies | Descriptions |
|---|---|
| Lemon juice | This natural acid can help break down grime and stubborn stains on brass. |
| Baking soda | This mild abrasive can help scrub away dirt and residue from your brass items. |
| Bowl | You will need a mixing bowl to create the cleaning solution. |
| Soft-bristled brush | You will need a brush with soft bristles to scrub away dirt and stains without damaging the brass surface. |
| Water | You will need water to rinse your brass items after cleaning them with the lemon and baking soda solution. |
| Cloth | You will need a clean and dry cloth to buff and shine your brass items after cleaning them. |
Instructions:
- Begin by mixing together a paste of lemon juice and baking soda in a bowl. You can adjust the amounts of each ingredient until you achieve a thick and spreadable consistency.
- Take your soft-bristled brush and apply the paste directly to your brass item, making sure to scrub gently in a circular motion. Pay particular attention to any stubborn stains or grime buildup on the surface of your brass item.
- Once you have thoroughly scrubbed the brass item with the lemon and baking soda solution, rinse it off with clean water and dry it thoroughly with a clean cloth.
- Finally, use a dry cloth to buff and shine your brass item until it gleams.
Tips:
- Be sure to wear gloves when cleaning with lemon juice and baking soda, as lemon juice can be acidic and may cause irritation to your skin if you have sensitive skin.
- Make sure to rinse your brass items thoroughly with water after cleaning them with this solution, as any remaining lemon juice or baking soda can cause discoloration or damage to your brass over time.
- If you have particularly stubborn stains or grime buildup on your brass item, you can let the lemon and baking soda solution sit on the surface for a few minutes before scrubbing it off. This can help loosen and remove the dirt and debris more effectively.
Method 2: Vinegar and Salt
One method of cleaning and polishing brass at home is by using a solution made with vinegar and salt. This simple yet effective method can easily remove tarnish and restore the shine to your brass.
Here’s how to do it:
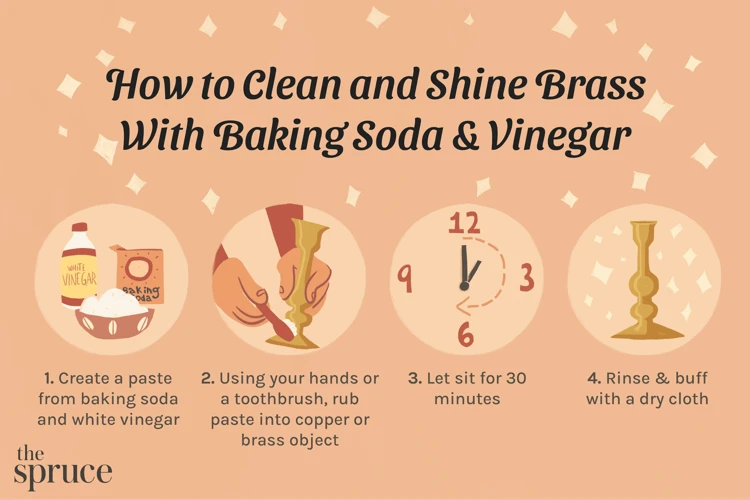
- Mix the solution: In a bowl, mix equal parts white vinegar and table salt to create a paste.
- Apply the solution: Using a soft cloth or sponge, apply the vinegar and salt solution to the brass. Be sure to cover every nook and cranny.
- Let it sit: Allow the solution to sit on the brass for about 10-15 minutes.
- Scrub the brass: Using a soft-bristled brush, scrub the brass gently to remove any remaining tarnish. Be careful not to scratch the surface of the brass.
- Rinse the brass: Rinse off the brass with warm water to remove any remaining solution.
- Dry and polish the brass: Dry the brass with a clean, soft cloth and then use a brass polish to bring back the shine.
This method is perfect for cleaning larger items such as brass lamps or candlesticks, but it can also be used on smaller items like doorknobs or drawer pulls. The combination of vinegar and salt creates a chemical reaction that dissolves the tarnish without damaging the brass.
Method 3: Commercial Brass Cleaner
When it comes to cleaning and polishing brass, commercial brass cleaner is a popular option for many people. These cleaners can be found in hardware stores or online, and they are specifically designed to remove tarnish and restore shine to brass surfaces. Follow these steps to effectively clean and polish your brass with a commercial cleaner:
| Supplies You’ll Need: | Instructions: |
|---|---|
| – Commercial brass cleaner – Soft cloth – Water – Gloves (optional) |
1. Put on gloves if desired. 2. Apply the brass cleaner onto a soft cloth. 3. Rub the cloth onto the brass surface, focusing on areas with tarnish or discoloration. 4. Allow the cleaner to sit for the amount of time recommended on the product label. 5. Rinse off the surface with water and dry with a clean towel. 6. Apply brass polish and buff with a clean, soft cloth for added shine and protection. 7. Store your newly cleaned brass away from moisture and humidity to prevent tarnishing. |
Remember to always follow the instructions on your commercial brass cleaner. Some products may require dilution before use, and others may have longer or shorter recommended sitting times. Also, make sure to rinse off any remaining cleaner residue thoroughly to avoid damaging the brass surface. With this method, your brass will be looking bright and shining in no time!
Polishing and Buffing the Brass

After cleaning your brass, it’s time to bring out its shine by polishing and buffing it. This step is essential to get that lustrous finish that makes brass so appealing. In this stage, you will need to apply brass polish and buff it with a clean rag gently. A little elbow grease and patience are required, but the results are well worth it. Let’s delve into the details of this critical step in achieving a polished brass look.
Apply Brass Polish
After cleaning your brass, it’s time to apply the polishing agent to achieve a lustrous shine. Here are some common brass polishing products and how to use them:
| Product | Instructions |
|---|---|
| Brass polish cream | Apply a small amount of polish cream onto a soft cloth and gently rub it onto the surface of the brass. Be sure to cover the entire surface evenly. Allow the cream to sit for a few minutes before wiping it off with a clean cloth or rinsing it with water. Repeat as necessary until you achieve the desired shine. |
| Liquid brass polish | Apply a small amount of liquid brass polish onto a soft cloth or a brush and gently rub it onto the brass surface. Brush in the direction of the grain of the brass. Allow the polish to sit for a few minutes before wiping it off with a clean cloth. Repeat the process until you achieve the desired shine. |
| Brass polish spray | Apply a small amount of brass polish spray onto a soft cloth and gently rub it onto the surface of brass. Be sure to cover the entire surface evenly. Allow the spray to sit for a few minutes before wiping it off with a clean cloth or rinsing it with water. Repeat as necessary until you achieve the desired luster. |
Remember not to overuse the polish as it can cause buildup and detract from the appearance of the brass. Use only a small amount at a time and repeat as necessary. Always follow the manufacturer’s instructions for use and safety.
Buff with a Clean Rag
After applying the brass polish, it’s time to buff your brass with a clean rag. This will help to remove any excess polish and bring out the shine in your brass. When buffing, it’s important to use a soft and lint-free cloth, such as a microfiber cloth or an old cotton t-shirt. Avoid using anything that could scratch the surface of your brass.
To buff your brass, follow these simple steps:
- Apply pressure: Use firm pressure as you buff the brass. This will help to create a nice shine on the surface of your brass.
- Circular motions: Buff the brass in circular motions. This will help to evenly distribute the polish and create a consistent shine on the surface of your brass.
- Polishing sections: Work on small sections of your brass at a time. This will help to ensure that you cover the entire surface of your brass and don’t miss any spots.
- Patient approach: Be patient as you buff your brass. It may take some time to achieve the level of shine you desire. Don’t rush the process, as this could lead to scratches or other damage to your brass.
Remember to keep checking your cloth as you buff, as it may become clogged with polish or residue. If this happens, simply switch to a clean section of your cloth or grab a new one. Once you’ve finished buffing, take a step back and admire your newly polished and shimmery brass.
It’s important to note that you should buff your brass gently and not apply too much pressure, as this can scratch or damage the brass. Take your time and don’t rush the process, as a patient and careful approach will result in the best outcome for your brass.
Finishing Touches
Once you’ve completed the cleaning and polishing process for your brass items, a few finishing touches can make a big difference in their appearance. Here are some tips to add those final touches and make your brass look like new again:
- Remove any remaining polish: use a clean, dry microfiber cloth to remove any excess polish from the brass. This will ensure that the brass stays shiny and clean for as long as possible.
- Check for missed spots: After polishing, it’s important to go over the brass and check for any missed spots. If you notice any areas that still appear dull or tarnished, work on them again until they are polished and shiny.
- Apply a protective coating: You may want to apply a protective coating to your brass items to keep them shining longer. You can use a clear paste wax or a specialized brass protective coating. Follow the manufacturer’s directions to apply the coating properly.
- Display your brass: After cleaning and polishing your brass items, it can be tempting to tuck them away in a closet or cupboard. Instead, display them in a prominent place to show off their beauty and add elegance to your home.
By following these finishing touches, you can ensure that your brass items stay clean, shiny, and beautiful for years to come.
Caring for Your Brass
After spending time and effort to clean and polish your brass items, it’s important to maintain their shine and luster. Brass is a relatively durable metal, but it can still tarnish and dull over time if not cared for properly. By taking a few preventative measures and regularly cleaning and maintaining your brass pieces, you can keep them looking beautiful for years to come. In this section, we’ll discuss some tips and tricks for caring for your brass and keeping it in pristine condition.
Prevention
Taking preventive measures can extend the lifespan of your brass and make cleaning and maintenance much easier. Here are some helpful tips to prevent tarnishing and damage to your brass:
- Protect from moisture: Moisture can cause damage and tarnishing to brass. Be sure to keep brass items away from humid areas like bathrooms or damp basements.
- Keep away from direct sunlight: Direct sunlight can also cause tarnishing and fading of brass. Avoid displaying brass items in areas where they will get direct sunlight.
- Handle with care: Brass can be easily scratched or dented. When handling brass items, be gentle to avoid any damage.
- Regular dusting: Regularly dust your brass items to prevent dirt and dust from building up on the surface. This will also make cleaning easier when it comes time for a deeper clean.
By following these helpful tips, you can ensure your brass items stay looking their best for longer periods of time while also making cleaning and maintenance easier in the long run.
Cleaning and Maintenance
Cleaning and Maintenance:
| Step | Description |
| Step 1: | Regularly dust or wipe down your brass items with a soft, dry cloth to prevent dirt buildup. |
| Step 2: | For more thorough cleaning, use one of the cleaning methods described above. |
| Step 3: | After cleaning, rinse the brass thoroughly with water and dry it with a soft cloth to prevent spotting. |
| Step 4: | Apply a thin layer of brass polish to protect the brass from tarnishing in the future. |
| Step 5: | Store your brass items in a dry, cool place, away from direct sunlight and moisture to prevent discoloration and oxidation. |
It’s important to regularly dust or wipe down brass objects to keep them looking their best. This also prevents dirt buildup which can be more difficult to clean later on. If the brass objects become dirtier than expected, use one of the three cleaning methods described above.
After cleaning, ensure that you thoroughly rinsed your brass object with water to remove any remaining cleaning solution. Once rinsed, dry your brass object with a soft cloth. If you don’t dry your brass object, spotting could occur and destroy the recently cleaned surface.
A thin layer of brass polish can be applied after cleaning to protect it from tarnishing in the future. To prevent discoloration and oxidation, store your brass objects in a dry, cool place and away from direct sunlight and moisture. These storage tips can ensure the longevity of your brass objects.
Conclusion
In conclusion, cleaning and polishing brass at home can be a simple and rewarding process. With the right supplies and methods, you can transform tarnished and dull brass into shiny and beautiful pieces that will enhance the beauty of your home.
However, it’s important to remember that prevention is key when it comes to caring for your brass. Keeping your brass items clean and dry after use can help prevent tarnish and other types of damage from accumulating over time. Additionally, storing your brass in a dry, low-humidity environment can also help to protect it from damage.
When it comes to cleaning and maintenance, it’s important to use the right methods and tools for the job. Avoid using harsh chemicals or abrasive materials, as these can damage your brass items. Instead, stick to safe and effective methods like the ones outlined in this article. And be sure to regularly clean and maintain your brass to keep it looking its best.
Overall, with a little effort and attention, you can keep your brass looking beautiful for years to come. So go ahead and give it a try, and enjoy the satisfaction of seeing your brass items shine like new again!
Frequently Asked Questions
How do I know if my item is made of brass?
You can check if an item is made of brass by performing a magnet test. If a magnet does not stick to the item, then it is likely made of brass.
Can I use regular polish to clean brass?
No, you should not use regular polish to clean brass. Regular polish can be too abrasive and cause damage to the brass.
How often should I clean my brass items?
It depends on the frequency of use and the environment. Generally, brass items should be cleaned every few months or as needed.
Can I use lemon juice instead of fresh lemons?
Yes, you can use lemon juice instead of fresh lemons. However, keep in mind that the acidity levels of bottled lemon juice may differ from fresh lemons.
Should I wear gloves while cleaning brass?
It is recommended to wear gloves while cleaning brass to avoid direct contact with any chemicals and to prevent oils from your hands leaving fingerprints on the brass.
Can I use commercial brass cleaners on antique brass items?
No, commercial brass cleaners may be too harsh and cause damage to antique brass. It is best to use gentler cleaning methods on antique brass items.
Can I use a toothbrush to clean the brass?
Yes, a toothbrush can be a useful tool to clean small crevices and hard-to-reach areas on brass items.
What should I do if my brass has patina?
If you want to keep the patina on your brass item, simply clean it with a mixture of mild soap and water. If you prefer your brass to be shiny, you can remove the patina with a brass cleaner before polishing.
Can brass items be polished too much?
Yes, over-polishing brass items can cause damage to the brass and strip the protective coating. It’s important to follow proper cleaning and polishing techniques to avoid over-polishing.
What should I do if my brass item has stubborn stains?
If the stains are stubborn, try repeating the cleaning process or using a different cleaning method. If the stains still won’t come off, it’s best to seek professional help to avoid damaging the brass item.