
Maintaining the appearance of your car is as important as keeping it running smoothly. One key aspect of car maintenance is applying car polish. While it may seem like a simple process, proper application can make a significant difference in the final result. Are you tired of seeing swirl marks and scratches on your car’s paint? Do you want to know how to create a protective layer to improve your car’s longevity? Look no further! In this guide, we’ll walk you through the steps to properly apply car polish for the best possible results. From the types of car polish available to common mistakes to avoid, you’ll have all the information you need to achieve a flawless finish.
Why Proper Application is Important
As you embark on your car polishing journey, it’s essential to understand why proper application is vital. Polishing your car can not only make it look like new again but also create a protective layer against harmful elements. Without a proper application, you may end up with unwanted swirls and scratches that can diminish your vehicle’s appearance. The last thing you want is a freshly polished car with blemishes all over! Learning how to correctly apply car polish is key to achieving the best possible results. Before we dive deep into the application process, let’s explore the benefits of car polish and why it’s essential to understand the types of polish available.
Prevents Scratches and Swirl Marks
Properly applying car polish is an essential part of keeping your car’s exterior looking new and shiny. Not only does it make your car look better, but it also protects the paint from scratches and damage caused by UV rays, dirt, and debris. Preventing scratches and swirl marks is one of the most crucial reasons to apply car polish regularly.
Scratches and swirl marks are unsightly blemishes that can make your car’s paint look dull and damaged. They are particularly noticeable on darker colored cars and can be difficult and expensive to repair. However, applying car polish helps to fill in and conceal these imperfections, leaving a smooth and glossy finish that’s pleasing to the eye.
To prevent scratches and swirl marks, it’s essential to use the proper techniques and tools when applying car polish. You also need to make sure that your car’s surface is free of any dirt or debris that could cause further damage during the polishing process.
Additionally, applying a high-quality car polish that contains ingredients like microabrasives or silicones can help fill in small scratches and create a protective barrier that shields your car’s surface from further damage. Choosing the right type of car polish is also crucial in preventing scratches and swirl marks.
To learn more about the benefits of car polish and other related topics, check out our other articles on wax versus sealant, top 10 car polish brands, the importance of prepping your car for polishing, car polish ingredients, polishing your car on a budget, how often to apply car polish, and car polishing dos and don’ts.
Creates Protective Layer
When applying car polish, it’s important to note that it not only enhances the appearance of your vehicle, but also adds a layer of protection to the paint. This protective layer acts as a barrier against environmental contaminants such as dirt, grime, dust, and even UV rays from the sun.
The Benefits of a Protective Layer
The added layer of protection helps prevent damage to your car’s surface, keeping it looking newer for a longer period of time. This is especially important for those who live in areas with extreme weather conditions, such as salted roads during winter. A protective layer also helps to maintain the value of your car if you ever decide to sell it.
Types of Protective Layers
There are multiple types of protective layers that can be applied to your car, including wax, sealants, and ceramic coatings. Wax is a popular option as it provides a glossy finish and is easy to apply. Sealants, on the other hand, last longer and provide a harder protective layer, but may require more effort to apply. Ceramic coatings are the most durable and long-lasting option, but also require the most time and effort to apply.
Proper Application of a Protective Layer
Regardless of the type of protective layer you choose, proper application is key in achieving the best results. This means ensuring that your car’s surface is clean and free of any contaminants before applying the protective layer. Using the correct applicator is also important in avoiding streaks or uneven application. Lastly, buffing the protective layer with a microfiber cloth will ensure that it is evenly distributed and bonded to the paint.
Applying car polish not only enhances the appearance of your car, but also provides a layer of protection against environmental contaminants. There are multiple types of protective layers available, each with their own set of benefits and drawbacks. Regardless of the type chosen, proper application is crucial in achieving the desired results.
Types of Car Polish
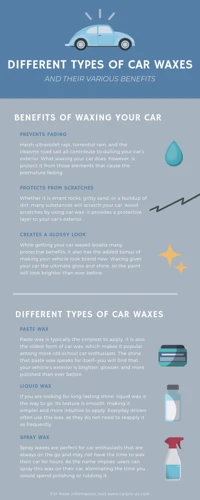
If you are new to the world of car care products, the variety of car polishes available can be overwhelming. Different types of car polishes offer different benefits, and it’s essential to understand them to choose the right one for your vehicle. Some popular types of car polish include Carnauba Wax, Synthetic Wax, and Ceramic Coating. Each type of car polish has unique properties that can affect its durability, shine, and ease of use. Let’s explore these types of car polish to help you make an informed decision about which one to use on your car.
Carnauba Wax
Carnauba wax, derived from the leaves of the Brazilian carnauba palm, is a popular choice for car enthusiasts due to its high melting point, durability, and glossy finish. This natural wax is often used in combination with synthetic waxes for added protection and shine. Here are some additional benefits and considerations when using carnauba wax for your car:
- Long-lasting Protection: Carnauba wax provides strong protection against UV rays, environmental contaminants, and water damage. Its high melting point means it can withstand high temperatures without breaking down or losing its protective properties.
- Natural Shine: Carnauba wax gives cars a deep, warm shine that cannot be replicated by synthetic waxes alone. Its natural formula contains oils and esters that enhance the color and clarity of your car’s paint.
- Smooth Application: Carnauba wax can be applied with ease, either by hand or with a buffer. Its consistency is smooth and easy to manipulate, making it ideal for achieving a uniform finish.
- Potential Drawbacks: While carnauba wax has many benefits, it may not be the best choice for every car owner. It can be more expensive than synthetic waxes, and its natural composition means it may not provide as much protection against acid rain or harsh chemicals.
Carnauba wax is an excellent choice for car owners who want to achieve a natural, glossy finish that will also protect their car’s paint. However, it’s important to consider the potential drawbacks and to determine if it’s the right choice for your specific car and driving habits.
Synthetic Wax
Synthetic wax is a popular alternative to traditional carnauba wax. It is made from polymers and other synthetic materials that are designed to mimic the shine and protection provided by natural wax. There are several benefits to using synthetic wax on your car, including easy application and long-lasting protection.
Here are some key features and benefits of using synthetic wax on your car:
- Easy Application: Synthetic wax is generally easier to apply than natural carnauba wax. It can be applied by hand or with a machine polisher, and it doesn’t require the same level of elbow grease as a natural wax.
- Lasting Protection: Synthetic wax provides a longer-lasting protection for your car than natural wax. It forms a strong protective barrier against environmental contaminants and harsh weather conditions.
- High Gloss Finish: Synthetic wax can provide a high-gloss shine to your car’s finish, similar to the shine provided by natural wax. This can enhance the overall appearance of your car and make it stand out on the road.
- Resistance to Fading: Synthetic wax is resistant to fading caused by exposure to sunlight, which means your car will maintain its glossy appearance for longer periods of time.
When choosing a synthetic wax for your car, it’s important to look for a high-quality product that provides long-lasting protection and a high-gloss finish. Additionally, be sure to follow the manufacturer’s instructions for application, as each product may have slightly different requirements.
Synthetic wax is a great choice for car owners who want an easy-to-use, long-lasting solution for protecting their car’s finish. By taking the time to apply synthetic wax properly, you can ensure that your car stays looking great for years to come.
Ceramic Coating
A relatively new addition to the world of car polish is ceramic coating. This type of polish uses nano-technology to create a durable layer of protection on your car’s surface, which can last for several years. Unlike traditional waxes and sealants, ceramic coatings provide superior durability and resistance to scratches, chemicals, and UV rays.
| Advantages | Disadvantages |
| — | — |
| Long-lasting protection | Expensive |
| High gloss finish | Requires professional application |
| Resistant to scratches and chemicals | Difficult to remove once applied |
| UV protection | May not be suitable for all paint types |
| Easy to clean | Requires proper maintenance |
| Cost-effective in the long run | |
Ceramic coatings are often applied by professionals, but there are some DIY options available. However, it’s important to note that application can be difficult and requires careful attention to detail. It’s recommended to thoroughly research and follow the manufacturer’s instructions before attempting to apply a ceramic coating yourself.
One of the biggest advantages of ceramic coatings is their long-lasting protection. This makes them ideal for those who want to protect their car’s finish for several years. Additionally, ceramic coatings provide a high-gloss finish that can enhance your car’s appearance.
However, ceramic coatings can be more expensive than traditional waxes and sealants. They also require professional application or careful DIY application, as they can be difficult to remove once applied. It’s also important to note that some types of ceramic coatings may not be suitable for all types of paint.
While ceramic coatings may be more expensive and require more effort to apply, their long-lasting protection and high-gloss finish make them a popular choice for car enthusiasts looking to protect and enhance their vehicles.
Preparing Your Car for Polish
Before applying polish to your car, you must ensure that it’s fully prepared. Neglecting this crucial step could lead to poor results and wasted effort. To make sure your car looks its best, it’s important to follow a few steps to prepare for polishing. By cleaning the exterior of your car, removing any contaminants, and making sure the surface is smooth, you can ensure that the polish will adhere properly and provide the best results possible. In this section, we will discuss the necessary steps to prepare your car for polishing.
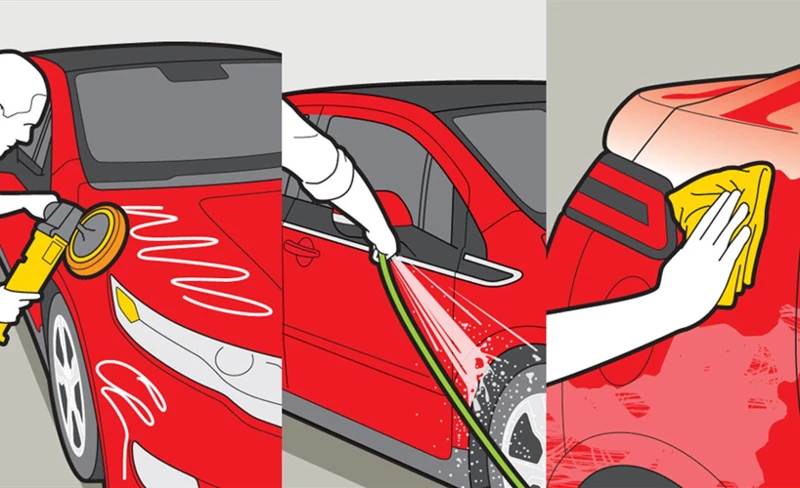
Washing Your Car
Before applying car polish, the first step is to wash your car properly. Washing your car helps to remove any dirt, debris, and contaminants that may be on the surface of the paint. These contaminants, if left on the surface, can cause scratches and swirl marks during the polishing process.
To properly wash your car, follow these steps:
| Step 1: | Start by rinsing your car with a hose or pressure washer to remove any loose dirt and debris. |
| Step 2: | Apply car shampoo to your car using a wash mitt or sponge. Be sure to use a shampoo specifically designed for cars as other detergents or household soaps can damage the paint. |
| Step 3: | Wash your car from the top down and use a separate wash mitt or sponge for the wheels and tires. This helps prevent any dirt or brake dust from scratching the paint. |
| Step 4: | Rinse your car thoroughly with water to remove all the soap suds. |
| Step 5: | Optionally, you can do a final rinse using a no-rinse car wash product which helps to leave a layer of protection on the paint. |
After washing your car, be sure to dry it properly. Letting your car air-dry can cause water spots which can be difficult to remove later on. To dry your car, use a microfiber towel or a drying towel designed specifically for cars. Gently pat the car dry, starting at the top and working your way down. Pay special attention to the areas around the doors and windows.
Drying Your Car
Once you have finished washing your car, it is important to properly dry it to prevent water spots and streaks from forming. There are a few methods you can use to dry your car, but the most effective way is to use a microfiber drying towel. Here are some steps to follow when drying your car:
| Step 1: | Start at the top of your car and work your way down. |
| Step 2: | Use the microfiber towel to pat the car dry rather than rubbing it back and forth. This will help prevent scratches. |
| Step 3: | Wring out the towel frequently to remove excess water and prevent it from becoming too wet to be effective. |
| Step 4: | Pay close attention to crevices and corners where water can collect and be sure to dry those areas thoroughly. |
| Step 5: | Be sure to dry the wheels and rims as well, as water spots can form on these areas too. |
Remember to use a microfiber towel specifically designed for car drying, as other types of towels can scratch the surface of your car. And if you prefer to use an air blower or chamois to dry your car, make sure to follow the instructions carefully and pay attention to any warnings about using those tools on your specific car model. Properly drying your car is a crucial step in preparing it for polish and protecting its finish for the long term.
Clay Bar Treatment
Before applying car polish, it’s important to prepare your car’s surface by using a clay bar treatment. This process helps to remove contaminants and debris that may have accumulated on your car’s paint, leaving it smooth and clean. Here are the steps to follow when using a clay bar:
- Wash Your Car: Before starting the clay bar treatment, you should first wash your car with a high-quality car shampoo. This will help to remove any loose dirt and debris from your car’s surface.
- Get Your Supplies: You will need a clay bar lubricant and a clay bar. These can be found at most auto parts stores or online.
- Spray the Lubricant: Spray the lubricant over a small section of your car’s surface, working in areas of about 2 square feet.
- Glide the Clay Bar: Take the clay bar and gently glide it over the lubricated area. Use only light pressure and let the bar do the work. The clay bar will pick up any contaminants that are embedded in your car’s paint.
- Wipe the Area: Once you have finished using the clay bar on a section, use a microfiber towel to gently wipe away any remaining lubricant and debris.
- Repeat: Continue these steps, working in small sections, until you have treated your car’s entire surface.
By using a clay bar treatment on your car before applying polish, you can ensure that the surface is free of debris and contaminants, providing a smooth surface for the polish to adhere to. This will ultimately result in a better-looking finish for your car.
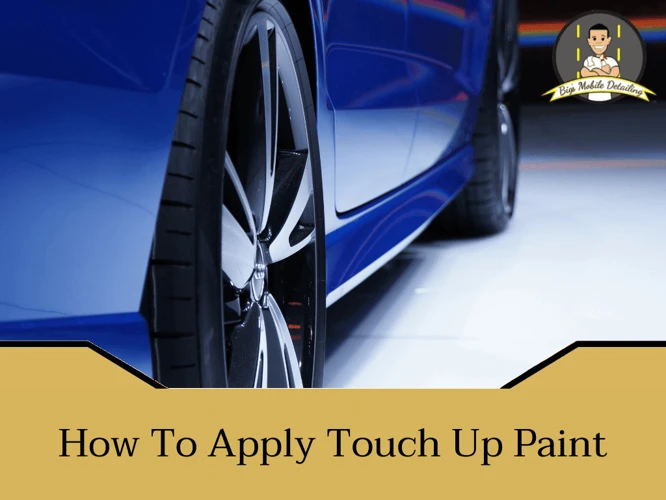
How to Apply Car Polish
Now that you have prepared your car for polish, it’s time to learn how to apply it properly. Applying car polish may seem like a simple task, but there are certain techniques that you need to keep in mind to achieve the best results. With the right tools and techniques, you can achieve a high-gloss finish that will enhance your car’s appearance and provide protection against environmental factors. In this section, we will guide you through the step-by-step process of applying car polish and highlight some common mistakes to avoid. So, let’s get started on transforming your car’s dull appearance to a shiny, like-new finish!
Choose Your Applicator
When it comes to applying car polish, choosing the right applicator is just as important as choosing the right type of car polish. The applicator you choose can affect the final result of your car’s finish. Here are some common types of applicators to choose from:
| Applicator | Pros | Cons |
|---|---|---|
| Microfiber Cloth | – Soft and gentle on car surface – Can be reused many times – Great for applying liquid polishes |
– Can leave behind lint if not washed properly – Not as effective on tough stains – May not hold up well with abrasive compounds |
| Foam Pad | – Comes in various sizes and shapes – Great for applying thick polishes – Can be washed and reused |
– Can absorb too much polish – May break down over time – May require more than one pad for larger vehicles |
| Applicator Brush | – Ideal for getting into tight spaces – Can be used for targeted application – Can be washed and reused |
– May scratch delicate surfaces – Not ideal for larger areas – May require multiple brushes for larger surfaces |
As you can see, each type of applicator has its own pros and cons. When choosing your applicator, consider the type of car polish you will be using, the size of the area you will be covering, and the level of precision you need. Ultimately, a combination of different applicators may be the best choice for a thorough and effective application of car polish.
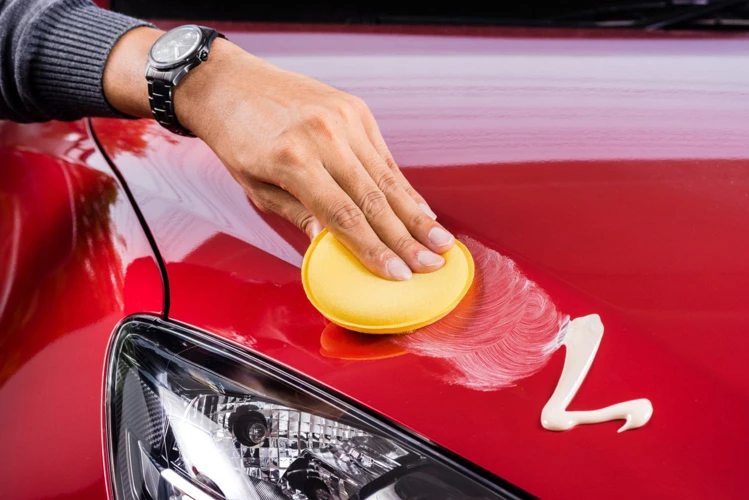
Apply the Polish
After preparing your car for polish, it’s time to apply the polish to achieve a clean and glossy finish. Proper application is essential to ensure that you achieve the desired results. Here are the steps to follow when applying polish:
| Step 1: | Shake the polish bottle before use to ensure it’s well mixed. |
| Step 2: | Using your chosen applicator, take a small amount of polish and apply it to the surface of your car in a circular motion. Use gentle pressure and avoid rubbing too hard, as this can cause scratches. |
| Step 3: | Work in sections, starting with one panel at a time. This helps to ensure that the polish is evenly distributed and prevents it from drying out before you have a chance to buff it. |
| Step 4: | Apply the polish to a small area at a time, making sure that you cover the entire surface. This process is especially important when applying polish to corners and edges, as these areas tend to be more difficult to reach. |
| Step 5: | Allow the polish to sit on the surface for a few minutes. This gives it time to bond with the paint and create a protective barrier. |
Remember to apply the polish in a shaded area to avoid it drying too quickly. Also, avoid applying polish to rubber or plastic areas, as it can cause discoloration or damage. Following these steps will ensure that your car gets a professional finish that will make it shine like new.
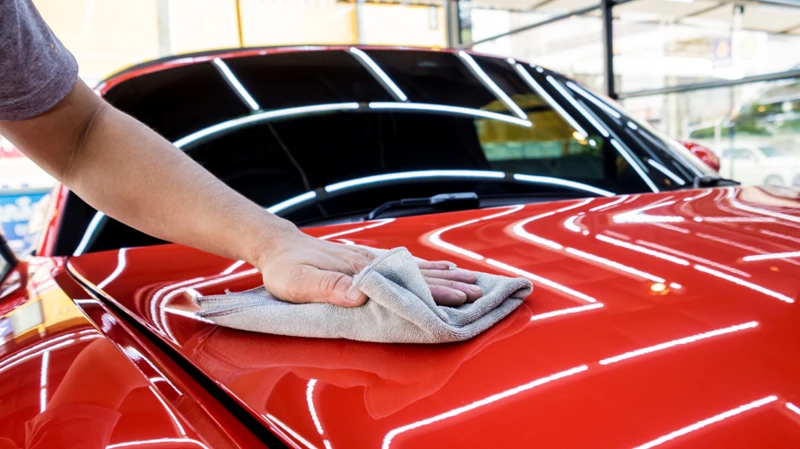
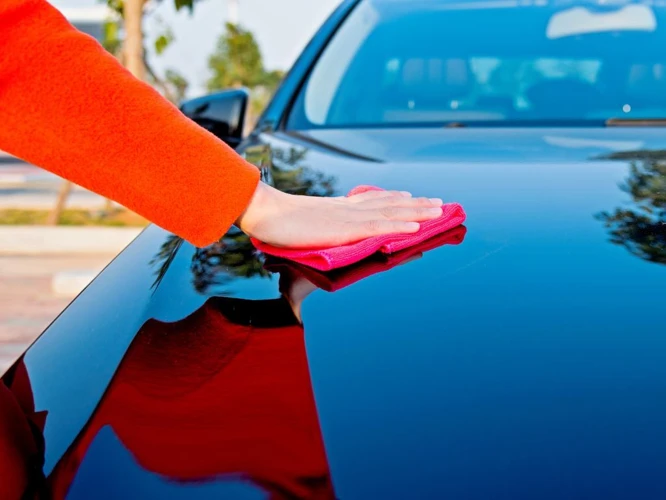
Buffing the Polish
After applying the car polish, it’s important to buff it properly for a smooth and shiny finish. Here are the steps to follow for buffing the polish:
| Step 1: | Wait for the polish to dry completely. The waiting time may vary depending on the type of polish used. |
| Step 2: | Use a clean, dry microfiber towel to buff the surface of the car. Apply firm pressure and use circular motions to buff the polish into the car’s paint. |
| Step 3: | Periodically fold the microfiber towel to expose a fresh, clean side. This ensures that you are not spreading any dirt or debris around while buffing. |
| Step 4: | Continue buffing until you have covered the entire surface of the car. It’s important to work in small sections to ensure that each section receives the proper attention. |
| Step 5: | Inspect the car to ensure that there are no streaks or residue left behind. If there are areas that require additional buffing, repeat the process until you achieve the desired finish. |
Remember, buffing the polish is the key to achieving a professional-looking finish. By following these steps, you can be sure that your car will look its best.
Areas of Focus
When detailing your car, it’s important not to overlook specific areas that can make a big difference in its overall appearance. Paying attention to certain details can elevate the final result, and make your car shine like never before. In this section of the article, we’ll discuss some of the vital parts of your car that require extra attention when applying polish. From the headlights to the wheels, we’ll cover it all to help you achieve a pristine finish you can be proud of.
Headlights and Taillights
When applying car polish, it’s important not to overlook the headlights and taillights. Over time, these vital components can become cloudy or yellowed, which can lead to reduced visibility and safety concerns.
Here are the steps to properly apply car polish to your headlights and taillights:
- Clean the surface: Before applying polish, clean the headlights and taillights with soap and water to remove any dirt, grime, or other debris.
- Apply the polish: Use a clean cloth or foam pad to apply the car polish to the surface of the headlights and taillights. Apply the polish in a circular motion, making sure to cover the entire surface area.
- Buff the polish: After applying the polish, use a separate clean cloth to buff the surface in a circular motion. This will help to remove any excess polish and leave a clear, smooth surface.
By taking care of your headlights and taillights with regular cleaning and polishing, you can improve visibility while also protecting the surface from damage and discoloration.
Chrome Trim
When it comes to applying car polish on the chrome trim of your vehicle, there are a few things to keep in mind to ensure the best results. Chrome trim is a popular feature on many vehicles and offers a stylish touch to the overall appearance. Here are some tips for properly applying car polish to the chrome trim:
- Clean the chrome trim: Before applying polish on the chrome trim, make sure it is clean and free of any dirt or debris. Use a mild soap and water solution to gently clean the surface, and then dry it thoroughly with a microfiber towel.
- Apply the polish: Choose a high-quality car polish specifically designed for chrome surfaces. Apply the polish using a soft applicator pad, working in small sections. Apply a thin, even coat and let it sit for a few minutes to allow it to properly bond with the surface.
- Buff the polish: Once the polish has set, use a clean microfiber towel to buff the surface in a circular motion. Avoid buffing too aggressively, as this can leave scratches and damage the chrome. Continue buffing until the surface is shiny and free of any visible residue.
Properly applying car polish to the chrome trim not only enhances its appearance but also extends its lifespan by creating a barrier against environmental contaminants such as water and chemicals. By applying car polish regularly, you can keep your chrome trim looking shiny and new for years to come.
Wheels and Rims
Maintaining the shine and gloss on your vehicle’s wheels and rims is a crucial part of overall car maintenance. However, applying car polish on these areas requires some extra attention and care. Here are the steps to follow when applying car polish on your wheels and rims:
- Clean the wheels and rims: Start by thoroughly cleaning your wheels and rims to remove any dirt, brake dust, or grime using a non-abrasive wheel cleaner. Rinse them thoroughly and dry them off completely.
- Apply the car polish: Put a small amount of car polish on a foam applicator. Apply the polish to each wheel, one at a time, using a circular motion. Ensure that the entire surface of the wheel is covered in an even layer of the car polish.
- Buff the car polish: Use a microfiber towel to gently buff and remove any excess car polish from the surface of the wheel. This will help to evenly distribute the car polish and give the wheels a shine.
When applying car polish on your wheels and rims, there are some areas that require extra attention. These areas include the lug nuts and wheel spokes. Be sure to apply the car polish to these areas as they are often overlooked and can attract dirt and grime.
It is recommended that you apply a layer of wax over the car polish on your wheels and rims to help protect them from any harmful elements on the road. This will not only enhance the shine of your wheels, but also extend their lifespan.
Remember, while applying car polish on your wheels and rims, avoid using abrasive cleaners or tools such as steel wool. This will scratch and damage the surface of your wheels and compromise their finish.
Properly applying car polish on your wheels and rims can add to the overall look and value of your vehicle. Regular maintenance and care will help to keep your wheels looking their best.
How Often to Apply Car Polish
Determining how frequently to apply car polish can be perplexing. Without proper knowledge, it’s difficult to estimate how often your vehicle will need the polish to maintain optimal appearance. Other factors such as the type of polish used, driving habits, and weather conditions can also influence the frequency of application. To keep your vehicle looking like new, it’s essential to understand the recommended frequency of car polish application, including various factors that can impact the frequency.
Factors to Consider
When considering how often to apply car polish, there are several factors to keep in mind:
- Driving Conditions: If you frequently drive in harsh conditions, such as extreme heat or cold, dusty roads, or near the ocean, you may need to apply polish more often to maintain the protective layer.
- Age of the Car: Older cars may require more frequent polishing to maintain the shine and prevent fading.
- Type of Polish: Different types of car polish have different lifespans. Synthetic wax and ceramic coatings tend to last longer than carnauba wax.
- Frequency of Washing: If you wash your car regularly, you may not need to polish it as often. However, if you don’t wash your car often, applying polish can help protect the paint from debris and UV rays.
Considering these factors can help you determine the optimal frequency for applying car polish. It’s important to remember that over-polishing can actually damage the paint, so be sure to follow the recommended guidelines for the specific polish you’re using.
Recommended Frequency
It is important to understand the recommended frequency for applying car polish to ensure that your vehicle maintains its shine and protection. The recommended frequency will depend on several factors such as how often you use your vehicle, the climate in which you live in, and the type of polish you are using.
Factors to Consider
- Frequency of Use: If you use your car on a daily basis, the paint will be exposed to different elements that can cause it to deteriorate faster. Your car will need a new layer of polish more regularly to maintain its shine than a car that is only used occasionally.
- Environment: The climate in which you live in can also affect how often you need to apply car polish. If you live in an area where the weather is generally dry, your car’s paint will be exposed to more dust and debris that can cause it to lose its shine quicker. If you live in an area that receives a lot of rain, your car will need a new layer of polish regularly to protect the paint from moisture and water spots.
- Type of Polish: The type of polish you use can also affect how often you need to apply it. Synthetic waxes and ceramic coatings can last longer than traditional carnauba waxes, and hence, require less frequent application.
Recommended Frequency
In general, it is recommended that you apply car polish every three to six months. This will help ensure that your car’s paint remains protected and shiny. However, if you use your car more frequently or live in a harsher climate, you may need to apply polish more often.
Remember, too much polishing can actually damage the paint, so it’s important to not overdo it. Follow the instructions on the polish and do not apply it more frequently than recommended. By taking care of your car’s paint with regular polishing, you can help maintain its beauty and value for years to come.
Common Mistakes to Avoid
When it comes to car polishing, it is important to approach it with care and attention to detail. Unfortunately, even the most experienced car owners can make mistakes in the process. Avoiding these common mistakes can help you achieve the best results possible and make your car shine like new. In this section, we will discuss some of the most common missteps car owners make when polishing their vehicles and provide tips on how to avoid them. By staying mindful of these mistakes, you can ensure that your car retains its glossy finish for longer.
Using Too Much Polish
Using too much polish is a common mistake that many car owners make when polishing their vehicle. When applying an excess amount of polish, it can lead to inconsistencies in the finish and can be particularly challenging to remove. Here are some tips to avoid using too much polish:
- Start With Small Amount: It is essential to use a small amount of polish when applying it to your car. Begin with a small blob and work in sections, rubbing the polish onto the surface in a circular motion.
- Focus on One Area at a Time: When polishing your car, it is best to focus on one small area at a time. Begin with the hood or the roof and work your way down the vehicle. This method ensures that you apply an even layer of polish and avoid using too much in one spot.
- Keep a Light Touch: When it comes to applying car polish, less is more. Applying too much pressure or too much polish can damage or scratch the paint. Instead, use a light touch, and let the polish do the work for you.
- Remove Excess Polish: After applying the polish, it is crucial to remove any excess with a microfiber cloth. This ensures that the surface is even and prevents streaks and swirl marks.
Remember, using too much polish can be damaging to the paint and create a lot of unnecessary work. So, take your time, apply a small amount, and remove any excess polish for a stunning finish.
Using the Wrong Applicator
Using the wrong applicator when applying car polish can lead to subpar results and potentially damage your vehicle’s paint job. It’s essential to choose the right type of applicator for your specific polish, as well as the surface you’re working on.
Types of Applicators
There are several types of applicators to choose from, each with its own unique features and benefits. Here are some of the most common types of applicators:
| Type of Applicator | Features | Benefits |
|---|---|---|
| Microfiber Towels | Soft, absorbent material | Good for applying liquid and spray polishes to large areas |
| Foam Applicator Pads | Soft foam material | Great for applying cream and paste polishes to small areas with precision |
| Buffing Pads | Made of wool, microfiber, or foam | Used for buffing off excess polish and enhancing shine |
Choosing the Right Applicator
When choosing an applicator, consider the type of polish you’re using and the surface you’re working on. For liquid and spray polishes, microfiber towels are a great choice for large areas of the vehicle. Foam applicator pads work well for cream and paste polishes and allow for precise application to small areas.
It’s essential to avoid using abrasive materials, such as rough towels or sponges, which can scratch the paint job. Additionally, avoid reusing dirty or contaminated applicators, as this can transfer debris onto the paint and cause damage.
Choosing the right applicator for your car polish is crucial for achieving the best results and protecting your vehicle’s paint job. Whether you opt for microfiber towels or foam pads, selecting an appropriate applicator will help ensure your paint stays looking shiny and new.
Skip Buffing Process
One common mistake that people make when applying car polish is skipping the buffing process. Buffing the polish is an essential step that helps to remove any excess product and create a smooth, shiny finish. By skipping this step, you may end up with a dull-looking finish and even leave some residue on the surface.
To avoid this mistake, it’s important to be patient and take your time when buffing the polish. Use a clean microfiber towel or polishing pad to buff the surface in circular motions. Make sure to apply gentle pressure and avoid pressing too hard, as this could damage the paint or create swirl marks.
Another key tip is to check your work as you go, especially in areas where it’s hard to see, such as around the corners and edges of your car. This will help you ensure that you’ve covered every inch of the surface and that the polish has been evenly applied.
If you notice any areas that are still hazy or dull, this might indicate that you need to spend more time buffing the polish. Similarly, if you notice any streaks or smudges, you may need to use a clean towel or pad to remove any excess product and buff the surface again.
By taking the time to properly buff your car polish, you can achieve a beautiful, smooth, and shiny finish that will last for weeks or even months. So don’t skip this important step and enjoy the results of a job well done.
| Common Mistake: | Skip Buffing Process |
|---|---|
| Why it’s a mistake: | Leaves excess product and creates a dull-looking finish |
| How to avoid it: | Be patient, take your time, use a clean microfiber towel or polishing pad, apply gentle pressure, and check your work as you go |
| Signs to watch for: | Hazy or dull areas, streaks or smudges |
Conclusion
In conclusion, applying car polish properly is crucial for achieving the best results in terms of protecting your car’s exterior and enhancing its overall shine. By taking the time to carefully prep your car with a thorough wash, dry, and clay bar treatment, you can ensure that the polish will adhere properly and last longer. Choosing the right type of car polish, such as carnauba wax or ceramic coating, is also an important consideration based on your specific needs and preferences.
When it comes to application, using the appropriate applicator and working on small areas at a time can help avoid common mistakes and produce a more even and consistent finish. Remember to always buff the polish after application to remove any excess and further enhance the shine.
It’s important to focus on specific areas of the car, such as headlights, taillights, chrome trim, and wheels, to ensure that they get the proper protection and shine they need.
Additionally, knowing how often to apply car polish is a key consideration to maintain your car’s exterior in good condition. Factors such as weather, driving habits, and storage conditions can influence the frequency of application, but it’s generally recommended to polish your car every few months.
By avoiding common mistakes in the application process, such as using too much polish, using the wrong applicator, or skipping the buffing process, you can ensure a smooth and flawless finish for your car.
Overall, taking the time to properly prepare your car and carefully apply car polish can provide a number of benefits, including protecting your car’s paintwork from scratches and swirls, creating a protective layer, enhancing its shine, and prolonging its overall lifespan.
Frequently Asked Questions
How often should I wash my car before applying polish?
It is recommended to give your car a thorough wash before applying polish, ideally every two to four weeks depending on your driving conditions and level of dirt accumulation.
Can I use car polish on a dirty car?
No, it is not recommended to apply car polish on a dirty car. Make sure to give your car a thorough wash and dry before applying polish.
Can I use car polish on matte finish cars?
No, car polish is not recommended for use on cars with a matte finish. Instead, use a dedicated, non-glossy car detailing product to prevent any damage to the finish of your car.
Can I use the same applicator for all types of car polish?
No, it is best to use a separate applicator for each type of car polish to ensure the best application and results. For example, use a microfiber applicator for ceramic coatings and a foam applicator for wax.
Do I need to clay bar my car before applying polish?
It is recommended to clay bar your car before applying polish to remove any contaminants from the surface of your car and ensure a smooth finish.
Can I apply polish in direct sunlight?
No, it is best to apply polish in a cool, shaded area to prevent the polish from drying too quickly and leaving streaks or residue.
Can car polish remove scratches?
While car polish cannot remove deep scratches, it can help to reduce the appearance of light scratches and swirl marks on your car’s surface.
How long should I wait before buffing car polish?
This varies depending on the type of car polish being used. Follow the instructions on the product label for the recommended drying time before buffing the polish.
Can I apply car polish to a newly painted car?
It is recommended to wait at least 30 days before applying car polish to a newly painted car to ensure the paint has fully cured and settled.
Can I polish just a specific area of my car?
Yes, you can polish specific areas of your car, such as the headlights or chrome trim, to give them a fresh shine. However, it is recommended to polish the entire surface of your car for an even finish.