Have you ever looked at the ingredients list on the back of your conventional shoe polish and wondered what kind of chemicals you were putting onto your shoes? If you’re conscious about the impact your actions have on the environment, using natural alternatives for shoe polish is a no-brainer. Not only are they better for the planet, but they are also better for your shoes and your health. In this article, we’ll explore the benefits of using natural shoe polish and walk you through the essential ingredients, tools, and materials you need to make your own DIY natural shoe polish. We’ll also provide you with easy-to-follow recipes and tips for applying and storing your natural shoe polish.
The Benefits of Using Natural Shoe Polish
The world is becoming increasingly conscious of the impact of our daily lives on the environment. One area that we can make a positive change and contribute towards sustainability is by switching to natural alternatives in our daily routines. When it comes to polishing shoes, opting for a natural shoe polish has its advantages. Not only are natural ingredients better for the environment, but they’re also better for you and your shoes. Unlike synthetic shoe polish, natural shoe polish contains no harsh chemicals or toxins that can enter your body through your skin when you buff your shoes. Natural shoe polish allows your shows to breathe, which is essential for their longevity. In the following sections, we will explore the essential ingredients, tools, and DIY natural shoe polish recipes that you can easily make at home. We will also provide tips and tricks for preparing your shoes for polish application, proper application techniques, and how to store your DIY shoe polish.
Essential Ingredients for DIY Shoe Polish
To make your own natural shoe polish, you will need essential ingredients that are both effective and eco-friendly. Here are the key components you will need for DIY shoe polish, along with their benefits and purposes.
| Ingredient | Benefits and Purpose |
|---|---|
| Beeswax | Provides waterproofing and creates a protective layer that prolongs the lifespan of your shoes. |
| Olive Oil | Moisturizes and conditions the leather to prevent cracking and drying out. |
| Coconut Oil | Conditions the leather and gives it a glossy finish. Additionally, its antimicrobial properties protect your shoes from fungal and bacterial infections. |
| Cedarwood Oil | Serves as a natural insect repellent to keep your shoes safe from moth damage. Its pleasant scent leaves your shoes smelling fresh and clean. |
| Vinegar | Cleans and removes dirt and stains from your shoes without damaging the leather. |
| Lemon | The acidic properties of lemon juice make it an excellent cleaner for removing stubborn stains and grime from your shoes. |
| Carnauba Wax | A natural wax that provides a hard and shiny finish to your leather shoes. Its water-resistant properties protect your shoes from moisture and dirt. |
| Almond Oil | Conditions the leather and enriches its natural color. It also provides a protective layer to prevent the leather from cracking and drying out. |
| Lanolin | Conditions and softens the leather, making it more pliable and less prone to cracking. It also provides a water-resistant layer to protect your shoes from moisture. |
| Jojoba Oil | A non-greasy oil that moisturizes the leather without leaving any residue or buildup. It also helps to restore the natural shine of the leather. |
By using these ingredients in your DIY shoe polish recipes, you can protect your shoes from wear and tear while also avoiding the harmful chemicals that are present in many commercial shoe polish products. To learn more about different types of shoe polish, their uses, and how to apply them, check out our article on shoe polish types and uses.
Tools and Materials You Need
To make your own natural shoe polish, you will need some basic tools and materials. Here’s what you need:
- Double boiler: This is necessary to gently melt the waxes and oils you will be using for your shoe polish. You can easily make your own double boiler by placing a heat-safe glass or metal bowl over a pot of simmering water.
- Whisk or spatula: You will need this to mix the ingredients in your shoe polish recipe.
- Storage container: You will want to store your homemade shoe polish in an airtight container to prevent it from drying out. Glass or metal containers work well for this.
- Beeswax: Beeswax is a key ingredient in many natural shoe polish recipes. It helps to protect and waterproof your shoes. You can find beeswax in craft stores or online.
- Carrier oil: Carrier oils like olive oil, coconut oil, or almond oil are used in many natural shoe polish recipes to help nourish and condition the leather. Choose a high quality oil for best results.
- Essential oils: Essential oils are optional, but they can be used to add a pleasant scent to your shoe polish. Cedarwood, lemon, and lavender are all popular options.
- Vinegar: Vinegar is often used in natural shoe polish recipes because it helps to remove dirt and stains from the leather. Choose a high quality white vinegar for best results.
- Lanolin: Lanolin is a natural wax that is derived from sheep’s wool. It is a great ingredient to add to shoe polish because it helps to protect the leather and keep it supple.
- Carnauba wax: Carnauba wax is a plant-based wax that is often used in natural shoe polishes because of its high melting point and water resistance.
By gathering these tools and materials, you will be able to make your own natural shoe polish at home. For tips on how to properly apply shoe polish, check out our article on how to apply shoe polish or learn about the benefits of using shoe trees to keep your shoes looking great.
DIY Natural Shoe Polish Recipes
One of the best ways to keep your shoes looking sharp and well-maintained is by polishing them regularly. However, many commercial shoe polishes contain harmful chemicals that are not environmentally or health-friendly. That’s where DIY natural shoe polish recipes come in handy. By making your own shoe polish, you can use natural ingredients that are both effective in cleaning and protecting your shoes and safe for your health and the environment. In this section, we will provide you with some easy-to-follow DIY natural shoe polish recipes that you can make at home with just a few essential ingredients and tools. But before we dive into the recipes, let’s take a closer look at the benefits of using natural shoe polish and the tools and materials you’ll need.
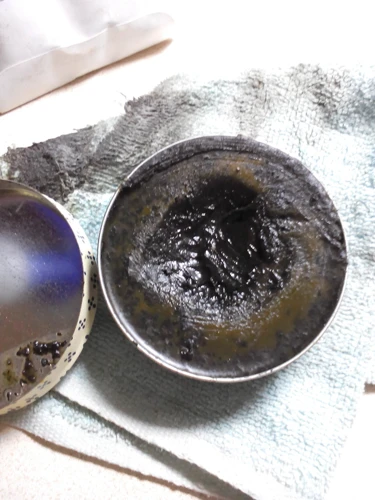
Recipe 1: Beeswax and Olive Oil Shoe Polish
To make your own natural shoe polish using beeswax and olive oil, you will need the following ingredients and materials:
| Ingredients | Materials |
| 1/4 cup grated beeswax | Small saucepan |
| 1/2 cup olive oil | Heat-safe container or jar |
| 5-10 drops of essential oil (such as lavender or lemon) | Clean cloth or brush for application |
Step 1: In a small saucepan, melt the beeswax on low heat. Beeswax typically melts at around 145 degrees Fahrenheit, so it’s important to keep the heat low to avoid burning the wax.
Step 2: Once the beeswax has melted, add the olive oil to the saucepan and stir well. Olive oil helps to nourish the leather and restore its natural shine.
Step 3: Remove the mixture from heat and add a few drops of your favorite essential oil. The essential oil not only adds a pleasant scent to your shoe polish, but it can also have anti-fungal and anti-bacterial properties.
Step 4: Let the mixture cool and solidify. Once the mixture has cooled, it should have a soft, creamy texture.
Step 5: Using a clean cloth or brush, apply a small amount of the natural shoe polish to your shoes. Rub the polish onto the leather in circular motion.
Step 6: Allow the polish to dry completely before buffing the shoes with a clean cloth to restore the shine.
This natural shoe polish is an eco-friendly alternative to commercial polish that contains harsh chemicals. Plus, it’s easy to make and will leave your shoes looking like new. For more information about the history of shoe polish or tips on removing shoe polish stains, check out our other articles.
Recipe 2: Coconut Oil and Cedarwood Shoe Polish
To create a natural shoe polish that not only nourishes but also has a pleasant scent, try using coconut oil and cedarwood. Cedarwood adds a natural woodsy fragrance to the polish, making it an ideal choice for those who enjoy the scent of the great outdoors.
Below is a table outlining the ingredients and steps needed to make coconut oil and cedarwood shoe polish.
| Ingredients | Amount |
|---|---|
| Coconut oil | 1/4 cup |
| Cedarwood essential oil | 10-15 drops |
Instructions:
1. In a small bowl, melt the coconut oil until it becomes a liquid.
2. Add 10-15 drops of cedarwood essential oil to the melted coconut oil and mix well.
3. Using a soft cloth or brush, apply the polish to your shoes, moving in small circular motions to ensure an even coat.
4. Allow the shoes to dry for at least an hour before wearing them. For best results, leave the shoes overnight to allow the polish to really soak in.
This simple DIY natural shoe polish recipe is easy to prepare and use, and will give your shoes a healthy glow while also providing a protective barrier against moisture and wear. Give it a try and enjoy the natural scent of cedarwood every time you shine your shoes!
To learn more about different shoe polishing techniques and products, check out our article on the best shoe polish brands.
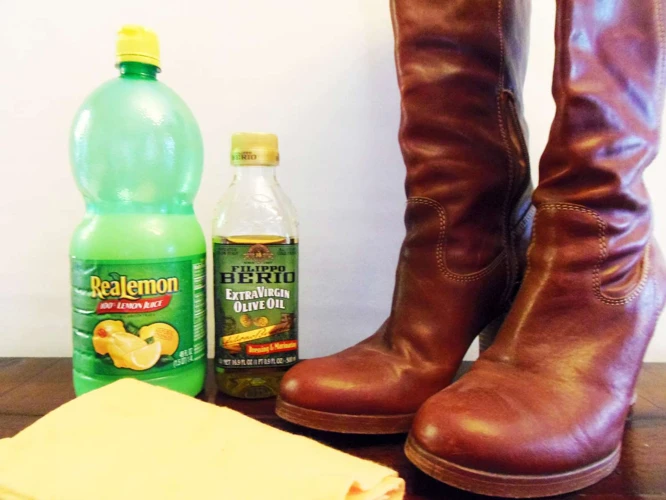
Recipe 3: Vinegar and Lemon Shoe Polish
To make a natural shoe polish using vinegar and lemon, you will need the following ingredients:
- 1/4 cup white vinegar
- 1/4 cup olive oil
- Juice of half a lemon
- A container with a lid for storage
To prepare the shoe polish, mix the white vinegar and olive oil together in the container. Squeeze the juice of half a lemon into the mixture and stir well.
This natural shoe polish is particularly effective on leather shoes, as the acidity of the vinegar helps to break down any dirt or grime that has accumulated on the surface of the leather. Meanwhile, the olive oil helps to condition and moisturize the leather, keeping it soft and supple.
To apply the vinegar and lemon shoe polish, follow these simple steps:
- Clean your shoes: Before applying the polish, make sure your shoes are clean and dry. You can use a soft-bristled brush to remove any loose dirt or debris from the surface of the shoes.
- Apply the polish: Using a soft, lint-free cloth, apply a small amount of the vinegar and lemon shoe polish to the surface of the shoes. Rub the polish in gently, using circular motions to work it into the leather.
- Buff your shoes: After applying the polish, use a clean, dry cloth to buff the shoes to a shine. The vinegar and lemon shoe polish should leave your shoes looking clean and polished, without any of the toxic chemicals found in commercial shoe polishes.
Remember to store your natural shoe polish in a container with a tight-fitting lid to prevent it from drying out. With regular care using natural shoe polishes like this one, you can keep your shoes looking their best and prolong their lifespan.
If you are interested in learning more about shoe care, check out our article on shoe polishing frequency for tips on how often to polish your shoes, or our article on shoe cream vs. shoe polish to learn about the differences between these two common shoe care products. Additionally, if you’re looking for a way to shine your shoes without using polish, check out our article on shining shoes without polish.
Recipe 4: Carnauba Wax and Almond Oil Shoe Polish
One natural shoe polish recipe that you can make at home is using carnauba wax and almond oil. Carnauba wax is known for its hardness, which makes it a great ingredient for creating a protective layer on your shoes. Almond oil, on the other hand, is a great moisturizer that keeps your shoes looking shiny and polished.
To create this DIY shoe polish recipe, you will need the following ingredients:
- 1 cup of carnauba wax
- 1 cup of almond oil
You will also need a double boiler, a glass jar with a lid, and a clean cloth.
Here are the steps to follow:
- Start by melting the carnauba wax in a double boiler.
- Once the wax has melted, add the almond oil to the double boiler and stir well.
- Remove the double boiler from the heat source and let the mixture cool down for a few minutes.
- Pour the mixture into a clean glass jar and let it cool down until it solidifies.
- Once the mixture has solidified, use a clean cloth to apply the shoe polish onto your shoes.
- After applying the shoe polish, use another clean cloth to buff your shoes until they are shiny and polished.
This DIY natural shoe polish recipe is perfect for adding a protective layer to your shoes while also keeping them looking shiny and new. Plus, the use of natural ingredients makes this recipe environmentally-friendly and safe for use around pets and children.
Recipe 5: Lanolin and Jojoba Oil Shoe Polish
For those who want a high-quality natural polish for their shoes, this lanolin and jojoba oil recipe is perfect. Lanolin is a waxy substance extracted from sheep wool and is known for its water-repellent properties. Jojoba oil is extracted from the seeds of the jojoba plant and is known for its ability to moisturize and condition leather. Here’s how to make it:
Ingredients:
- 2 tbsp lanolin
- 2 tbsp jojoba oil
- 5-10 drops of essential oil (optional)
Instructions:
1. In a double boiler or a heat-safe bowl, melt the lanolin and jojoba oil together over low heat.
2. Once melted, remove from heat and let it cool a bit.
3. If desired, add a few drops of your favorite essential oil for fragrance.
4. Using a clean cloth, apply a small amount of the polish to your shoes in circular motions.
5. Let it sit for a few minutes, then buff with a clean cloth to remove any excess polish.
This recipe will leave your shoes looking shiny and well-nourished, all while using natural and eco-friendly ingredients. Keep in mind that a little goes a long way, so start with a small amount and add more as needed.
Tips and Tricks for Applying Natural Shoe Polish
When it comes to polishing your shoes, the application process is just as important as the type of polish you use. Applying natural shoe polish can be a bit different from using traditional commercial products, but with the right tips and techniques, you can achieve a clean and polished look while also taking care of the environment. In the following sections, we’ll cover some essential tips and tricks for applying natural shoe polish that will help you preserve the quality of your shoes while minimizing waste and avoiding harmful chemicals. Let’s get started!
Preparing Your Shoes for Polish Application
Before applying any natural shoe polish, it is important to properly prepare your shoes to ensure the best results. Here are some steps you can take:
| Step | Description |
|---|---|
| 1 | Start by removing any dirt or debris from the surface of your shoes using a soft-bristled brush or a damp cloth. This will help prevent any scratches or damage to the shoe’s materials during the polishing process. |
| 2 | If your shoes have any scuff marks or stains, use a gentle cleaner specifically designed for the shoe’s material to remove them. Be sure to follow the manufacturer’s instructions carefully and test a small, inconspicuous area before applying the cleaner to the entire shoe. |
| 3 | Dry your shoes completely before applying the natural shoe polish. You can stuff them with newspaper or a towel to absorb any remaining moisture and help the shoes maintain their shape while drying. |
| 4 | Consider conditioning your shoes before polishing them if they are made of leather or another natural material. Apply a small amount of leather conditioner to a soft cloth and rub it into the shoe’s surface in circular motions. Let the conditioner absorb into the material for a few minutes before wiping away any excess with a clean cloth. |
By following these steps, you can ensure that your shoes are clean and ready for natural shoe polish application. Taking the time to properly prepare your shoes will help ensure that they look their best and stay protected.
Proper Application Techniques
When applying natural shoe polish, it’s important to use proper techniques to ensure that your shoes are protected and look their best. Here are some tips for achieving the best results:
- Prep your shoes: Before applying any polish, make sure your shoes are clean and dry. Use a soft cloth or brush to remove any dirt or dust. For suede or nubuck shoes, use a specialized brush to gently remove any surface stains or marks.
- Apply polish evenly: Use a soft cloth or brush to apply the polish in a circular motion. Start with a small amount of polish, and add more as needed. Be sure to cover the entire surface of the shoe, including the seams and edges.
- Let the polish dry: Allow the polish to dry for at least 10-15 minutes before buffing with a clean, dry cloth. For a higher shine, use a polishing brush or a buffing wheel to gently work the polish into the leather.
- Repeat as necessary: Depending on how worn your shoes are, you may need to apply multiple coats of polish to achieve the desired level of shine and protection. Let each coat dry completely before applying the next.
- Avoid over-polishing: While it may be tempting to keep polishing your shoes to achieve a high shine, over-polishing can actually damage the leather and cause it to crack or dry out. Instead, focus on keeping your shoes clean and polished regularly with a moderate number of polish applications.
By following these proper application techniques, you’ll be able to achieve a beautiful, long-lasting shine on your shoes using natural, eco-friendly ingredients.
Storing Your DIY Shoe Polish
After making your own natural shoe polish, it’s important to know how to store it properly to ensure its longevity and effectiveness. Here are some tips on how to store your DIY shoe polish:
1. Store in a Cool, Dry Place
It’s important to store your homemade shoe polish in a cool, dry place to prevent mold or bacteria growth. A pantry or closet shelf is a good location. Avoid storing your polish in direct sunlight or high heat areas, as this can cause the oils to break down and spoil.
2. Use Air-Tight Containers
To prevent air from getting into the container and spoiling the polish, make sure to store it in an air-tight container. Glass jars with tight-fitting lids or metal tins work well for storing shoe polish.
3. Label Your Containers
Make sure to label your shoe polish containers with the recipe name, ingredients, and date made. This will help you keep track of what you have and when it was made, so you know when it’s time to make a fresh batch.
4. Keep Away from Children and Pets
Shoe polish should always be kept out of reach of children and pets. It’s important to store your natural shoe polish in a secure location to prevent accidental ingestion or other hazards.
To summarize, proper storage of DIY shoe polish is crucial for maintaining its effectiveness and longevity. Remember to store in a cool, dry place, use air-tight containers, label your containers and keep them away from children and pets. By following these simple tips, your natural shoe polish will last for months and keep your shoes looking great.
| Storing Your DIY Shoe Polish |
|---|
| 1. Store in a Cool, Dry Place |
| 2. Use Air-Tight Containers |
| 3. Label Your Containers |
| 4. Keep Away from Children and Pets |
Conclusion
In conclusion, by using DIY natural shoe polish recipes, you can clean and protect your shoes in an environmentally friendly way. Avoiding chemical-laden products benefits not only the earth but also your health. By using essential ingredients such as beeswax, coconut oil, and vinegar, you can create effective and cost-efficient shoe polish.
Remember that proper preparation before applying the polish and the correct application technique is crucial. You can use a soft cloth, a brush, or even your fingers to apply the polish. After applying the polish, allow your shoes to soak in the mixture overnight to get the best results.
Not only are these natural shoe polish recipes beneficial for your shoes, but also for the environment. You can enjoy the added benefit of using sustainable ingredients and reducing waste.
It’s essential to store your DIY natural shoe polish in a cool, dark place, so it doesn’t spoil quickly. By using small containers, you can avoid waste and ensure that your homemade polish remains fresh for more extended periods.
The benefits of using natural shoe polish are numerous, and with these DIY recipes, you can make your shoe polish and save money in the process. By reducing your carbon footprint and using organic ingredients, you can make a positive impact on the environment and your health. So ditch the harsh chemicals and switch to a more natural alternative today!
Frequently Asked Questions
What makes natural shoe polish better than commercial shoe polish?
Natural shoe polish is better than commercial shoe polish because it doesn’t contain harsh chemicals that can be harmful to your shoes and the environment. It is also cheaper and easy to make.
What are the essential ingredients for DIY shoe polish?
The essential ingredients for DIY shoe polish are wax (beeswax or carnauba wax), oil (olive oil, almond oil, or jojoba oil), and essential oils (cedarwood, lemon, or other scents).
Can I use any type of wax for DIY shoe polish?
No, you should use beeswax or carnauba wax because they provide a protective coating to your shoes.
Can I use any type of oil for DIY shoe polish?
Yes, you can use olive oil, almond oil, or jojoba oil because they are beneficial for the leather and won’t cause any damage to it.
What are the tools and materials needed for DIY shoe polish?
You will need a saucepan, a glass jar to store the shoe polish, a double boiler or a heat-safe bowl and a pot, a spoon or stirrer, and a clean cloth or brush to apply the shoe polish.
How do I prepare my shoes for polish application?
You should first remove any dirt or debris from your shoes and wipe them clean with a damp cloth. Let them dry completely before applying the shoe polish.
How do I apply DIY shoe polish?
You can apply DIY shoe polish with a clean cloth or brush. Start by taking a small amount of the polish and rubbing it onto the shoe in circular motions. Then, let the polish dry completely and buff with a clean cloth for a shiny finish.
How long does DIY shoe polish last?
DIY shoe polish can last for several months if stored properly in a cool, dark place in a tightly sealed container.
Can I use natural shoe polish on any type of shoe?
Yes, you can use natural shoe polish on any type of shoe, including leather, suede, and fabric.
Are there any precautions I should take when making and using natural shoe polish?
Be careful when handling hot wax and oil, and work in a well-ventilated area. Be sure to test the shoe polish on a small, inconspicuous area of your shoe before using it on the entire shoe.