Introduction
Maintaining the appearance and durability of your hardwood or tile floors is an important aspect of keeping your home or workspace looking its best. Regular cleaning helps, but it may not be enough. That’s where floor polish comes in. By applying floor polish to your floors, you can enhance their appearance, protect against scratches and scuffs, make cleaning easier, and extend the lifespan of your floors. In this article, we’ll take a closer look at the benefits of using floor polish, the types of floor polish available, and how to apply it properly.
What is Floor Polish
Floor polish is a substance used to enhance the appearance and protect the surface of hardwood or tile floors. It’s a mixture of chemical compounds that apply a coating on the floor’s surface, making it smoother and shinier. It’s different from regular waxing that only provides a temporary shine. Floor polish is a long-term option for maintaining the quality of floors. There are different types of floor polishes that contain various ingredients to perform specific functions. Some common ingredients found in floor polish are wax, acrylic, and oil-based materials. Each type of polish is formulated to cater to different floors and desired outcomes.
It’s essential to use the right type of floor polish to avoid damaging the flooring. When selecting a particular polish, consider the type of floor, location, and foot traffic frequency. It’s also crucial to follow the manufacturer’s instructions on the specific type of floor polish for best results. In this way, you’ll ensure that you do not use the wrong type of polish, which may have undesirable effects.
If you want to learn more about the types of floor polish, check out our floor polish types guide for an in-depth look at each kind.
Why Use Floor Polish
Using floor polish is an essential step in the maintenance of hardwood or tile floors. It provides a protective layer that helps to maintain the appearance and durability of your floors. The use of floor polish is recommended for both residential and commercial settings as it can help protect your floors against scratches and scuffs. While there are alternative products like floor wax or oil that can be used to protect floors, they lack some of the benefits of floor polish.
Here are some reasons why using floor polish is a great choice for your floors:
| Reasons to Use Floor Polish | Explanation |
| Enhances Appearance | By adding a layer of shine to your floors, floor polish can create a more polished, professional look. |
| Protects Against Scratches and Scuffs | Floor polish provides a protective layer that creates a barrier between your floors and foot traffic or other sources of damage. This can help guard against scratches and scuffs, which can cause significant damage over time. |
| Makes Cleaning Easier | Applying floor polish helps make cleaning and maintenance of hardwood or tile floors easier. The protective layer created by floor polish resists dirt, dust, grime, and other debris, preventing them from settling into your floors or creating stains |
| Extends the Lifespan of Your Floors | Polishing your floors regularly helps to extend their lifespan, saving you money in the long run. As it protects your floors from damage and helps to maintain their appearance, floor polish can help you avoid costly repairs and replacements that might be necessary otherwise. |
Without a doubt, using floor polish on your hardwood or tile floors can provide numerous benefits. Nevertheless, it is necessary to know which type of floor polish suits your needs and to follow proper application techniques, and to avoid common mistakes. You can check our Floor Polish Guide or read about Common Mistakes in Using Floor Polish to become more knowledgeable about its use.
Benefits of Using Floor Polish
You’ve invested a lot in your hardwood or tile floors, and you want to keep them looking beautiful and in great condition for as long as possible. One way to achieve this is by using floor polish. Not only does polish give floors a shine, but it also protects them against scratches, scuffs, and other damage. In this section, we’ll explore the benefits of using floor polish on your hardwood or tile floors, and how it can help you extend the lifespan of your floors.
1. Enhances Appearance
Using floor polish is an effective way to enhance the appearance of your hardwood or tile floors. With regular use of floor polish, your floors will look shiny, clean, and brand new. By creating a protective layer on top of your floors, scratches, scuff marks, and other signs of wear and tear will be diminished.
The Benefits of Using Floor Polish for Appearance:
- Polished floors make a great first impression on guests and visitors.
- The floors appear smooth and glossy, reflecting more light and making the room feel brighter and more spacious.
- The polish helps to diminish the appearance of minor scratches, scuffs, and other signs of wear and tear, creating a smoother and more consistent appearance.
- Using floor polish can give your floors a rich and natural-looking finish, making them look more expensive and luxurious.
- With floor polish, you don’t have to worry about dull or faded floors anymore.
- Enhanced shine and luster
- Long-lasting protection against scratches and scuffs
- Resistance to water and other liquids
- Improved slip-resistance, making it great for high-traffic areas
- Thoroughly clean the floor with a wood-specific cleaner and let it dry completely.
- Apply the wax-based polish with a clean applicator, working in small sections.
- Allow the polish to dry completely, typically about 30-60 minutes.
- Buff the floor with a soft cloth or buffing machine to enhance the shine.
- Durable: Acrylic-based floor polish is known for its durability and ability to withstand heavy foot traffic.
- Scratch-resistant: It provides excellent scratch and scuff resistance, making it ideal for high-traffic areas such as hallways and entryways.
- Water-resistant: Acrylic-based floor polish creates a barrier that is resistant to water and other liquids, which can help to prevent damage from spills and moisture.
- Easy to apply: Applying acrylic-based floor polish is easy and can be done using a mop or applicator. It dries quickly, allowing you to get back to using your floors in no time.
- Provides a long-lasting shine: Oil-based polish provides a long-lasting shine that can last for months or even years.
- Protects against scratches and scuffs: The natural oils in the polish create a protective layer on the floor that helps prevent scratches and scuffs.
- Increases the lifespan of your floors: By protecting your floors, oil-based polish can help extend the lifespan of your hardwood or tile floors.
- Enhances the natural beauty of your floors: Oil-based polish can enhance the natural beauty of floors by highlighting the grain and texture of hardwood or the color and shine of tiles.
- Easy to apply: Applying oil-based floor polish is a straightforward process that can be done with a mop or a floor buffer.
- Can be slippery: Oil-based polish can make floors slippery, so it’s important to be careful when walking on newly polished floors.
- Can take longer to dry: Oil-based polish can take longer to dry than other types of floor polish, so it’s important to allow for enough time to ensure the polish is completely dry before walking on the floor.
- Can be difficult to remove: Oil-based polish can be difficult to remove from floors, so it’s important to follow the manufacturer’s instructions for removal.
- Gentle on the floors: Water-based polish is a good option for maintaining the natural beauty of your floors as it doesn’t contain harsh chemicals that can damage them over time.
- Quick-drying: Water-based polish dries quickly compared to other types of floor polish, which means you can walk on your newly polished floors in no time.
- Easy to clean: Since water-based polish doesn’t leave any residue or buildup, cleaning your floors after applying this type of polish is easy and hassle-free.
- Lasting shine: Despite being a gentler option, water-based polish offers a long-lasting shine to your floors. It can also resist scuffs and scratches, though not as well as wax-based and acrylic-based polishes.
- Compatible with underfloor heating: Water-based polish can be safely used on floors with underfloor heating systems, making it a great option for those who want warm floors during the winter months.
To make the most of the benefits of floor polish, it is important to choose the right type of polish and apply it correctly. Many types of floor polish are available, such as wax-based, acrylic-based, oil-based and water-based, each with its own set of advantages and disadvantages. Proper application of polish can enhance the appearance of your floors and protect them from further damage.
To learn more about the benefits of using floor polish, check out our FAQs page, or read about the differences between floor polish and wax in our blog post.
2. Protects Against Scratches and Scuffs
Using floor polish on your hardwood or tile floors can help protect against scratches and scuffs caused by everyday wear and tear. These scratches and scuffs not only make your floors look worn and dirty, but they can also weaken the structural integrity of the floor over time.
Floor polish creates a protective layer over the floor’s surface that acts as a barrier, preventing scratches and scuffs from penetrating into the floor’s surface. This protective layer helps to keep your floors looking new for longer, saving you time and money in costly repair or replacement expenses.
Additionally, the protective layer created by the floor polish also helps to eliminate the need for harsh chemicals or abrasive cleaners that can damage your floors. With the polish in place, cleaning spills and stains becomes easier and less damaging to your floors.
Keep in mind that not all floor polishes are created equal. Be sure to choose a high-quality floor polish that is specifically designed for your type of flooring to ensure adequate protection. Some of the best types of floor polish include wax-based, acrylic-based, oil-based, and water-based polishes.
Using floor polish is a great way to protect your floors and maintain their appearance for many years to come. For more information on how to maintain your floors after applying polish, check out our article on cleaning floors after polish. And, if you’re looking for Enviro-friendly alternatives to traditional floor polish, check out our article on Enviro-floor polish alternatives.
3. Makes Cleaning Easier
Using a floor polish can make your cleaning routine much easier. The polish creates a smooth and protective barrier on the surface of your floors, making dirt, dust, and grime easier to remove. With regular use, you’ll find that you spend less time and effort cleaning your floors.
This is particularly important in high-traffic areas of your home or office that are prone to accumulating dirt and grime. Instead of having to scrub your floors with harsh chemicals or spend hours on your hands and knees trying to get them clean, a simple sweep and mop is all you need to get your floors looking their best.
Another benefit of using floor polish to make cleaning easier is that it helps to protect against stains and spills. Because the polish creates a protective barrier on the surface of your floors, it is much harder for liquids to seep into the wood or tile and cause permanent damage.
Using a high-quality floor polish can help simplify your cleaning routine and save you time and effort. Additionally, it helps to protect your floors from scratches, scuffs, and other forms of damage. If you want truly beautiful and long-lasting floors, investing in a floor polish is definitely worth considering.
| Benefits of Using Floor Polish on Your Hardwood or Tile Floors |
|---|
| Makes Cleaning Easier |
| Protects Against Scratches and Scuffs |
| Enhances Appearance |
| Extends the Lifespan of Your Floors |
4. Extends the Lifespan of Your Floors
Floor polish not only enhances the appearance of your hardwood or tile floors, but it also plays an essential role in extending their lifespan. Floor polish creates a protective layer on the surface of your floors that shields them from daily wear and tear, including scratches, scuffs, and stains. This protective layer acts as a barrier between the floor and environmental factors that can damage it, such as harmful UV rays, moisture, and high traffic.
Types of Wear and Tear:
| Type of Wear and Tear | Description |
| — | — |
| Scratches | Often caused by dragging heavy objects or pet claws. |
| Scuffs | Marks left by shoes or furniture that have rubbed on the floor. |
| Stains | Discolorations caused by spills or tracked-in dirt. |
| UV Rays | Exposure to sunlight can cause the floor to fade or discolor over time. |
| Moisture | If not cleaned up quickly, spills and leaks can damage the floor’s finish and even warp the wood. |
| High Traffic | The constant weight and movement of people and furniture can cause the floor to wear down over time. |
Regular use of floor polish helps to prevent these types of wear and tear from occurring, which in turn extends the lifespan of your floors. Rather than having to replace your floors every few years due to damage, regular use of floor polish can keep them looking new for much longer.
It’s important to note that the lifespan of your floors isn’t just about aesthetics. Flooring replacement can be a costly and time-consuming process, especially if you have to replace it every few years due to damage. By using a floor polish, you can save money in the long run and avoid needing to replace your floors prematurely.
By applying a fresh coat of floor polish as needed, you’ll be ensuring that your floors remain protected from damage and looking their best for years to come.
Types of Floor Polish
So you’ve decided to use floor polish on your hardwood or tile floors for all its amazing benefits. But before you head off to the store to buy some, you should know that there are different types of floor polish available. Which one should you choose? Let’s take a closer look at the wax-based, acrylic-based, oil-based, and water-based polishes and their respective pros and cons, so you can make an informed decision.
1. Wax-Based Polish
Wax-based polish is the traditional option for polishing hardwood floors. It is made from a blend of natural waxes, such as beeswax or carnauba wax, and petroleum distillates. The petroleum distillates help to dissolve and spread the wax evenly across the floor.
The benefits of wax-based polish include:
However, wax-based polish also has some drawbacks. It requires a significant amount of prep work and ongoing maintenance. Over time, the wax layer needs to be stripped and reapplied, as it can collect dirt and grime. Additionally, wax-based polish can be slippery when wet, posing a safety hazard.
When applying wax-based polish, follow these steps:
Wax-based polish is a good option for those who want a long-lasting, high-shine finish on their hardwood floors. However, it does require ongoing maintenance and can be more difficult to apply correctly compared to other types of polish.
2. Acrylic-Based Polish
Acrylic-based polish is a popular choice for those who are looking for a durable and long-lasting solution for their floors. This type of floor polish is made with a mixture of acrylic polymers that create a hard and protective coating on the surface of the floor. Here are some of the benefits of using acrylic-based floor polish:
Using acrylic-based floor polish can help to protect your floors from daily wear and tear, while also enhancing their natural beauty. It provides a strong and protective layer that can help to extend the lifespan of your floors and reduce maintenance costs over time.
3. Oil-Based Polish
Oil-based floor polish is an excellent option for those who want a longer-lasting shine on their floors. This type of polish contains natural oils, which not only give the floor a beautiful shine but also provide a protective layer to prevent scratches and scuffs.
Here are some benefits of using oil-based floor polish:
However, there are some things to keep in mind when using oil-based floor polish:
Oil-based floor polish is an excellent choice for those who want a long-lasting shine and added protection for their hardwood or tile floors.
4. Water-Based Polish
When it comes to choosing a type of floor polish, one option is water-based polish. This type of polish is often favored by those who want to minimize their exposure to fumes and chemicals, as it has lower VOC (volatile organic compound) levels compared to other types of floor polish. Additionally, water-based polish is an eco-friendly option, as it is free from toxic solvents.
Here are some benefits of using water-based polish on your hardwood or tile floors:
If you’re looking for a floor polish that’s gentle on your floors, easy to clean, and eco-friendly, water-based polish is a good option to consider. Keep in mind that this type of polish is not as durable as other types, so you may need to apply it more frequently to maintain your floors’ shine.
How to Apply Floor Polish
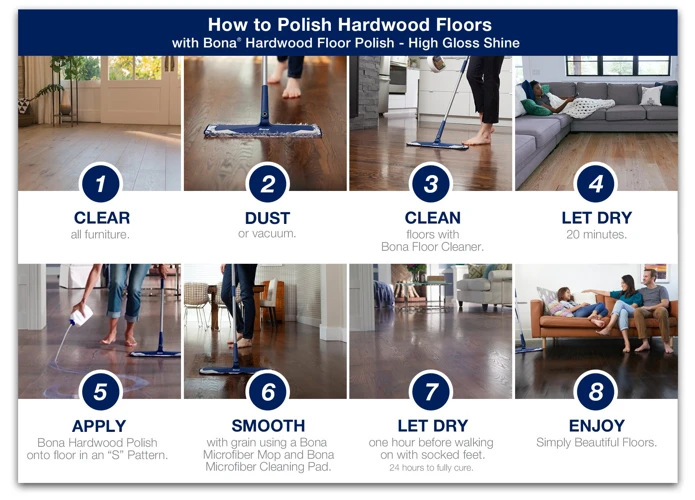
Now that we’ve covered the benefits of using floor polish on your hardwood or tile floors, you may be wondering how to apply it. Applying floor polish may seem daunting, but with the right tools and steps, you can achieve beautiful, long-lasting floors. In this section, we’ll walk you through the process step-by-step, from cleaning the floor to buffing the finish.
1. Clean the Floor
Before applying floor polish, it is important to clean the floor thoroughly to ensure the best possible results. Here are the steps to follow for effective cleaning:
| Step 1: | Remove any loose debris, such as dirt, dust, or small particles, from the floor surface. This can be done with a broom or vacuum cleaner. |
| Step 2: | Wash the floor with a suitable cleaning solution according to the floor type (hardwood, tile, etc.). When using a cleaning solution, always ensure that it is safe for your floor type and that it does not leave any residue. |
| Step 3: | Rinse the floor with clean water to remove any remaining cleaning solution or residue. Use a damp mop or cloth, and avoid oversaturating the floor. |
| Step 4: | Dry the floor completely with a clean towel or mop. Ensure that there is no moisture left on the floor, as this can affect the adhesion and performance of the floor polish. |
Following these steps will ensure that the floor is properly cleaned and ready for floor polish application. It is important to note that if there are any scratches or stains on the floor surface, they should be treated and resolved prior to floor polishing to ensure the best possible results.
2. Prepare the Polish
Before applying floor polish to your hardwood or tile floors, it is important to properly prepare the polish to ensure that it is ready for use. Here are a few simple steps to follow in order to properly prepare the polish:
1. Read the instructions: Before you start preparing the floor polish, it is important to carefully read the instructions on the packaging. Every floor polish is unique and may require specific preparation steps, so it is crucial to follow the instructions that are provided.
2. Shake the bottle: Once you have familiarized yourself with the instructions, shake the bottle of floor polish well. This will help to mix any settling that may have occurred during storage and ensure that the polish is evenly mixed.
3. Dilute if needed: Some types of floor polish may need to be diluted before use. This will be indicated in the instructions, so be sure to read them carefully. If the polish needs to be diluted, you can use water or a specific product recommended by the manufacturer.
4. Use the right tools: In order to properly apply the floor polish, you will need a few tools, such as a mop or sponge. Make sure that you have the right tools on hand before you start preparing the polish.
5. Protect the area: Finally, it is important to protect the area where you will be applying the floor polish. This may involve laying down a protective tarp or placing towels around the edges of the room to catch any spills or drips.
By taking these simple steps to prepare your floor polish, you can ensure that it is ready to use and that it will provide the best possible results for your floors.
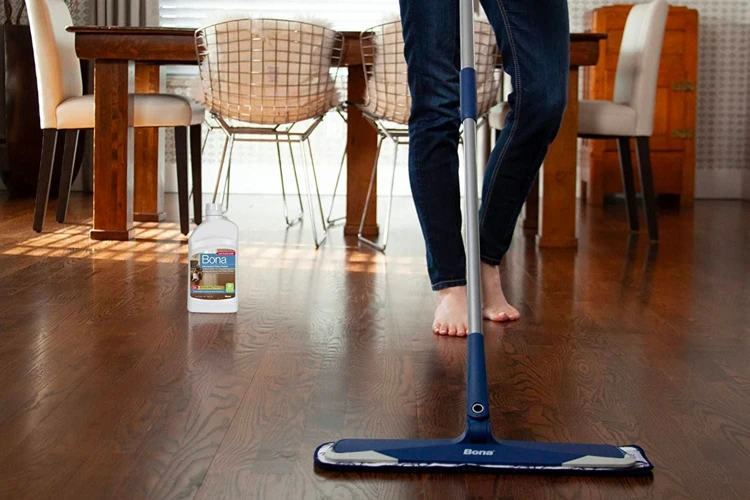
3. Apply the Polish
Now that you have prepared the polish and cleaned the floor, it’s time to apply the polish. This step is crucial to ensure the best results and to make your floors look stunning. Here are the steps to follow when applying the polish:
| Step | Action |
|---|---|
| Step 1 | Start at the farthest corner of the room from the door and work your way towards the door. |
| Step 2 | Pour a quarter-sized amount of polish on the floor. |
| Step 3 | Using a polish applicator or a clean mop, spread the polish evenly on the floor. Make sure to apply thin coats and avoid over-applying in one area. |
| Step 4 | Work in sections of about 4×4 feet (1.2×1.2 meters) to ensure that the polish is spread evenly and to avoid missing any spots. |
| Step 5 | Continue spreading the polish until the entire floor is covered. If you need to apply a second coat, wait for the first one to dry completely before beginning the second coat. |
Remember, applying the polish in a thin and even layer is the key to achieving a beautiful and long-lasting finish. Take your time and ensure that the entire floor is covered with the polish. Once you are done, allow the polish to dry completely before walking on the floor or applying a second coat.
4. Allow to Dry
Once you have applied the floor polish, it is important to allow it to dry completely before walking on the surface. This will ensure that the polish has fully adhered to the floor and will not scratch or peel off easily.
The drying time will depend on the type of polish used and the humidity of the room. To determine the drying time, refer to the manufacturer’s instructions on the product label.
While waiting for the floor polish to dry, it is important to keep the area free from foot traffic and any other debris that could potentially damage the surface. It is also important to avoid placing any furniture or objects on the floor until it is completely dry.
During the drying process, it is important to maintain proper ventilation in the room. Open windows or doors in the area to promote air circulation, which will help the floor polish dry faster and more evenly. You can also use fans to help speed up the process.
Do not attempt to speed up the drying process by applying heat to the surface. This can cause the floor polish to dry too quickly, resulting in a streaky or uneven finish. Additionally, applying heat can cause the polish to bubble or crack, which can lead to costly repairs in the future.
Once the floor polish is completely dry, you can begin to use the surface as normal. However, it is important to wait at least 24 hours before placing any heavy furniture or objects on the surface. This will ensure that the floor polish has fully cured and is completely hardened.
Always follow the manufacturer’s instructions carefully when applying and allowing floor polish to dry. This will help ensure that your floors maintain their beautiful appearance and are protected from scratches, scuffs, and other damage.
5. Buff the Floor
After allowing the floor polish to dry completely, the final step in the process is buffing the floor. This step is crucial for achieving the desired shine and finish on your hardwood or tile floors. Buffing involves using a polishing machine to agitate the surface of the floor and remove any unevenness or streaks in the polish.
To buff your floor, you will need to follow these steps:
| Step 1: | Attach the polishing pad to the bottom of the floor polishing machine. Use a soft, clean pad to avoid any damage to your floors. |
| Step 2: | Turn on the polishing machine and begin moving it over the surface of the floor. Make sure to move in a circular motion to evenly distribute the polish. |
| Step 3: | Apply pressure evenly to the machine to ensure that the polish is buffed properly into the surface of the floor. Avoid putting too much pressure on the machine, as this can cause damage to your floors. |
| Step 4: | Continue buffing until you have covered the entire floor surface. Make sure to overlap each section to avoid missing any spots. |
| Step 5: | Once you have finished buffing, turn off the machine and remove the polishing pad. Clean the pad thoroughly and store it for future use. |
Buffing your floors may seem like an extra step, but it is essential for achieving a polished and professional look. Be sure to take your time and follow the proper techniques to ensure that your floors stay looking their best for years to come.
Conclusion
As we come to the end of this article, it’s clear that using floor polish can have numerous benefits for both hardwood and tile floors. From enhancing their appearance to protecting against scratches and scuffs, floor polish can make cleaning and maintaining your floors much easier. There are various types of floor polish you can choose from depending on your needs and preferences. And, with the right application technique, you can enjoy beautiful, long-lasting floors for years to come. So, whether you’re sprucing up your home or office, don’t hesitate to give your floors the shine they deserve with the help of floor polish.
Get Beautiful and Long-Lasting Floors with the Help of Floor Polish
Achieving beautiful and long-lasting floors is possible with the use of floor polish. By applying a good quality floor polish, you are not only enhancing the appearance of your floors, but also providing protection against scratches, scuffs, and other damages. Additionally, it makes cleaning easier and extends the lifespan of your floors.
Floor polish comes in different types such as wax-based, acrylic-based, oil-based, and water-based polish. Each type has its own advantages and disadvantages, which can be chosen based on the needs and preferences of the homeowner.
To apply floor polish, the floor needs to be cleaned thoroughly first, and the polish needs to be prepared according to the type being used. The polish is then applied to the floor in sections and allowed to dry completely. Once dry, the floor is buffed to a shine.
If you want to enjoy beautiful and long-lasting floors, the use of floor polish is highly recommended. It not only protects your floors but also enhances their beauty. To learn more about floor polish and how to apply it, check out the detailed guide above.
| Benefits | Advantages |
| Enhances appearance | Gives a shiny and glossy finish to the floors |
| Protects against scratches and scuffs | Prevents damage from heavy foot traffic and furniture |
| Makes cleaning easier | Resists dirt and grime buildup |
| Extends the lifespan of your floors | Reduces the need for frequent repairs and replacements |
Frequently Asked Questions
1. How often should I use floor polish?
It is recommended to use floor polish once or twice a year, depending on the amount of foot traffic in the area.
2. Can I apply floor polish on any type of flooring?
No, you should only apply the appropriate type of floor polish for your specific flooring. For instance, some floor polishes may be better suited for hardwood floors, while others may work better on tile floors.
3. Is it necessary to clean the floor before applying polish?
Yes, it is important to clean the floor thoroughly before applying floor polish. This will ensure that any dirt, debris or stains are removed from the surface so that the polish can be applied evenly.
4. How can I prevent scratches and scuffs on my floors?
Applying floor polish is one effective way to protect your floors against scratches and scuffs. Additionally, placing protective felt pads under furniture legs can help to further prevent damage.
5. Can I use any type of mop to apply floor polish?
It is recommended to use a microfiber mop or a soft sponge mop to apply floor polish. Avoid using abrasive materials, such as scrub brushes or steel wool, which can damage the surface of the floor.
6. Can I walk on the floor while the floor polish is drying?
No, it is best to avoid walking on the floor while the polish is drying. This will help to prevent smudging or streaking, which can be difficult to remove once the polish has dried.
7. Do I need to dilute the floor polish before application?
This depends on the specific type of floor polish you are using. Some products may require dilution, while others can be applied directly. Always read the manufacturer’s instructions before use.
8. How long does it take for the floor polish to dry?
The drying time of floor polish can vary depending on the type of polish and the humidity level in the room. It is best to allow the polish to dry completely for at least 24 hours before walking on the floor or placing any furniture on it.
9. How often should I buff my floors after applying polish?
You can buff your floors as often as you like, but it is recommended to do so every few months to maintain the shine and protect the surface of the floor.
10. What should I do if the floor polish starts to peel or flake?
If you notice the floor polish starting to peel or flake, it may be time to reapply a fresh coat. Make sure to remove any flaking polish before applying a new coat and follow the manufacturer’s instructions carefully.