Walking on a freshly polished floor is like stepping into a whole new world. The pristine shine and smooth texture make any room look more inviting and professional. But polishing floors isn’t an easy task – there are many steps involved to ensure a long-lasting and flawless finish. If you’re feeling overwhelmed with the idea of polishing your own floors, fear not! This comprehensive step-by-step guide will take the confusion out of the process and provide you with everything you need to know to achieve a professional-looking finish. So let’s roll up our sleeves and get ready to apply some floor polish!
Preparation

Before applying floor polish, it is important to properly prepare the floor. In this section, we will cover the necessary steps to take in order to ensure a professional and long-lasting finish. Clearing the floor, selecting the appropriate polish, and gathering the necessary supplies will all be addressed. These steps are crucial in achieving a flawless finish. Also, if you have any questions about which type of floor polish to use, check out our FAQ section to learn more.
Clear the Floor
Before applying floor polish, it’s essential to clear the floor. This means removing all dirt, debris, and furniture from the surface to ensure a smooth and even application of polish. Failing to clear the floor before application can lead to a patchy and inconsistent finish.
Here is a step-by-step guide to clearing the floor:
- Remove all furniture and objects from the floor, either by moving them to another room or covering them with a drop cloth.
- Use a broom or vacuum cleaner to remove loose dirt and debris from the floor.
- Pay special attention to corners and edges, where dirt often accumulates.
- For hard-to-reach areas, use a microfiber mop or cloth to remove dirt and debris.
It’s important to note that some floor polishes may require additional preparation, such as stripping the old polish or using a specific cleaning solution. Make sure to read the manufacturer’s instructions before beginning the application process.
If you’re unsure about which floor polish to choose, our guide to the top floor polish brands and features can help you make an informed decision. And if you’re concerned about the impact of floor polish on the environment, check out our alternatives to traditional floor polish article for more information.
Choose the Right Polish
Choosing the right floor polish is essential for achieving a professional and long-lasting finish. The type of polish you need will depend on the type of flooring you have. When selecting a floor polish, consider the following:
- Type of Flooring: Different floorings require different types of polishes. For instance, a vinyl floor polish might not work well on a hardwood floor. Check the manufacturer’s instructions for the recommended polish for your type of flooring.
- Purpose: Determine what you want the polish to accomplish. Do you want to protect your floors? Do you want to restore their shine? Do you need a heavy-duty polish for high-traffic areas?
- Finish: Floor polishes come in different finishes from matte to high gloss. Consider the look you want to achieve when selecting the polish.
- Application: Some polishes require special equipment or techniques for application. Be sure to choose a polish that you are comfortable applying.
- Brand: There are many types of floor polishes available, so it’s essential to choose a reputable brand. Research the brands available and read reviews to determine the quality and effectiveness of different products.
Choosing the right polish will not only give you a better end result but also help protect and maintain your floors. If you’re unsure which polish to choose, consider consulting with professionals or reading more information about benefits of floor polish in our article or frequently asked questions on the subject in our FAQ page. Additionally, it’s important to know how to properly clean floors after polishing, which you can learn more about in this article. Finally, you might want to read about the differences between floor polish and wax in our helpful guide and protecting your floors better with floor polish in this article.
Gather Supplies
Before starting the floor polishing process, it’s important to gather all the necessary supplies so that you’re fully prepared. Here are the items you’ll need to get the job done:
- Floor Polish: The first supply you’ll need is the floor polish. Make sure you select a product that’s designed for use on your specific type of flooring. You can find water-based or oil-based floor polishes available in your local home improvement store or online.
- Mop and Bucket: You’ll need a mop and bucket to clean your floor before applying the polish. Opt for a mop with a removable and washable head to make the process easier. Plus, using a bucket with a wringer will make it easier to remove excess water from the mop.
- Cleaner: Using a cleaner before applying the polish is essential to ensure that there’s no dirt or debris left on the floor. If you prefer to use a natural cleaner, mix water and vinegar in equal parts.
- Protective Gear: Don’t forget to protect your hands by wearing gloves while applying the polish. Additionally, wearing knee pads can help prevent discomfort while working on the floor.
- Applicator: You can use a microfiber mop or a wax applicator to apply the polish. Either way, make sure the applicator has a clean head or pad that’s free of dirt or debris.
- Tape: If you don’t want to accidentally apply polish to areas you don’t need to, use painter’s tape to cover baseboards or other areas that you don’t want to get polish on.
- Furniture Sliders: If you have heavy furniture on the floor, it’s best to use sliders to move them around. Heavy furniture can scratch the polish and damage your floor if not moved properly.
Once you have all the supplies you need, you can begin the floor polishing process. Keep in mind that the wrong floor polish or improper application can cause damage to your flooring. To avoid common mistakes, make sure to read up on /common-mistakes-floor-polish/ before getting started.
Step-by-Step Guide
Now that you have completed the necessary preparation, it is time to start the step-by-step process of applying floor polish for a professional and long-lasting finish. This guide will take you through each stage of the process, highlighting the key steps that you need to take to achieve the desired results. By following these steps carefully, you will be able to polish your floors to a high standard that will help to enhance the appearance of your home or workplace while also providing additional protection to the flooring material. So, let’s get started!
Step 1: Sweep and Vacuum the Floor
Step 1: Begin by thoroughly cleaning the floor.
| Tools and Supplies: | Sweeping brush or broom, dustpan, vacuum cleaner |
Before applying the polish, make sure the floor is free from any debris, dust, or dirt particles. This will ensure a smooth and even finish once the polish is applied. Start by sweeping the entire area with a sweeping brush or broom. Focus on the corners and hard-to-reach areas, as these spots tend to accumulate more dust and dirt. Collect the gathered debris and dispose of it in a dustpan.
Next, use a vacuum cleaner to thoroughly remove any dust or fine dirt particles that may be missed by sweeping. If there are any stubborn stains or marks on the floor, use a suitable cleaner and a damp mop to remove them. Make sure the floor is completely dry before proceeding to the next step.
By ensuring the floor is clean and dry, you will prevent any debris from getting trapped in the polish, which can cause bumps and uneven areas on the finished product.
Step 2: Mop the Floor
Before applying floor polish, it’s important to ensure that the floor is free of any dust or debris. This is where Step 2: Mop the Floor comes in. Follow these simple steps for a thorough clean:
| Step | Action |
| 1 | Remove any loose debris or dirt by vacuuming or sweeping the floor. |
| 2 | Fill a bucket with warm, soapy water. Use a neutral pH cleaner to avoid damaging the floor. |
| 3 | Dip a mop into the bucket, wring it out until it’s just damp, and start mopping the floor. |
| 4 | Pay special attention to any areas with heavy foot traffic or stains. Use a scrub brush or microfiber cloth to scrub away stubborn dirt or stains. |
| 5 | Rinse the mop frequently in the bucket to avoid spreading dirty water. |
| 6 | Once the entire floor has been mopped, rinse the mop and bucket thoroughly and go over the floor again with clean water to remove any leftover soap or cleaning solution. |
| 7 | Allow the floor to dry completely before moving on to the next step. |
By properly mopping the floor, you will create a clean surface that will allow the floor polish to adhere better and result in a more professional and long-lasting finish.
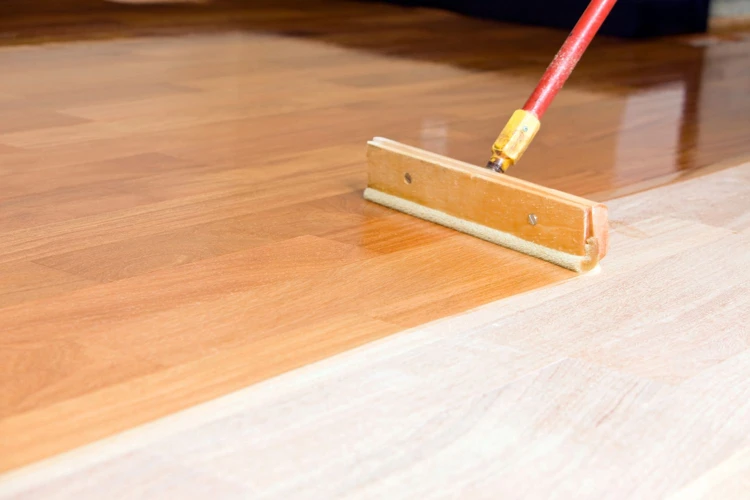
Step 3: Apply the First Coat of Polish
Before applying the first coat of polish, make sure the floor is completely clean and dry. Use a clean mop or applicator pad to apply a thin and even layer of floor polish in circular motions. Start from the farthest corner of the room and work your way towards the exit to avoid stepping or dragging any dirt onto the newly polished surface.
It is important to avoid applying too much polish, as this could result in a uneven finish or streaks. A thin and even layer of polish is all that is necessary for a professional and long-lasting finish.
If you are using a water-based floor polish, make sure to work quickly and apply the polish in sections to prevent it from drying out too quickly. If the polish does start to dry out, add a small amount of water to the mop or applicator pad to help spread the polish more evenly.
Be sure to pay extra attention to high traffic areas and areas that may see more wear and tear, such as doorways and hallways. These areas may need an additional coat of polish to ensure they are properly protected.
Once the first coat of polish is applied, allow it to dry for the recommended amount of time before applying any subsequent coats. This will usually take a few hours, but refer to the manufacturer’s instructions for specific drying times.
Step 4: Wait for the First Coat to Dry
Once you have applied the first coat of polish to the entire floor, you must be patient and wait for it to dry before applying subsequent coats. Keep in mind that the drying time can vary depending on the type of polish you are using and the humidity and temperature in the room. Here are some tips to help ensure that the first coat dries properly:
- Wait for the suggested drying time: Check the instructions on the polish you are using, as it should give you an idea of how long it will take for the first coat to dry. Avoid walking on the wet polish or moving anything on the floor during this time to prevent smudging and ruining your hard work.
- Use air circulation: Turn on fans or open windows to promote air flow and speed up the drying process. This is especially important in large rooms or areas with high humidity.
- Stay off the floor: Avoid walking on the floor or allowing anyone else in the room until the polish is completely dry. Otherwise, you could end up with footprints, smudges, or other imperfections in the finish.
Remember, rushing the drying process could result in an uneven, blotchy finish that will require extra work to fix. It’s best to give the first coat of polish plenty of time to dry before moving on to subsequent coats. This way, you can achieve a smooth, seamless finish that looks professionally done.
Step 5: Apply Subsequent Coats of Polish
To achieve a professional and long-lasting finish, it’s recommended to apply 2-3 coats of polish. Take a small amount of polish on a clean applicator and spread it evenly on the floor. Here’s the step-by-step guide:
| Step | Action |
|---|---|
| Step 1 | Start in one corner of the room and apply a thin layer of polish. |
| Step 2 | Apply the polish in a figure-eight motion. |
| Step 3 | Overlap each pass slightly to ensure full coverage. |
| Step 4 | Use a light touch when applying the polish to avoid streaks and bubbles. |
| Step 5 | Let the first coat dry completely before applying the next coat. |
| Step 6 | Repeat the process for the second and third coats, if desired. |
Remember, applying multiple thin layers of polish will produce a better finish than applying one thick coat. Take your time and apply each coat evenly to achieve the best results.
Step 6: Give the Floor Time to Dry
Once you have applied all the necessary coats of polish, it is important to give the floor ample time to dry. Rushing this step can ruin all of the hard work done thus far. Here are some tips to ensure your floor dries properly:
| Tip | Description |
| Avoid walking on the floor | Walking on the floor can leave unwanted footprints or marks. It is best to avoid walking on the floor as much as possible until it has fully dried. |
| Open windows and doors | Good ventilation will speed up the drying process. Open windows and doors to create a cross breeze and help the floor dry faster. |
| Use fans to circulate air | If you have fans available, use them to create air flow and circulate air around the room. This will help the floor dry quicker. |
| Avoid placing furniture on the floor | Putting furniture on the floor before it is properly dried can cause damage or leave marks. If possible, hold off on moving furniture back into the room until the floor is completely dry. |
| Wait at least 24 hours | The time it takes for the floor to dry depends on various factors such as humidity, temperature and type of polish used. As a general rule, wait at least 24 hours before walking on or placing furniture on the floor. |
Following these tips will help ensure that your floor dries properly and that the polish sets for a professional and long-lasting finish.
Finishing Touches
Now that you have applied multiple coats of polish to your floor, it’s time to add the finishing touches that will truly elevate the appearance of your space. These final touches include buffing the floor and adding a top coat. Not only do these steps help to enhance the shine of your floors, but they also help to protect the polish and extend its lifespan. In this section, we will guide you through these final steps to achieve a professional and long-lasting finish.
Buffing the Floor
After applying the topcoat and waiting for it to dry, buffing the floor is the next step to achieve a shiny, long-lasting finish. Buffing the floor with a buffing machine or a high-speed burnisher will remove scuffs and small scratches, leaving the floor with a smooth and glossy appearance.
Step 1: Clean the buffing machine or burnisher thoroughly to prevent dust and debris from damaging the recently applied topcoat.
Step 2: Attach a buffing pad to the machine, making sure it is securely fastened.
Step 3: Turn on the machine and begin buffing the floor, starting in a small corner and working in straight lines.
Step 4: Move the machine in a circular motion to buff any remaining scuffs or scratches on the floor.
Step 5: Once you have buffed the entire floor, turn off the machine and remove the buffing pad.
Step 6: Make sure to clean the buffing pad and machine once again to prevent debris from sticking to them for future use.
Buffing the floor is an essential step in achieving a professional-looking finish. It can be time-consuming, but it is worth it in the end to ensure a long-lasting polished appearance.
Adding a Top Coat
After buffing the floor, the next step is to add a top coat to provide extra protection and shine. Here’s how you can do it:
- Prepare the top coat: Choose a high-quality top coat that’s compatible with the polish you used before. Make sure to read the manufacturer’s instructions and follow them carefully. Add the top coat to a clean bucket and mix it thoroughly.
- Apply the top coat: Dip the mop or applicator into the top coat mixture and apply it to the floor in a thin, even layer. Be careful not to apply too much, as this can cause puddles and streaks. Remember to work in small sections and overlap each section to avoid missed spots.
- Allow the top coat to dry: Wait for the top coat to dry completely before walking on the floor. This may take several hours depending on the brand of top coat you’re using. Make sure to avoid any foot traffic or furniture on the floor during this time to prevent smudging or damage to the finish.
- Add extra layers if necessary: If you want a higher gloss or more protection, you can add additional layers of top coat. Just repeat steps 2-3 once the previous layer has dried.
- Clean up: Once you’re done with the top coat, clean your tools and dispose of any leftover mixture or containers according to the manufacturer’s instructions.
By adding a top coat, your polished floor will have a more resilient and glossy finish that will last longer.
Cleaning Up
After successfully applying the polish and achieving a beautiful, professional-looking finish on your floor, it’s time to tackle the final stage of the process: cleaning up. While it may seem like a mundane task, proper cleanup is crucial in order to maintain the integrity of your flooring and ensure that your supplies are ready for the next project. In this section, we will go over the necessary steps for disposing of materials, as well as cleaning and storing your tools properly. By following these simple steps, you’ll be able to enjoy your newly polished floors for years to come.
Properly Dispose of Materials
When it comes to proper disposal of the materials used in floor polishing, it is important to follow certain guidelines to ensure that you are not harming the environment or risking the health of those around you. Here are some steps you can take:
1. Dispose of any unused polish properly. If you have any unused polish, do not simply dump it down the drain or throw it in the trash. Some polishes may contain harmful chemicals that can damage the environment. Instead, contact your local waste management facility to find out how to properly dispose of it.
2. Dispose of used polish pads or rags. After you have finished polishing your floor, discard any used polish pads or rags in an appropriate container. Depending on the type of polish you used, you may need to dispose of them as hazardous waste, so it’s important to check with your local waste management facility.
3. Clean any equipment used in the polishing process. To prevent any leftover polish from drying on your equipment, it’s important to clean it immediately after use. Use warm, soapy water to clean any brushes, applicators, or polishing machines. Rinse them thoroughly and allow them to dry completely before storing them away.
4. Keep your workspace clean. Clean up any spills or drips immediately to prevent them from spreading or staining your floor. Use a mop or cloth to wipe up any excess polish and dispose of it properly.
By following these guidelines, you can ensure that you are properly disposing of any materials used in the floor polishing process and keeping your workspace clean and safe.
Clean Your Tools
After completing the floor polishing process, it is important to properly clean your tools. This will not only help prolong the life of your tools but will also ensure that they are ready for the next use. Here are the steps to clean your tools:
- Gather your cleaning supplies: Before you start cleaning your tools, make sure you have all the necessary supplies. You will need warm water, a mild soap, a sponge or cloth, and a bucket.
- Remove excess polish: Use a scraper or putty knife to remove any excess polish from your applicator or other tools.
- Wash the tools: Add a few drops of mild soap to warm water in a bucket. Dip the sponge or cloth into the soapy water and wring it out. Use the damp sponge or cloth to wipe down your tools, paying special attention to any areas with buildup or residue. Rinse the tools thoroughly with clean water and dry them off with a rag or towel.
- Clean the container: If you used a container to hold your polish, make sure to clean it out thoroughly as well. Use warm, soapy water and a sponge to wipe down the inside of the container, removing any remaining polish or residue.
- Store your tools: Once your tools are completely dry, store them in a cool, dry place until the next use. This will help prevent them from rusting or becoming damaged.
By following these steps to clean your tools, you can rest assured that they will be in good condition for the next time you need to use them. Properly caring for your tools is a simple but important part of maintaining a professional finish on your floors.
Conclusion
After following the step-by-step guide to applying floor polish, you should have a beautifully shiny and protected floor that will last for a long time. It’s important to remember that proper preparation and application are essential for achieving the best results.
Clearing the floor, choosing the right polish, and gathering supplies are all important aspects of the preparation process. Once you have everything you need, be sure to sweep and vacuum the floor thoroughly to remove any loose debris. Mopping the floor with a neutral cleaner will also help ensure that the surface is clean and ready for polish.
When it comes to applying the polish, be sure to follow the manufacturer’s instructions for the specific product you are using. Applying multiple coats is recommended for achieving a long-lasting finish, but be sure to wait for each coat to dry completely before applying the next one. Buffing the floor and adding a top coat are also great ways to add extra protection and shine.
Cleaning up is the final step, and it’s important to properly dispose of any materials and clean your tools before storing them away. With these steps, you’ll be able to enjoy a beautifully polished floor for years to come.
In conclusion, taking the time to properly prepare and apply floor polish will not only result in a great-looking floor, but also provide protection from everyday wear and tear. Plus, the satisfaction of having a polished floor is a reward in itself. Just remember to take your time, follow the steps and manufacturer’s instructions, and have fun!
Frequently Asked Questions
How often should I apply floor polish?
Depending on the amount of foot traffic in your home or business, it is recommended to apply floor polish every 6-12 months.
Can I apply floor polish on any type of flooring?
No, not all types of flooring can be polished. Make sure to check with the manufacturer’s guidelines for your specific flooring material.
Is it necessary to buff the floor after applying polish?
Buffing the floor after applying polish can help achieve a smoother and shinier finish. It is recommended, but not mandatory.
Can I apply multiple coats of polish in one day?
No, it is recommended to wait until each coat of polish is completely dry before applying the next one. This can take several hours.
Can I apply floor polish on a newly installed floor?
No, it is recommended to wait at least 30 days after installation before applying floor polish to allow the floor to fully cure.
Why is it important to choose the right polish?
Choosing the right polish for your flooring type can help protect and extend the life of your floor. Using the wrong polish could lead to damage or discoloration.
What tools do I need to apply floor polish?
You will need a mop, bucket, applicator pad, and the appropriate polish for your flooring type.
Can I walk on the floor while it’s drying?
No, it is recommended to avoid walking on the floor until it is completely dry to prevent smudging or damaging the finish.
How do I dispose of the leftover polish?
You should dispose of any leftover polish according to your local government’s guidelines for hazardous waste.
Why should I apply a top coat?
Applying a top coat can help protect the floor against scratches, scuffs, and general wear and tear. It can also add extra shine to the finish.