Have you ever looked at your floors and felt like they were missing something? A little extra shine, perhaps? That’s where floor polish comes in. Floor polish is a product that can make your floors look brand new again by adding shine and protection. But with so many different types of floor polish out there, how do you know which one to choose for your specific floor type? In this article, we’ll go over the different types of floor polish available and which one is best for each type of flooring. Plus, we’ll cover how to apply and maintain your floor polish for long-lasting results. Let’s dive in and give your floors the shine they deserve.
The Importance of Floor Polish
Maintaining a sparkling clean floor is essential for enhancing the aesthetic appeal of your space. One effective way to protect your floors from dust, scratches, and other forms of wear and tear is by using floor polish. Floor polish is a blend of chemicals that create a protective layer on your flooring material, making it durable and visually pleasing. In this section, we will discuss the significance of using floor polish as well as provide some helpful tips on how to choose the right polish for your floor type. Take a look at our benefits of floor polish page for more insights.
Benefits of Floor Polish
Polishing your floors can bring many benefits to both the appearance and the longevity of your floors. Here are some of the benefits of floor polish:
- Provides a protective layer: Floor polish creates a protective barrier on the surface of your floors to help prevent scratches, stains, and other damage.
- Improves appearance: Applying floor polish can make your floors look shiny and new, adding to the overall aesthetic of your space.
- Increases durability: A layer of polish can also increase the durability and longevity of your floors by protecting them from wear and tear.
- Prevents moisture penetration: Floor polish can help prevent moisture from seeping into your floors, which can cause warping or other damage.
- Easy to clean: Polished floors are generally easier to clean and maintain than unpolished floors since the surface is smoother and less prone to collecting dirt and debris.
Using the right floor polish can not only make your floors look better, but also extend their lifespan and improve their durability. Properly polishing your floors can be a great investment in the appearance of your home or business. If you want to know more about floor polish and the different options available, you can check our comprehensive Floor Polish Guide.
Factors to Consider When Choosing a Floor Polish
When it comes to choosing the right floor polish for your floors, you need to consider a few factors to ensure that you make the right decision. These factors include:
| Factor to Consider | Description |
|---|---|
| Type of floor | Some floor polishes work better on certain types of floors than others. For example, you wouldn’t want to use a wax floor polish on a concrete floor. It’s important to choose a polish that is specifically designed for the type of floor you have. |
| Traffic | If your floors experience a lot of foot traffic, you’ll want a floor polish that is durable and long-lasting. Conversely, if your floors don’t see much foot traffic, you can opt for a less durable polish. |
| Environmental impact | Some floor polishes contain harsh chemicals that can be harmful to the environment. If you’re concerned about the impact your floor polish has on the environment, you may want to look for alternatives that are eco-friendly. |
| Application method | Some floor polishes require special application methods or equipment. Make sure you choose a polish that you feel comfortable applying or be prepared to hire a professional. |
| Desired finish | Different floor polishes create different finishes. For example, a wax floor polish will create a glossy finish while an oil-based floor polish will create a more matte finish. Consider the look you want to achieve before choosing a floor polish. |
| Budget | Of course, cost is always a consideration. Higher-quality floor polishes tend to be more expensive, but they may last longer and require less frequent applications. Consider your budget when choosing a floor polish. |
By considering these factors, you’ll be able to narrow down your options and choose a floor polish that will protect and enhance your floors while also meeting your specific needs. However, it’s important to avoid common mistakes when applying the polish to ensure that you get the best results possible.
Different Types of Floor Polish
When it comes to keeping your floors looking new and shiny, floor polish is an essential tool. However, with so many different types of floor polish available, it can be difficult to know which type to choose for your specific flooring type. From polyurethane to wax to water-based options, each type of floor polish comes with its own unique advantages and disadvantages. In this section, we’ll explore the various types of floor polish available and compare their pros and cons. By the end of this section, you’ll have a better understanding of which type of floor polish will work best for your floors. To learn more about frequently asked questions on floor polish, check out our FAQs on Floor Polish.
Polyurethane Floor Polish
Polyurethane floor polish is a popular option among homeowners and professionals alike, due to its durability and long-lasting finish. It is a synthetic coating made by chemically reacting a polyol with a diisocyanate or a polymeric isocyanate. The resulting compound forms a hard, protective layer on the floor’s surface, which is highly resistant to scratches, scuff marks, and stains.
Benefits of Polyurethane Floor Polish:
- Extremely durable and long-lasting
- Provides excellent protection to the floor surface
- Resistant to scratches, scuff marks, stains, and chemicals
- Forms a high-gloss or satin finish, depending on the desired effect
- Easy to clean and maintain
Factors to Consider When Choosing Polyurethane Floor Polish:
- Indoor or outdoor use: Polyurethane floor polish is suitable for indoor use only, as exposure to UV light can cause it to yellow or degrade over time.
- Application method: Polyurethane floor polish can be applied using a roller or spray gun, depending on the size of the area and the desired finish.
- Drying time: Polyurethane floor polish can take several hours to dry, and up to 24 hours to fully cure.
- Type of flooring: Polyurethane floor polish is ideal for wooden floors, but may not be suitable for other types of flooring, such as concrete or vinyl.
Pros and Cons of Using Polyurethane Floor Polish:
While Polyurethane floor polish has many benefits, it also has some drawbacks to consider before choosing this option.
Pros:
- Durable and long-lasting
- Provides excellent protection to the floor surface
- Easy to clean and maintain
- High-gloss or satin finish
Cons:
- May require professional application
- Can be expensive
- Not suitable for outdoor use or areas with high humidity
- May not be suitable for all flooring types
Polyurethane floor polish is a great option for those looking for a durable, long-lasting finish on their wooden floors. However, it is important to consider factors such as application method, drying time, and the type of flooring before choosing this option. If maintained properly, Polyurethane floor polish can provide a protective layer for many years, making it a worthwhile investment.
Acrylic Floor Polish
Acrylic floor polish is a type of floor polish that is water-based and made up of polymer emulsion. This type of floor polish has gained popularity due to its durability, glossy finish, and easy application process. Another factor that makes it a popular choice is that it dries quickly, making it a convenient option for those who need to polish their floors within a short period of time.
Benefits of Acrylic Floor Polish:
- Provides a glossy finish that enhances the appearance of the floor
- Dries quickly and allows for easy application
- Offers good durability and resistance against scuffs and scratches
- Does not require buffing or continuous maintenance
- Retains its shine for an extended period of time
- Protects the floor from stains, spills, and other debris that might cause damage
Factors to Consider When Choosing Acrylic Floor Polish:
- Indoor or outdoor use: Some acrylic floor polishes are designed for indoor use only and might not be suitable for outdoor flooring.
- Foot traffic: High-traffic areas may require more frequent application of floor polish to maintain a glossy finish.
- Floor type: Acrylic floor polish may not be suitable for all floor types. It is best to consult the manufacturer’s instructions to determine if it is a suitable option.
- Budget: Acrylic floor polish is available at different price points, and they vary in quality and durability. Choose a brand that fits your budget while also delivering the desired level of quality.
Pros:
- Dries quickly, making it a convenient option for busy areas
- Offers a glossy finish that is visually appealing and enhances the floor’s appearance
- Provides durable protection against scratches and scuffs
- Does not require special maintenance processes like buffing
Cons:
- May not be suitable for all types of flooring
- May require more frequent application in high-traffic areas
Acrylic floor polish is an excellent choice for those who want to protect their floors and enhance their appearance. It is a durable and easy-to-use option that provides a glossy finish. However, it is important to consider factors such as floor type, foot traffic, and budget before choosing a brand. Regular cleaning is also important to maintain the polish’s effectiveness. For tips and information on cleaning floors after polishing, click here. To learn more about the differences between floor polish and wax, click here. To see our top picks for the best floor polish brands and their features, click here. For more information on how floor polish protects your floors, click here.
Epoxy Floor Polish
Epoxy floor polish is a popular choice for industrial and commercial settings due to its durability and resistance to heavy traffic, chemicals, and moisture. Here are some characteristics and benefits of this type of floor polish:
- High adhesion: Epoxy floor polish bonds well to concrete and other surfaces, creating a strong and permanent coating. This makes it ideal for facilities that require heavy machinery or equipment, such as factories or warehouses.
- Long-lasting: Epoxy floor polish can last for years without fading or showing signs of wear and tear, even in high-traffic areas. This makes it a cost-effective choice for businesses that want to minimize maintenance and replacement costs.
- Chemical resistance: Epoxy floor polish is highly resistant to chemicals, making it a great choice for facilities that handle hazardous materials or where spills are common, like laboratories or clinics.
- Moisture resistance: Epoxy floor polish is also resistant to moisture and water damage, making it ideal for facilities with high humidity or exposure to water, like hospitals or food processing plants.
- Customizable: Epoxy floor polish can be customized with different colors, patterns, and textures to fit the design and functional needs of a facility. This can create a professional and attractive look for commercial settings, like office buildings or hotels.
Keep in mind that while epoxy floor polish is a great choice for certain settings, it may not be suitable for every type of floor or surface. Be sure to consult with a professional before choosing any type of floor polish, and follow proper preparation and application techniques for the best results.
Wax Floor Polish
Wax floor polish is a classic and well-known option for polishing floors. It is made from natural waxes such as beeswax or carnauba wax, and it provides a protective layer that can enhance the natural beauty of the flooring.
Benefits:
- Provides a natural, warm shine to the floor.
- Can fill in small scratches and imperfections in the floor surface.
- Easy to apply and buff.
- Can be buffed to a high gloss or a low sheen depending on preference.
Factors to consider:
- Wax polish requires frequent reapplication, usually every six months to a year.
- Not as durable as other types of floor polish. Heavy foot traffic can wear down the wax layer quickly.
- Wax polish is not recommended for floors that are exposed to moisture, as it can leave water marks and become slippery.
How to apply:
- Thoroughly clean the floor and let it dry completely.
- Apply a thin layer of wax polish with a clean cloth or mop, working in small sections.
- Let the wax dry according to the manufacturer’s instructions.
- Buff the floor with a clean, dry cloth or a floor buffer to achieve desired shine.
Maintenance:
- Sweep or vacuum regularly to remove dirt and dust.
- Spot clean spills immediately to prevent stains.
- Reapply wax polish every six months to a year, or when the shine begins to dull.
Wax floor polish can be a great option for homeowners who want a natural-looking shine on their flooring. However, it is important to consider the maintenance requirements and durability before choosing this option.
Oil-based Floor Polish
Oil-based floor polish is another popular option. This type of floor polish is made from a mixture of various oils, such as linseed oil, tung oil, and mineral oil, and is usually solvent-based. It creates a thick and durable layer on top of the floor, providing excellent protection.
Pros:
| Benefits | Explanation |
| Good protection | The thick layer formed by oil-based polish provides good protection against scratches, stains and most chemicals. |
| Easy to apply | Oil-based polish is relatively easy to apply and can be done with a brush or a mop. |
| Long-lasting | The durability of oil-based floor polish ensures that it lasts much longer than other types of floor polish before needing to be reapplied. |
| Deep shine | Oil-based polish creates a deep, rich shine that can enhance the natural beauty of hardwood and other types of flooring. |
Cons:
| Drawbacks | Explanation |
| Long drying time | Oil-based floor polish can take a long time to dry, which can be frustrating if you need to use the floor soon after applying it. |
| Strong odor | Oil-based polish has a strong odor that can linger for a while after application, and may be bothersome to those with sensitivities. |
| Can yellow over time | Over time, oil-based polish may begin to yellow, especially if exposed to direct sunlight. |
| Difficult to remove | If you need to remove oil-based floor polish, it can be quite difficult, and may require the use of strong chemicals or a professional stripping service. |
Oil-based floor polish is a great option for those looking for a durable, long-lasting finish with a deep shine. However, it may not be the best choice for those with sensitive noses or those concerned about yellowing over time.
Water-based Floor Polish
Water-based floor polish is a popular choice among homeowners and businesses for its eco-friendly properties and ease of use. This type of floor polish is made of a water-based formula and typically contains little to no volatile organic compounds (VOCs), making it a safe and environmentally-friendly option. Here are some key features of water-based floor polish:
| Advantages | Disadvantages |
| – Dries clear, without yellowing the floor |
– May require more frequent application than oil-based polishes |
| – Low VOCs, eco-friendly |
– May not be as durable as oil-based or wax polishes |
| – Quick drying time |
– May not provide the same shine as oil-based or wax polishes |
| – Less odor than other types of floor polish |
– May be more expensive than other types of floor polish |
Water-based floor polish is a great option for those looking for an eco-friendly and low VOC solution for maintaining their floors. However, it may require more frequent application and may not provide the same level of durability or shine as oil-based or wax polishes. It is also important to note that water-based polishes may be more expensive than other types of floor polish.
Comparing Floor Polish Types: Pros and Cons
When it comes to choosing a floor polish, understanding the different types available is important for making an informed decision. Each type has its own unique set of advantages and disadvantages that should be carefully considered.
Polyurethane Floor Polish: One of the most popular types of floor polish is polyurethane, which offers high levels of durability and protection. It dries quickly and is resistant to scratches and stains, making it ideal for high-traffic areas. However, it can be difficult to apply and requires proper ventilation during application due to its strong odor.
Acrylic Floor Polish: Acrylic polish is also popular due to its high gloss finish and ease of application. It’s less expensive than other types of floor polish and can be applied in thin layers for a more natural look. However, it’s not as durable as polyurethane and may need to be reapplied more often.
Epoxy Floor Polish: Epoxy is a highly durable floor polish that’s commonly used in industrial settings. It can withstand heavy foot and vehicle traffic and is resistant to chemicals and moisture. However, it can be difficult to apply and may require the use of a professional.
Wax Floor Polish: Wax is a traditional and cost-effective option for polishing floors, but it requires more maintenance than other types. It can be easily scratched and may require regular stripping and recoating. Wax is also not moisture-resistant and may become discolored over time.
Oil-based Floor Polish: Oil-based polish provides a warm, natural appearance to floors and is easy to apply. It’s also highly durable and provides protection against scratches and stains. However, it takes longer to dry and has a strong odor, requiring proper ventilation during application.
Water-based Floor Polish: Water-based polish is environmentally-friendly and has a low VOC content. It dries quickly and provides high levels of durability and resistance to scratches and stains. However, it can be difficult to apply evenly, and may require multiple coats.
It’s important to carefully consider the pros and cons of each type of floor polish before making a decision. Factors to consider include the durability, cost, ease of application, and maintenance requirements of each type.
Choosing the Right Floor Polish for Your Floor Type
When it comes to choosing the right floor polish for your floor type, there are several factors to consider. With so many different types of floor polish available, selecting the best one can be a daunting task. Not all floor polishes are created equal, and choosing the wrong one could lead to damage, discoloration, or an uneven finish. It’s important to carefully evaluate your floor type and its specific needs before making a decision. In this section, we’ll discuss the best floor polish options for various floor types and offer tips for selecting the right one to ensure a long-lasting and beautiful finish.
Hardwood Floors
When it comes to hardwood floors, the type of floor polish you choose can make a big difference in the durability and appearance of your flooring. Polyurethane and acrylic floor polishes are two popular choices for hardwood floors. Polyurethane is a durable, long-lasting option that offers a high level of protection against scratches and scuffs. Acrylic is a good choice for those who want a lower-maintenance option that still provides some protection.
Factors to Consider
There are several factors to consider when choosing a floor polish for hardwood floors:
| Factor | Description |
|---|---|
| Level of Traffic | The amount of foot traffic in the room can affect the type of polish you choose. |
| Color | The color of your hardwood floors can help determine the color of the polish you choose. |
| Type of Hardwood | The type of hardwood you have can impact the type of polish you need. |
| Prior Treatment | If your floors have been treated with a certain type of finish previously, it may influence the type of polish you use. |
Application
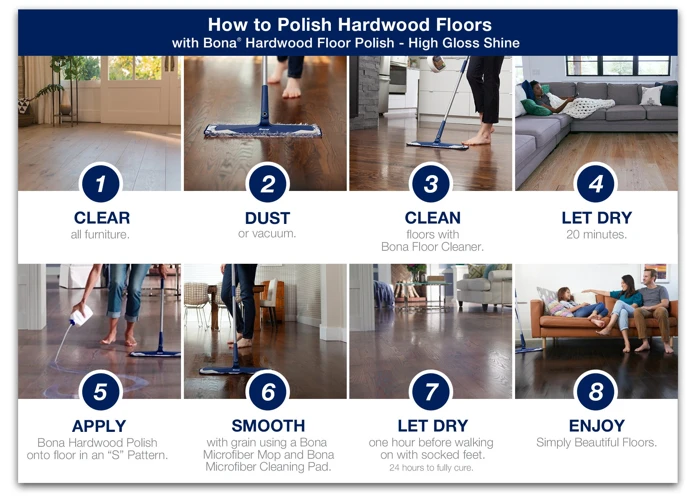
When applying floor polish to hardwood floors, it’s important to follow the manufacturer’s instructions carefully. Clean the floors thoroughly beforehand and make sure they are completely dry before applying the polish. Use a clean, dry mop or applicator pad to apply the polish in thin, even coats. Allow each coat to dry completely before applying the next.
Maintenance
To maintain the appearance of your hardwood floors, regular cleaning is important. Be sure to sweep or vacuum regularly, as dirt and debris can scratch the surface of the polish. Use a damp mop to clean the floors, being careful not to get them too wet. For regular touch-ups, use a microfiber mop or cloth and a small amount of floor polish.
Avoid these common mistakes: using too much polish, not allowing enough drying time between coats, and using the wrong type of polish for your floors. By taking the time to choose the right polish and maintain it properly, you can keep your hardwood floors looking beautiful for years to come.
Tiled Floors
Tiled Floors: Tiled floors are a popular flooring choice in many homes and businesses. They are durable, easy to maintain, and water-resistant. However, choosing the right floor polish for a tiled floor can be a bit tricky. Here are some factors to consider and types of floor polish to use:
| Factors to Consider | Types of Floor Polish |
|---|---|
| The type of tiles | Acrylic, Water-based |
| The level of foot traffic | Polyurethane, Epoxy |
| The desired shine | Wax |
| The presence of stains or etches on the tiles | Oil-based |
Acrylic and water-based floor polish are both great options for tiled floors. They are easy to apply, quick-drying, and offer good protection against scratches and stains. If your tiled floor is in an area with high foot traffic, **polyurethane and epoxy floor polish** are better choices. They are thicker and provide more protection against wear and tear. If you want to enhance the shine on your tiled floor, you can consider using a **wax floor polish**. However, wax may need to be reapplied more frequently than other types of floor polish.
Oil-based floor polish can be used on tiled floors that have stains or etches. This type of floor polish can help to mask the imperfections on the tiles and restore their original appearance. However, be sure to clean the tiles thoroughly before applying an oil-based floor polish to ensure that the surface is free from dirt and debris.
When applying floor polish to a tiled floor, it is best to avoid using too much product in one area. This can cause the polish to build up and create a sticky residue. Instead, apply the polish in thin, even layers using a mop or sponge. Allow each layer to dry completely before applying the next.
To maintain the floor polish on your tiled floor, it is important to sweep or vacuum regularly to remove dirt and debris. Spot clean any spills or stains as soon as possible to prevent them from becoming permanent. Touch-up the polish as needed and reapply it when it begins to wear off.
By considering the factors listed above and choosing the right type of floor polish, you can help to maintain the beauty and durability of your tiled floor for years to come.
Stone Floors
Stone floors are a popular choice in many homes and commercial buildings due to their durability and elegance. However, choosing the right floor polish for your stone floors can be a bit confusing. Here are some tips on the different types of floor polish that work best on different types of stone floors:
| Type of Stone | Recommended Floor Polish |
|---|---|
| Marble | Acrylic floor polish or water-based floor polish |
| Granite | Water-based floor polish |
| Slate | Water-based floor polish or oil-based floor polish |
| Travertine | Water-based floor polish |
When polishing stone floors, it is important to choose a floor polish that will not damage the stone or create a buildup on the surface. Acrylic and water-based floor polishes are generally safe for most types of stone floors, as they do not contain harsh chemicals or solvents that could cause damage.
Before applying any floor polish on your stone floors, it is important to properly clean and prepare the surface. Use a pH-neutral stone cleaner and a soft brush or mop to remove any dirt and debris from the floor. Rinse the floor thoroughly with clean water and allow it to dry completely before applying any polish.
It is also important to read the manufacturer’s instructions carefully before applying the floor polish. Some types of polishes may require multiple coats, while others may require a certain drying time before the floor can be used again.
Regular maintenance, such as sweeping or vacuuming the floor to remove dirt and debris, can help extend the life of the floor polish. Touch-ups and reapplication of the floor polish may be necessary over time to keep the floor looking its best.
By choosing the right floor polish for your stone floors and properly maintaining it, you can help ensure that your floors retain their beauty and durability for years to come.
Laminate Floors
Laminate floors are a popular choice due to their durability and affordability. However, using the wrong floor polish can damage the floor or leave it looking dull. When choosing a floor polish for laminate floors, it’s important to consider the specific needs of this type of flooring. Here are some tips for choosing the right floor polish for your laminate floors:
- Type: Choose a water-based floor polish for laminate floors. Oil-based, wax, or solvent-based polishes can damage the floor and cause it to become slippery.
- Sheen: Laminate floors typically have a matte or satin finish, so choose a low sheen or matte floor polish to maintain the natural look of the floor. Avoid high-gloss polishes, as they can make the floor look artificial or plastic-like.
- Brand: Stick to a reputable brand that is known for producing high-quality, specifically-formulated products for laminate floors. Don’t choose a generic or multi-purpose floor polish, as it may not be suitable for laminate floors.
Once you have chosen the right floor polish for your laminate floor, it’s important to properly apply and maintain it. Here are some steps to follow:
- Cleaning: Before applying the floor polish, clean the floor thoroughly to remove any dirt, dust, or debris. Use a soft-bristled brush or vacuum cleaner to ensure that the floor is completely clean.
- Preparing: Before applying the polish, ensure that the floor is completely dry. Avoid using any water or liquid to clean the floor, as moisture can damage the laminate material.
- Applying: Apply the floor polish evenly, using a clean microfiber mop or applicator. Avoid applying too much polish or leaving any streaks or bubbles on the floor.
- Drying and Curing: Allow the polish to dry and cure completely before walking on the floor or moving any furniture on it. Follow the manufacturer’s instructions for drying time and curing.
To maintain the floor polish on your laminate floors, follow these tips:
- Regular Cleaning: Clean the floor regularly using a soft-bristled brush or vacuum cleaner. Avoid using harsh chemicals, abrasive cleaners, or wax-based cleaners.
- Polish Touch-ups: If the floor polish starts to look dull or worn, apply a light touch-up coat to restore the shine.
- Reapplication: Depending on the type and brand of the floor polish, it may need to be reapplied every 6 to 12 months. Follow the manufacturer’s instructions for reapplication.
- Troubleshooting: If you experience any issues with the floor polish, such as streaks, bubbles, or discoloration, consult the manufacturer’s instructions for troubleshooting tips or contact a professional cleaner.
By following these tips for choosing and maintaining the right floor polish for your laminate floors, you can keep your floors looking shiny and new for years to come.
Vinyl Floors
Vinyl floors are a popular choice for their durability and affordability. They are versatile, easy to maintain, and come in a wide range of designs, including wood and stone looks. When it comes to choosing the right floor polish for your vinyl floors, there are a few things to consider.
Type of Floor Polish:
One of the most suitable types of floor polish for vinyl floors is the water-based floor polish. This type of polish is easy to apply and dries quickly, without leaving a residue. It also offers a high level of protection and durability to the vinyl surface.
Cleaning and Prepping:
Before applying any floor polish, it’s essential to clean the floor thoroughly. Sweep or vacuum up any dirt or debris, and then mop the floor with a mild detergent and warm water. Rinse thoroughly and allow the floor to dry completely. If there are any stains or marks on the floor, remove them before polishing.
Application:
When applying the floor polish, make sure to follow the manufacturer’s instructions carefully. Use a clean and dry mop, and apply the polish in thin, even coats. Avoid over-applying or using too much polish, as this can leave streaks or a cloudy finish. Allow each coat of polish to dry completely before applying the next.
Maintenance:
To maintain the finish of the vinyl floor, it is essential to keep it clean and free of dirt and debris. Sweep or vacuum the floor on a regular basis, and mop with a mild detergent and warm water as needed. Avoid using strong chemicals or abrasive cleaning tools, as these can damage the floor’s surface.
Troubleshooting:
If you encounter any issues with the floor polish, such as streaking or flaking, it may be due to over-application or not allowing the floor polish to dry completely. In such cases, remove the existing polish with a floor stripper, and start the process again, ensuring to follow the manufacturer’s instructions carefully.
For your vinyl floors, choose a water-based floor polish and ensure to clean and prep the floor thoroughly before application. Apply thin and even coats, allowing each coat to dry before the next. Finally, maintain the floor by keeping it clean and avoiding harsh chemicals or abrasive cleaning tools.
Concrete Floors
When it comes to concrete floors, a durable and long-lasting floor polish is essential. There are several types of floor polish that are suitable for concrete floors, including:
- Water-based floor polish
- Epoxy floor polish
- Polyurethane floor polish
- Acrylic floor polish
Each type of floor polish has its own set of pros and cons, so it’s important to consider the specific needs and usage of your concrete floors when choosing a floor polish.
Water-based floor polish is a good choice for high-traffic areas because it dries quickly and is resistant to scuff marks. It’s also a more environmentally friendly option compared to some other types of floor polish.
Epoxy floor polish is another durable option that is often used in industrial settings because of its resistance to chemicals and moisture. However, it can be difficult to apply, so it’s important to hire a professional.
Polyurethane floor polish is a popular choice because of its high levels of durability and shine . However, it can be more expensive compared to other types of floor polish.
Acrylic floor polish is a budget-friendly option that can be easily applied by DIYers. However, it may not be as durable and long-lasting compared to other types of floor polish.
Regardless of the type of floor polish chosen, maintaining the polish on concrete floors requires regular cleaning and touch-ups. It’s also important to avoid using abrasive cleaning products that can damage the polish.
If there are any issues with the floor polish, such as peeling or fading, it’s important to address them quickly to avoid further damage to the underlying concrete.
When choosing a floor polish for concrete floors, it’s essential to consider the specific needs of the space and to properly maintain the polish to ensure a long-lasting and beautiful finish.
Carpeted Floors
When it comes to carpeted floors, selecting the right type of floor polish is unnecessary since the polish is meant for hard floors. Instead, the focus should be on regular cleaning and maintenance to keep the carpet looking its best. Below are some tips to consider:
- Vacuuming: Regular vacuuming is crucial to maintain the cleanliness of the carpet. Dirt and dust can quickly accumulate on the carpet, making it look dingy and dull.
- Spot cleaning: Address spills and stains as soon as possible to prevent them from setting in. Blot the spill with a clean cloth or paper towel, and avoid rubbing or scrubbing to prevent damage to the carpet fibers.
- Deep cleaning: Over time, carpets can accumulate dirt, dust, and other debris that a regular vacuum cannot remove. Consider hiring a professional carpet cleaner to deep clean the carpet on a regular basis.
- Protective treatments: Some carpet manufacturers offer protective treatments that can help repel stains and spills. It’s important to check with the manufacturer’s guidelines before applying any type of treatment.
By regularly maintaining and cleaning your carpet, you can prolong its lifespan and keep it looking fresh and new.
How to Apply Floor Polish
You’ve chosen the perfect floor polish for your specific type of flooring. Now what? Applying floor polish may seem like a daunting task, but it doesn’t have to be. With the right tools and technique, you can achieve a shiny, protected surface in no time. In this section, we’ll guide you through the step-by-step process of applying floor polish, from cleaning and preparing the floor to the actual application and drying/curing process. By the end, you’ll feel confident in your ability to maintain and protect your floors for years to come.
Cleaning the Floor
Before applying floor polish, it’s essential to clean the floor thoroughly to avoid any dirt or debris getting sealed into the surface. Here are some steps to follow for cleaning different floor types:
| Floor Type | Cleaning Steps |
|---|---|
| Hardwood Floors | Remove any loose dirt or debris using a broom, vacuum or dust mop. Avoid using excessive water, which can damage the wood. Use a hardwood floor cleaner according to the manufacturer’s instructions. |
| Tiled Floors | Sweep or vacuum the floor to remove any dirt or debris. Use a tile cleaner and warm water to scrub the surface. Use a grout brush for any stubborn stains in between tiles. |
| Stone Floors | Sweep or vacuum the floor to remove any dirt or debris. Use a stone cleaner and warm water to mop the surface. Avoid using acidic cleaners that can etch or damage the stone. |
| Laminate Floors | Sweep or vacuum the floor to remove any dirt or debris. Use a laminate floor cleaner and warm water to mop the surface. Avoid using excessive water, which can cause the laminate to warp. |
| Vinyl Floors | Sweep or vacuum the floor to remove any dirt or debris. Use a vinyl floor cleaner and warm water to mop the surface. Avoid using abrasive cleaners that can scratch the surface. |
| Concrete Floors | Sweep or vacuum the floor to remove any dirt or debris. Use a concrete cleaner and warm water to scrub the surface. Use a stiff bristled brush or floor scrubber for any tough stains. |
| Carpeted Floors | Vacuum the carpet thoroughly, focusing on high-traffic areas. Use a carpet cleaner according to the manufacturer’s instructions to remove any stains or marks on the carpet. |
Remember to allow enough time for the floor to dry completely before applying any floor polish. Proper cleaning ensures a smooth, even application of the polish, and helps keep your floors looking their best.
Preparing the Floor
Before applying floor polish, it is important to properly prepare your floors. This will ensure that the polish adheres well and lasts longer. The preparation process will vary depending on the type of flooring you have.
Hardwood Floors: First, thoroughly clean the floors to remove any dirt and debris. Next, inspect the floor for any scratches or dents, and use a wood filler to repair any imperfections. Sand the floors to remove any remaining residue and create a smooth surface.
Tiled Floors: Clean the tiles with a damp mop and mild soap or tile cleaner. Any stubborn stains or grime can be removed with a scrub brush. If the grout between the tiles is discolored, use a grout cleaner to brighten it. Once the tiles are clean and dry, apply a tile primer to help the polish adhere better.
Stone Floors: Sweep and vacuum the floors to remove dirt and dust. Use a stone cleaner and warm water to mop the floors, then rinse with clean water. Allow the floors to dry completely before applying polish.
Laminate Floors: Sweep or vacuum the floors to remove any debris. Do not saturate the laminate floors with water, as this can cause damage. Instead, use a laminate cleaner to wipe down the surface, and then dry it with a clean cloth.
Vinyl Floors: Sweep and mop the floors with a mild cleaner to remove dirt and stains. Rinse the floors with clean water, and allow them to dry completely.
Concrete Floors: Sweep or vacuum the floor to remove any dirt or dust. If the floors have any stains or marks, use a concrete cleaner to remove them. Once the floors are clean, rinse with clean water and allow them to dry before applying polish.
Carpeted Floors: Vacuum the carpet thoroughly to remove all debris and dirt. If there are any stains or spots, use a carpet cleaner to remove them before applying polish.
Taking the time to properly prepare your floors before applying polish will not only help the polish adhere better, but will also improve the overall appearance of your floors.
Applying the Floor Polish
Once you have cleaned and prepared your floor, it’s time to apply the floor polish. Follow these steps to ensure a smooth application:
Step 1: Prepare the Polish
Before applying the polish, be sure to read the manufacturer’s instructions carefully and prepare the polish accordingly. Most polishes require mixing or diluting with water or a solvent.
Step 2: Apply the First Coat
Using a clean mop or applicator, apply the first coat of polish to the floor. Be sure to apply an even layer, working your way from one end of the room to the other. Avoid over-applying the polish, as this can lead to streaking or bubbling.
Step 3: Allow to Dry
After applying the first coat, allow the polish to dry completely. The manufacturer’s instructions will indicate how long the drying process will take. During this time, avoid walking on the floor or placing any furniture or objects on it.
Step 4: Apply Additional Coats
Once the first coat is dry, apply additional coats of polish as needed. Depending on the type of polish and the desired shine, you may need to apply two or three coats. Be sure to allow each coat to dry completely before applying the next one.
Step 5: Finish with a Buffing Machine
For an extra smooth finish, use a buffing machine to polish your floor once the final coat of polish has dried. This will help to remove any streaks or bubbles, and give your floor a shiny, professional-looking finish.
Step 6: Allow to Cure
Finally, allow the last coat of polish to cure completely before walking on the floor or replacing any furniture. The curing time will depend on the specific type of polish you used.
Drying and Curing
After applying the floor polish, it is important to allow sufficient time for drying and curing before resuming foot traffic or any other activity on the floor. The drying and curing process can vary depending on the type of floor polish used, as shown in the table below:
| Type of Floor Polish | Drying Time | Curing Time |
|---|---|---|
| Polyurethane Floor Polish | 2-4 hours | 24-48 hours |
| Acrylic Floor Polish | 30 minutes – 2 hours | 24 hours |
| Epoxy Floor Polish | 1-2 hours | 24-72 hours |
| Wax Floor Polish | 30 minutes – 2 hours | 24 hours |
| Oil-based Floor Polish | 2-4 hours | 24-48 hours |
| Water-based Floor Polish | 30 minutes – 2 hours | 24 hours |
Drying time refers to the amount of time it takes for the surface of the floor to feel dry to the touch. However, just because the surface is dry doesn’t mean that the polish beneath it is completely cured. The curing time is the amount of time it takes for the polish to harden and bond completely to the floor, providing the desired protection and shine.
During the drying and curing process, it is important to avoid any foot traffic or activity that may disturb the surface of the floor. This can cause the polish to become uneven and lead to an inferior finish. Additionally, it is important to avoid any moisture or water on the floor during this time, as this can negatively impact the curing process.
By allowing adequate time for drying and curing, you can ensure that your floors look their best and provide the desired protection against wear and tear.
Maintaining the Floor Polish
Now that you have chosen and applied the perfect floor polish for your floor type, it is important to properly maintain it to ensure its longevity and continued shine. Regular maintenance not only avoids the need for costly repairs or replacement but also keeps your floors looking their best. In this section, we will discuss the necessary steps for maintaining your floor polish and troubleshooting common issues that may arise. With proper care and attention, your floors will remain a beautiful and functional aspect of your home or business for years to come.
Regular Cleaning
Regular cleaning is an essential part of maintaining your floors and prolonging the life of the floor polish. Here are some key tips to keep in mind for regular cleaning:
- Vacuum or Sweep: Regularly vacuum or sweep your floors to remove dirt and debris that can scratch the surface.
- Mop: Use a damp mop to clean the floors, ensuring that the mop is well wrung out to prevent excess water from damaging the floor.
- Use the Right Cleaner: When mopping the floors, use a cleaner that is specifically designed for your floor type to prevent any damage to the polish.
- Don’t Use Harsh Chemicals: Avoid using harsh chemicals or abrasive cleaners that can damage the floor and strip away the polish.
- Wipe Up Spills: Quickly wipe up any spills to prevent the liquid from seeping into the floor and damaging the polish.
- Protect High-Traffic Areas: Consider placing rugs or mats in high-traffic areas to protect the floors from excess wear and tear
By regularly cleaning your floors using these tips, you’ll ensure that the floor polish stays intact and maintains its luster for a longer period of time. Just remember to use the right cleaners, avoid harsh chemicals, and protect high-traffic areas to keep your floors looking their best.
Polish Touch-ups
Regular maintenance of floor polish is important to keep the floor looking shiny and new. Sometimes, however, specific areas of the floor may start to look dull or scuffed before the next full application of polish. In such cases, it may be necessary to perform polish touch-ups. Here are the steps to follow:
- Clean the area: Before applying polish, make sure to clean the area thoroughly. Sweep away any dirt, debris, or dust. Use a damp cloth or mop to remove any stains or spills. Allow the area to dry completely.
- Prepare the polish: Check the type of polish that was previously used on the floor. If possible, use the same brand and type of polish. If not, ensure that the new polish is compatible with the existing polish. Mix the polish thoroughly before use.
- Apply the polish: Dip the mop or applicator into the polish and squeeze out any excess. Apply the polish to the area in thin, even coats, using a back-and-forth motion. Allow each coat to dry completely before applying the next. Repeat this process, if necessary, until the desired shine is achieved.
- Let it dry: After applying the polish, let the area dry completely. Avoid walking on the area for at least a couple of hours.
- Buff the area: After the polish has dried, use a buffing machine or a soft cloth to buff the area. This will help to remove any excess polish and give the area a uniform shine.
It is important to note that polish touch-ups should be used sparingly and only when necessary. Overuse of polish can lead to a build-up of residue, which can make the floor slippery and dull over time. If the floor requires frequent touch-ups, it may be time for a full application of polish.
Reapplication of Polish
When it comes to maintaining your floor’s polish, regularly reapplying the floor polish is essential. Over time, foot traffic, spills, and other types of damage can wear away the protective layer of polish on your floors. This can leave your floors vulnerable to scratches, stains, and other types of damage.
To ensure that your floors are always protected, you should consider reapplying the floor polish every few months or as needed based on the amount of traffic in the area. The process for reapplying the floor polish is similar to the initial application process, but it requires specific attention to detail.
Before reapplying the polish, you must first clean your floors thoroughly, removing any dirt, debris, or traces of old polish. You can do this by using a mild cleaner and a soft cleaning cloth or mop. Once the floor is clean and dry, you should inspect it for any signs of damage, such as deep scratches or stains.
If you notice any damage, you should address it before reapplying the polish. This may entail sanding or buffing the damaged areas to ensure that the floor’s surface is smooth and even.
When it comes time to reapply the polish, choose the same type of polish that you used initially. This will help to ensure that the new coat of polish bonds well with the existing layers. Always apply the polish in thin, even coats, using a clean mop or applicator.
| Steps for Reapplying Floor Polish |
|---|
| Clean your floors thoroughly to remove any dirt, debris, or traces of old polish. |
| Inspect the floor for any signs of damage and address them before reapplying polish. |
| Choose the same type of polish that you used initially. |
| Apply the polish in thin, even coats using a clean mop or applicator. |
| Allow each coat to dry completely before applying additional coats. |
| Avoid walking on the floor until the final coat has fully dried and cured (typically 24-48 hours). |
After applying the polish, allow each coat to dry completely before adding additional layers. Avoid walking on the floor until the final coat has fully dried and cured, which typically takes about 24-48 hours. With proper reapplication of floor polish, your floors can continue to look great and remain protected for years to come.
Troubleshooting Common Issues
When it comes to maintaining and caring for your floors, there can be some common issues that may arise with the floor polish. These problems can often be fixed with a little troubleshooting. Here are some common issues and solutions:
| Issue | Solution |
|---|---|
| Bubbling or Blistering | If you notice bubbling or blistering on the surface of your floor after applying the polish, it could be due to trapped moisture or uneven application. To fix this, you can sand down the affected area and reapply the polish, making sure to evenly apply it with a clean and dry applicator. |
| Peeling or Flaking | If you notice the polish starting to peel or flake off, it may be due to too many layers being applied, the floor not being properly cleaned before applying the polish, or using a polish that is not compatible with your floor type. To fix this, strip off the old polish and start again, making sure to properly clean and prep the floor before applying a compatible polish in thin layers. |
| Yellowing or Discoloration | If your floor polish turns yellow or discolored, it may be due to exposure to sunlight, using a polish not suited for your floor type, or applying too many layers. To fix this, strip off the old polish and start again with a suitable polish, making sure to avoid direct sunlight and applying thin layers. |
| Lack of Shine | If your floor isn’t as shiny as you would like it to be, it may be due to the polish being applied too thinly or not enough layers being applied. To fix this, apply an additional layer of polish, making sure to apply it evenly and allowing it to fully dry before adding another layer. |
| Streaking or Uneven Finish | If you notice streaking or an uneven finish on your floor after applying polish, it may be due to dirty applicator or not allowing the polish to fully dry before adding additional layers. To fix this, properly clean the applicator before reapplying the polish and allow ample time for each layer to fully dry before adding another layer. |
By addressing these common issues and taking the necessary steps to fix them, you can ensure your floors look their best and stay protected with a high-quality floor polish.
Conclusion
As we come to the end of our detailed guide on different types of floor polish and which one to use for your floor type, it is crucial to reflect on the significant points covered. Throughout the article, we have explored the benefits of floor polish, factors to consider when choosing a floor polish, and various types of floor polish. Additionally, we have also looked at choosing the appropriate floor polish for different flooring types, application of floor polish, and maintenance. As a result, it is essential to highlight the crucial takeaways and essential tips for selecting and maintaining floor polish moving forward.
Recap of Important Points
After discussing the different types of floor polish and how to choose the right one for your specific floor type, it is important to recap the most important points to remember when it comes to floor polish. Here is a list of key takeaways from this article:
- Choosing the right floor polish is crucial in maintaining the appearance and longevity of your floors. Take into account the material of your floors and the level of foot traffic they experience when selecting a polish type.
- There are various types of floor polish available such as polyurethane, acrylic, epoxy, wax, oil-based, and water-based. Each type has its own set of advantages and disadvantages depending on the floor type and level of traffic.
- Hardwood floors require a specialized type of polish. It is important to use a water-based or oil-based polish that is specifically designed for hardwood floors and avoid using wax-based polishes.
- Tiled, stone, and concrete floors can benefit from epoxy or wax-based polishes. These types of floor polishes offer added protection and shine for these types of surfaces.
- Vinyl and laminate floors require a specific type of polish that is designed for synthetic materials. Water-based polishes are usually recommended for these types of floors as they provide a protective barrier against scratches and stains.
- When applying floor polish, proper cleaning and preparation of the floors is crucial. Make sure to remove any debris and dirt before applying the polish to ensure a smooth and even finish.
- Maintaining floor polish is important in extending the life of the polish and keeping floors looking their best. Regular cleaning and touch-ups can help prevent scratches and wear and tear.
- Common issues with floor polish include streaking, tackiness, and flaking. If experiencing any of these issues, refer to the troubleshooting section of this article for solutions.
By keeping these important points in mind, you will be better equipped to choose the right type of floor polish for your specific floors and ensure they look their best for years to come.
Tips for Choosing and Maintaining Floor Polish
When it comes to choosing and maintaining the right floor polish, there are some tips you should keep in mind. Here are a few:
- Consider the type of flooring: The type of floor polish you choose should be based on the type of flooring you have. For example, a polyurethane floor polish may not be suitable for a waxed floor.
- Read reviews: Before choosing a floor polish, be sure to read reviews from other customers who have used the product. This will give you a better idea of how effective the product is and whether or not it’s worth the investment.
- Clean and prepare the floor: Before applying floor polish, it’s important to clean and prepare the floor properly. This means removing any dirt, debris, or old polish that may be on the floor.
- Apply polish in thin layers: When applying floor polish, it’s important to do so in thin layers. This will help ensure that the polish dries evenly and doesn’t clump or bubble.
- Use a microfiber mop: When cleaning and maintaining polished floors, it’s best to use a microfiber mop. This will help prevent any scratches or damage to the polished surface.
- Regularly clean and maintain: To keep your polished floors looking their best, it’s important to regularly clean and maintain them. This may include daily sweeping, weekly mopping, and touch-up polishing as needed.
- Don’t overuse polish: Overusing floor polish can actually do more harm than good. Too much polish can lead to a buildup of product, making the surface of the floor slippery and difficult to clean.
- Store polish properly: When not in use, be sure to store your floor polish properly. This may mean keeping it in a cool, dry place, away from direct sunlight and extreme temperatures.
By following these tips, you can choose and maintain the right floor polish for your flooring type and keep your floors looking their best for years to come.
Final Thoughts
As you can see, there are many types of floor polish available, and each one has its own set of pros and cons. When choosing the right type of floor polish for your specific needs, it’s important to consider the type of flooring you have, your budget, and your personal preferences. Remember that different types of floor polish have different levels of durability, shine, and slip resistance, so be sure to choose the one that meets your specific requirements.
Once you’ve applied your floor polish, it’s important to maintain it by regularly cleaning the floors and touch-up the polish as needed. Additionally, you should be prepared to reapply the polish as necessary to keep your floors looking their best.
Floor polish can provide many benefits, including extending the life of your floors, improving their appearance, and making them easier to clean. With a little bit of research and the right tools and expertise, anyone can achieve a beautiful, long-lasting finish on their floors. So don’t wait – take the first step and start exploring your options for floor polish today!
Frequently Asked Questions
What is the difference between wax and polyurethane floor polish?
Wax floor polish provides a softer and more natural finish, while polyurethane floor polish gives a harder and more durable finish.
Can all types of floor polish be used on hardwood floors?
No, wax floor polish is not recommended for hardwood floors as it can damage the wood. Water-based or oil-based polyurethane floor polish is typically used for hardwood floors.
Is acrylic floor polish suitable for high-traffic areas?
Acrylic floor polish is not as durable as other types of floor polish, so it may not be the best choice for high-traffic areas. Epoxy or water-based polyurethane floor polish would be more suitable.
Can floor polish be used on tiles?
Yes, there are certain types of floor polish that are suitable for use on tiles, such as acrylic, epoxy, and wax-based floor polish.
Can oil-based floor polish be used on concrete floors?
Yes, oil-based floor polish can be used on concrete floors. However, water-based polyurethane floor polish is a more popular choice for concrete floors as it provides better durability and protection.
How long does it take for floor polish to dry?
The drying time for floor polish varies depending on the type of polish and the environmental conditions. However, it typically takes anywhere from a few hours to a full day for floor polish to completely dry and cure.
Do I need to use a special brush to apply floor polish?
No, you can apply floor polish using a mop or a microfiber applicator. However, it’s important to use a clean and dry applicator to avoid streaks or bubbles in the polish.
Can floor polish be removed if I am not satisfied with the finish?
Yes, most types of floor polish can be removed using a stripping solution. However, it’s important to carefully follow the manufacturer’s instructions to avoid damaging the floor.
How often should I reapply floor polish?
The frequency of reapplying floor polish depends on the type of polish and the amount of foot traffic on the floor. Generally, it’s recommended to reapply the polish every 6-12 months.
Is it necessary to polish carpeted floors?
No, floor polish should not be used on carpeted floors. Instead, regular vacuuming and deep cleaning are recommended to maintain the appearance and condition of the carpet.