
Foil glue is a great way to create a strong, durable bond between two surfaces. Using it is easy and simple, and the materials needed are easy to find. To use foil glue, first cut off a small piece of the glue. Then, apply the glue to one of the surfaces to be bonded. Make sure that the glue is applied evenly and thinly.
Once the glue is applied to one surface, you can then place the other surface on top of it. Gently press down on the surfaces, making sure that they are firmly bonded. Now leave the two surfaces to cure for the recommended time. Depending on the type of glue you are using, this can take anywhere from an hour to up to 3 days. Once the glue has cured, you will have a strong bond between the two surfaces. Foil glue is a great way to bond two surfaces quickly and effectively, and can be used in a variety of projects.
What can i use instead of nail foil glue
If you’re looking for an alternative to nail foil glue, there are several options to consider. One option is to use nail art strips. These strips are made from a flexible, adhesive material and can be applied over the nail as a full wrap or as a single accent nail. You may need to trim them to fit, but they will stay in place without the need for additional adhesive. Another option is to use nail glue.
This is applied directly to the nail and acts as an adhesive for the nail foil. Nail glue can be bought from most beauty stores and lasts for several days. You can also consider using double-sided tape. This is applied to the nail and then covered in the foil. This will provide a strong adhesive and help keep the foil in place. If you don’t want to use any adhesive at all, you could use nail polish as a substitute. Apply the nail polish to the nail and then place the foil on top. This will help the foil stick to the nail, and the nail polish will act as a seal. Finally, you could use a top coat to help seal the foil. Apply a top coat to the nail after the foil is applied, and it will help the foil last longer. This is a great option if you’re looking for a more long-term solution.
What can I use instead of nail glue?
It can be used for a variety of craft and DIY projects, and it is much easier to use than nail glue. With foil glue, all you need to do is apply a thin layer of the adhesive to the back of the foil, and then press it onto the surface you are attaching it to. The glue will then bond the foil to the surface. Foil glue is available in a range of different forms, including liquid, spray, and foam. For most applications, liquid foil glue is the best choice.
It is easy to apply and can be used on a variety of materials, including paper, glass, plastic, and metal. Another great alternative to nail glue is a glue gun. Glue guns are easy to use and can be used for a wide range of craft and DIY projects. They are also relatively inexpensive and can last for many years with proper care and maintenance. If you don’t want to use either nail glue or foil glue, there are other options as well. You can use double-sided tape, hot glue, or rubber cement for many projects. These adhesives are all easy to use and are great for bonding a variety of materials. In summary, there are several alternatives to nail glue, such as foil glue, glue guns, double-sided tape, hot glue, and rubber cement. All of these options can be used for a variety of craft and DIY projects, and they are all relatively easy to use.
What is the difference between nail glue and super glue?
Nail glue and super glue differ in terms of their intended use. Nail glue is designed specifically to bond nail tips to natural nails, while super glue is designed to bond many materials together. When using foil glue, it is important to use the right glue for the right job. When using foil glue, it is best to start with nail glue because it is specifically designed to hold artificial nails in place. Super glue should be used only if nail glue is not available.
While super glue may work in a pinch, it is not designed to bond nails together and could cause damage over time. It is important to note that while super glue and nail glue are similar in some respects, they are not interchangeable. Super glue is not the same as nail glue and should only be used if nail glue is unavailable. When using foil glue, it is also important to make sure the surface you are applying it to is clean and free of any dirt, dust, or debris. If there is debris on the surface, the glue may not adhere properly and you could end up with a faulty bond. Finally, it is important to remember that nail glue and super glue have different drying times. Nail glue will typically dry within minutes, while super glue may take several hours. To ensure the best results, be sure to pay attention to the drying times of the glue you are using, and apply it accordingly.
What is the best glue for fake nails?
To apply the glue, you will need a small brush, nail glue, and a small bowl for mixing the glue. First, mix the glue with a few drops of water in the bowl to create a thin paste. Make sure to mix the solution thoroughly. Once the paste is ready, apply a thin layer to the false nails and stick them to the real nails. After applying the glue, wait a few minutes for it to dry and become tacky.
Then press the false nails firmly against the real nails to ensure a strong bond. The glue should dry completely within a few hours. Foil glue is one of the best glues to use when applying fake nails. It is easy to apply, dries quickly, and most importantly, it provides a strong bond and won’t break or chip when you move the nails. With proper application, the fake nails should last for several days or weeks.
Does nail glue damage natural nails?
Generally, nail glue does not cause any permanent damage to your natural nails. However, improper use of nail glue could lead to damage if you’re not careful. When using foil glue, it is important to make sure you are using the proper amount on each nail. Too much glue can cause your nails to stick together and make them difficult to separate. In addition, using too much glue can cause your nails to become brittle, leading to breakage and damage.
It is always best to use the right amount of nail glue and to be mindful of how much you are applying. Additionally, it is important to keep your nails clean and hydrated. This will help reduce the chance of damage caused by the glue. Lastly, it is important to use a quality nail glue that is designed specifically for foil wrapping. This will help ensure your nails stay in good condition and prevent them from being damaged by the glue. By following these guidelines, you can ensure that your natural nails stay healthy and free from damage caused by nail glue. With proper use and care, nail glue can be a great way to create beautiful nail art without any fear of damage to your nails.
How to apply nail foils without glue
Using foil glue to apply nail foils is easy and mess-free! All you need is a bottle of foil glue, a pair of tweezers, a pair of scissors, and the nail foil that you wish to use.
- First, cut the nail foil into small pieces.
- Make sure the pieces are small enough to fit the size of your nails.
- Next, use the tweezers to pick up the nail foil pieces and place them on your nails.
- Then, take your bottle of foil glue and apply it to the nail foil pieces.
- Make sure to cover the entire surface of the nail with the glue so that the foil will stick to the surface of your nails.
- Finally, let the glue and foil pieces dry for a couple of minutes and enjoy your brand new manicure.
- With this simple method, you can easily apply nail foils without having to use any glue.
How to remove gel nails at home without foil?
Removing gel nails at home without foil can be tricky, but with a little bit of know-how, you can do it! First, you need to get a few supplies: an electric file, foil glue, and some remover. Start by filing the top of the nail down to the desired length. Make sure not to file too much or you could damage your nail. Next, apply a generous layer of foil glue to the top of the nail. Allow the glue to dry for a few minutes to ensure it is secure.
Finally, use a remover to gently lift the nail from the nail bed. Once the nail is off, you can use a cotton ball with some remover to clean up the remaining residue. With some patience, you can easily remove your gel nails without foil!
What is the best professional nail glue?
It is also ideal for a variety of craft projects and can be used to attach rhinestones, gems, and other small decorations. To use foil glue, first roughen the surface of your artificial nail. This will help the glue to attach properly to the nail. Then, apply a small amount of foil glue to the underside of the foil. Place the foil onto the nail and press down firmly.
Wait a few moments for the glue to dry and harden. To ensure a secure bond between the foil and the nail, you should apply two thin layers of foil glue. The first layer should be allowed to dry before applying the second layer. Be sure to use a thin layer of glue each time, as too much glue can cause the foil to wrinkle. For best results, always use a professional nail glue designed specifically for use with foil glue. This type of glue is stronger than regular glue and can prevent the foil from peeling or bubbling. You can also use a professional glue remover to easily remove the foil from your nails when you are ready to change your design. Overall, the best professional nail glue for using foil glue is a strong and fast drying adhesive. By using a quality glue, you can ensure a secure bond between the foil and your nails. This will create beautiful, long-lasting nail art designs.
Can you use any glue for fake nails?
It is important to note that not all glues can be used for fake nails. To ensure the best results, it is recommended to only use foil glue for attaching fake nails. Using foil glue is simple. First, you will need to measure the fake nails to the size of your natural nails. Then, you will need to apply the foil glue to the fake nails.
Once the glue has dried, you can then press the nails onto your natural nails. Finally, you will need to hold the fake nails in place for a few seconds to ensure that the glue is properly adhered to your natural nails. Make sure to remain still while the glue sets, and to use a light dusting of powder to fill any gaps or uneven surfaces. Foil glue is a great way to ensure that your fake nails will stay in place and look professional. It is important to use the right type of glue for the job, so make sure to only use foil glue when applying fake nails. This will ensure that your nails look nice and last longer.
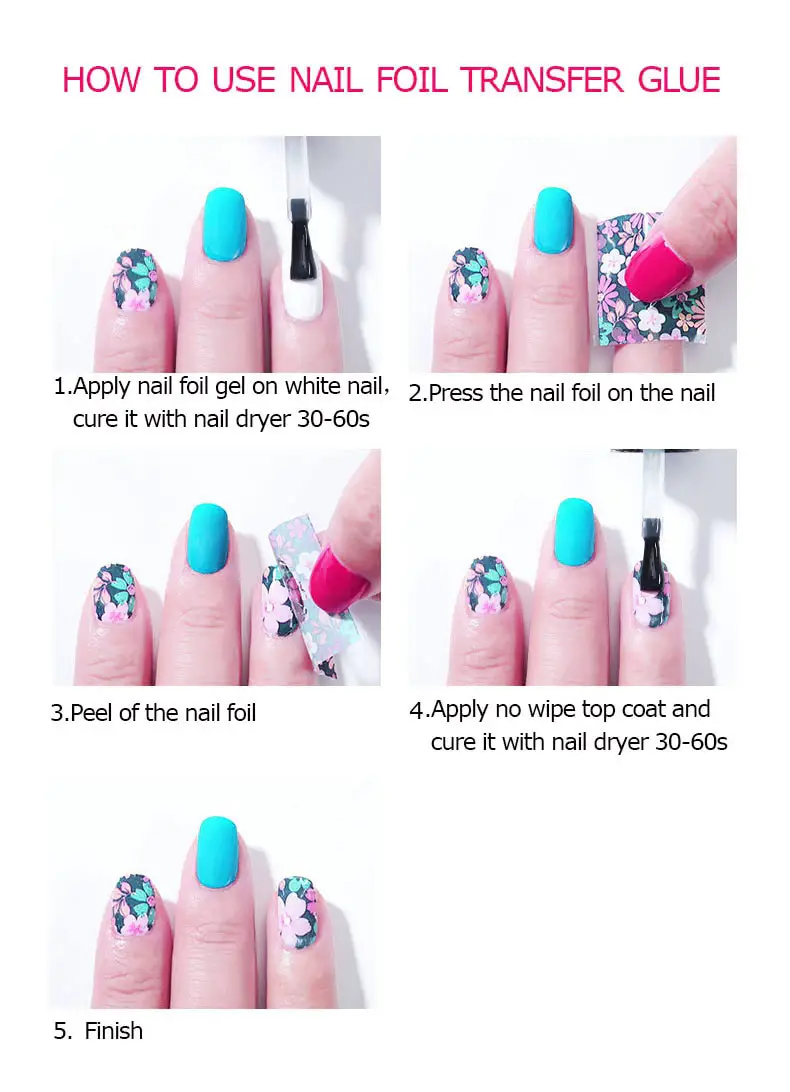
How do you use nail foil?
You can find nail foils in a variety of different colors and designs, and they come in convenient strips. To use the foil, you will need to start with a clean, dry nail. Apply a base coat, and allow it to dry completely before adding the foil. Once the base coat is dry, apply a layer of foil glue over the nail. Make sure to cover the entire nail with the glue.
Let the glue dry for a few moments, until it becomes slightly tacky. Once the glue is tacky, it’s time to add the foil. Cut a strip of nail foil to the size of the nail and place it over the glue. Rub the foil onto the nail with a soft damp cloth. The pressure will help to activate the glue, which will stick the foil onto the nail. Finally, seal the nail with a top coat to add shine and protect the foil. And there you have it – beautiful, eye-catching nails using nail foil!
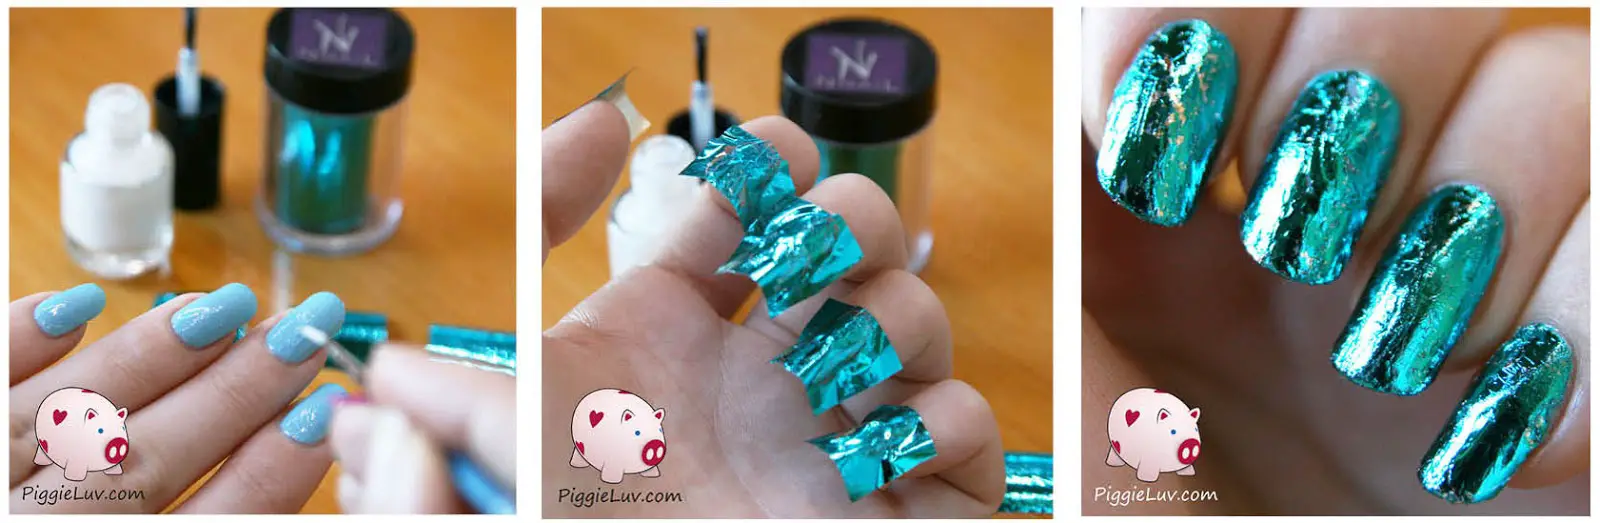
How to use nail art foil glue

The supplies needed are nail art foil glue, nail foil, and a color of nail polish of your choice. Start by applying a base coat of the nail polish to your fingernails. Let it dry completely. Then, apply a thin layer of the foil glue over the base coat of nail polish. Be sure to cover each nail completely.
Now, you can place small pieces of the foil onto the glue. Use a pair of tweezers to help with placing the foil accurately. Next, use a cotton bud to press down on the foil and make sure it adheres to the glue. Allow the glue and foil to dry completely before applying a top coat of clear nail polish. This will help to seal the foil in place. By following these steps you can create beautiful nail art with nail art foil glue. It is a great way to show your creativity and uniqueness. Have fun and enjoy the results!
How do you use a nail foil adhesive?
To begin, you need some nail foils, a foil glue adhesive, and a lint-free wipe. First, apply a thin layer of the adhesive to your nail and wait for it to become tacky. Once it’s ready, press the foil onto the nails and use the lint-free wipe to press it down and secure it. Next, carefully peel away the foil and discard it, leaving the adhesive on the nail. Then, use a top coat to seal in the design and protect it from smudging.
If you want to add extra sparkle, you can use a glitter top coat. Finally, be sure to remove any excess glue from your skin and store the adhesive in a cool, dry place. With these steps, your design will last for several days. With some practice, you can create amazing nail designs using nail foil adhesive. It is easy to use and the possibilities of unique and creative designs are endless.
How long does it take for nail foil glue to dry?
To use nail foil glue, start by cleaning your nails and removing any nail polish. Apply a thin layer of glue to the desired area of your nails and wait for it to become slightly tacky. Place the nail foil on top of the glue and press it down gently. Peel off the backing of the foil, then use a brush to remove any excess foil. Once the glue and foil have been applied, you can expect the nail foil glue to dry within a few minutes.
It is important to note that this drying time can vary depending on the type of glue and the amount used. For best results, you should wait at least 10 minutes or until the glue is completely dry before applying a top coat or using your hands. In general, the glue should be completely dry after 24 hours. This will ensure that the foil and glue have fully bonded and your nails look their best. Depending on the type of nail foil glue you are using, the drying time may be shorter or longer. You should always follow the instructions on the product label to ensure that the glue is completely dry before continuing. In summary, the drying time of nail foil glue depends on the type and amount of glue used. It usually takes 10 minutes for the glue to become dry and 24 hours for it to be fully bonded. Always read and follow the product instructions to ensure the best results.
How long do you leave foil on your nails?
To get the best results, you’ll need to know how long to leave the foil on your nails. In general, you should leave the foil on your nails for about 5 minutes. This will allow the glue to set and secure the foil in place. If you leave the foil on for too short of a time, it may not stick properly. You can also increase the amount of time you leave the foil on your nails to ensure a stronger bond.
For instance, leaving the foil on for 8-10 minutes will often be enough to create a stronger bond. Once the foil is secure on the nails, you can move onto the next step of the manicure. If you are adding colors or designs, make sure to do that after the foil has been left to dry. In order to ensure the foil glue works properly, it’s important to leave it on your nails long enough to allow the glue to set. This will give you the best results and keep the foil in place.
Do you cure nail foil glue?
Foil glue is easy to use and can be applied in just a few simple steps. To begin, make sure your nails are clean and free from any dirt or oils. You will then need to apply a thin layer of foil glue to your nails and wait for it to dry. Once it is dry, you can then carefully apply the nail foil to your nails. Make sure that the foil is completely adhered to the glue.
When you are ready to remove the foil glue, you can do so with a few simple steps. First, take a cotton pad and dampen it with some nail polish remover. Gently rub the cotton pad over the nail foil to remove it. If you are having difficulty removing the foil, you can use a cotton swab to help. Once you have removed the nail foil, you can then use a nail file to remove any excess glue from your nails. Do not attempt to cure the nail foil glue with a UV light or other curing methods. Doing so will cause the glue to become brittle and may damage your nails. Additionally, the glue will not last as long if it is not cured properly. To ensure that your nail foil stays on for longer, be sure to apply a top coat of clear nail polish. This will help to seal in the nail foil and keep it from peeling off. In conclusion, using nail foil glue is an easy and convenient way to add some sparkle to your nails. Be sure to take the proper steps in order to ensure that it adheres properly and lasts for a long time. Do not attempt to cure the glue with a UV light or other methods, and remember to finish with a top coat of clear nail polish. With these steps, you’ll be sure to have beautiful and sparkling nails!
How do you use gel nail glue with foil?
To start, apply a thin layer of gel nail glue onto the nail. Make sure to cover the whole nail and let the glue dry for about 30 seconds. Once the glue is dry, lay a piece of foil on top of the glue. Press the foil onto the glue firmly, working from one end of the nail to the other. Remove the foil slowly, making sure the glue and foil stay stuck together.
Then, cut off any excess foil with a pair of scissors. You can use tweezers to help place the foil in the desired shape on your nail. Once the foil is applied, you can apply a top coat over the nail to give it a glossy finish. After a few minutes, you will have a unique and beautiful nail design that is sure to turn heads. Gel nail glue with foil is an easy and fun way to create a variety of nail art looks. Whether you want to make subtle accents or bold designs, this technique can help you achieve the perfect look.