The feeling of driving a shiny, polished car is unbeatable. However, achieving that level of shine requires more than just a quick wash and wax. Prepping your car before polishing is a crucial step in the process that many car owners tend to overlook. But why is it so important? In this article, we will explore the various reasons why prepping your car is necessary, as well as the step-by-step process involved in doing so. Whether you’re a seasoned car enthusiast or a novice looking to improve your car’s appearance, this guide will provide you with all the information you need to make your car shine like new.
Why Prep Your Car Before Polishing?
As a car owner, you may have heard about the benefits of polishing your car. Not only does it give your car a shiny finish, but it can also protect your car’s paint from the harsh elements. However, before you start polishing your car, it’s important to understand the importance of prepping your car beforehand. This step is crucial to achieving the best results and making your car look its best. In this section, we will discuss why prepping your car before polishing is necessary and what it involves. Let’s dive in.
To Remove Contaminants
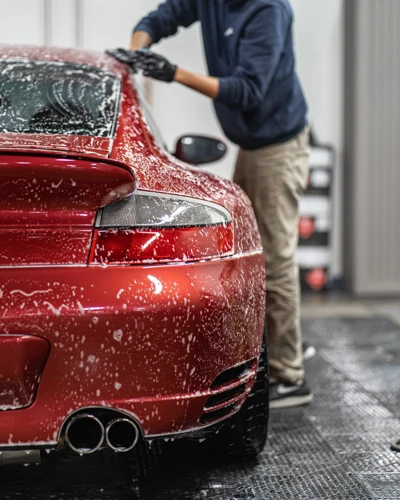
Contaminants on your car’s surface can be a major hindrance when polishing it. These contaminants can include dirt, dust, pollen, bird droppings, brake dust, and other environmental pollutants that settle on the surface of your car. If you don’t remove these contaminants before polishing, they can damage the paint of your car by scratching it when you apply the compound, making it a lot harder to correct later on.
To remove these harmful contaminants, you need to follow a thorough cleaning process. One way to do this is by using a pre-wash spray that loosens the dirt and grime on the car’s surface. You can find many pre-wash sprays on the market that are specifically designed for this purpose.
After using a pre-wash spray, make sure to properly wash your car with a high-quality car shampoo. Be sure to rinse your car properly to prevent any residual soap or cleaner from clinging onto the surface, leaving spots on the paintwork, and make sure to dry your car thoroughly after washing.
Another way to remove contaminants from your car’s surface is by using a clay bar. A clay bar will pick up any stubborn contaminants that remain on the surface of the car after washing. You need to lubricate the surface with a clay lubricant before applying the clay bar to avoid scratches.
Clay bars can be found in different levels of abrasiveness depending on the level and type of contamination on your car’s surface. After using a clay bar to remove contaminants, make sure to check that the surface has become completely smooth before proceeding to the next step.
Removing contaminants from your car’s surface is essential before polishing it. This process will prevent any damage and help achieve maximum results when polishing. By following the steps mentioned above, you will ensure that your car’s surface is cleansed of all contaminants and ready for the polishing process.
To Remove Scratches and Swirl Marks
Removing scratches and swirl marks is an important step in prepping your car before polishing. These imperfections can make your car look dull and dingy by reflecting light in an uneven pattern. Here are some methods for removing scratches and swirl marks:
- Compound: A compound solution, which contains abrasives, can be used to remove scratches and swirl marks from the car’s surface. Apply the compound to the affected area with a microfiber applicator pad and rub it in a circular motion. Wipe off the excess compound with a microfiber towel once the scratches have disappeared.
- Sanding: For deeper scratches or stubborn swirl marks that cannot be removed with a compound, wet sanding may be necessary. Wet sanding involves using a fine-grit sandpaper and water to physically remove the blemishes. This should be done cautiously, as it can damage the car’s paint if not done correctly.
- Polishing: After removing the scratches and swirl marks with compound or wet sanding, it’s necessary to use a mild polish to restore the car’s finish. A quality polish will help remove any remaining imperfections and bring out the car’s shine.
- Glaze or sealant: Using a glaze or sealant after polishing your car can help protect the newly polished surface and keep it looking shiny for longer. A glaze gives the car a wet and deep look, while a sealant provides a hard protective layer. You can choose between a wax or sealant depending on your preference and needs.
Remember, you don’t always need to use all of these methods – start with the least aggressive approach and work your way up if necessary. Removing scratches and swirl marks can be a slow and meticulous process, but it’s worth it for the end result. A well-polished car will not only look good but also will help preserve your car’s paint and finish.
To Smooth Out the Surface
One of the main reasons why people polish their cars is to obtain a smooth and flawless finish. This can be achieved by prepping the car’s surface before polishing. Prepping the surface helps to remove any impurities and imperfections, and smoothen out the surface. Here are some steps to take to achieve a smooth surface:
- Clean your car thoroughly: Wash your car using a high-quality car shampoo to get rid of any dirt, grime, or road contaminants that may be stuck on the surface.
- Remove all embedded contaminants: After thorough washing, you may still have some tar, bugs, or other contaminants embedded into the paint. Use a clay bar to remove these impurities.
- Fix scratches and swirl marks: If you have any minor scratches or swirl marks, use a scratch remover to eliminate them.
- Use a compounding solution: If the scratches on your car are deep, you may need to use a compounding solution to get rid of them.
- Sand the surface: In cases where compounding doesn’t work, sanding may be required. However, this should only be done by professionals because it can cause damage to your car’s paint if not done properly.
- Polish the surface: Once you have fixed any scratches or swirl marks, proceed to polish the surface using a quality polish.
- Use a glaze or sealant: Finally, apply a glaze or sealant to give your car a smooth and shiny finish that lasts.
By following these steps, you can achieve a smooth surface that will ensure your car looks its best. Prepping your car’s surface before polishing ensures that the polish will last for a long time. This saves you time and money, as you don’t have to keep polishing your car frequently.
How to Prep Your Car Before Polishing
Before polishing your car, it is important to properly prep the surface. This will not only ensure that the end result is flawless, but it will also help the polish last longer and protect the paint job. In this section, we will guide you through the steps of prepping your car for polishing. From cleaning the car thoroughly to using the right tools and products, we’ve got you covered. By following these steps, you can achieve a professional-looking finish that will make your car stand out on the road. But before we dive into the details of how to prep your car for polishing, let’s first discuss why it’s important to do so.
Car polish will not be effective in enhancing the look and protection of your car’s paint without proper preparation of the surface.
Clean Your Car Thoroughly
Cleaning your car thoroughly is the first and most important step in prepping your car before polishing. The polishing process will be ineffective if the car’s surface is covered in dirt, dust, and grime.
To clean your car, start with a good rinse using a hose or pressure washer. This will help remove any loose dirt and debris. Then, wash the car using a high-quality car wash soap and a soft wash mitt. This ensures that the cleaning process will not damage the paint or clear coat of the vehicle.
Pay special attention to the wheels and tires, as they often accumulate brake dust and road grime. Use a wheel cleaner or a specialized tire cleaner to remove any stubborn grime.
Dry your car with a microfiber towel or a drying towel, making sure to remove all the water spots. Leaving water on the surface could affect the polishing process.
Pro tip: Use a detailing spray after cleaning to remove any remaining dirt and to add a layer of lubrication before the next step.
Prepping your car before polishing takes attention to detail and patience. Investing time in this step will provide an excellent finish and help to keep your car’s paint looking its best for longer.
Using a wax or a sealant after polishing your car can also help maintain its shine and prevent it from further damage.
Remove Embedded Contaminants
Removing embedded contaminants is an essential part of prepping your car before polishing. It involves removing any particles, such as dirt or brake dust, that have become embedded in the paintwork. If these contaminants are not removed beforehand, they can cause further damage to the car’s exterior.
Here are the steps to remove embedded contaminants:
- Wash your car with a high-quality car wash soap to remove any loose dirt and grime.
- Inspect the surface of your car to locate any areas with embedded contaminants. These contaminants may feel rough to the touch.
- Apply a clay bar lubricant or detailing spray to the area.
- Use a clay bar to gently rub the panel in a back and forth motion. This process helps to lift the embedded contaminants from the surface of the paint.
- After each panel, fold the clay bar to reveal a fresh clean surface.
- Wipe down the panel with a microfiber towel to remove any excess clay residue.
To ensure that you have fully removed all the embedded contaminants, you can use the “plastic bag method”. Simply place a plastic bag over your hand and rub it over the surface of the paint. Any remaining embedded contaminants will cause the plastic to “grab” or “stick”.
By removing embedded contaminants, you create a smooth surface for applying polish. This helps to achieve a high-quality finish and increases the durability of your car’s paintwork.
Clay Your Car’s Surface
Claying your car’s surface is an important step in prepping your car before polishing. Clay bars help remove embedded contaminants that have bonded to the surface of your car’s paint. These contaminants can include tree sap, industrial fallout, and brake dust.
Here’s how to clay your car’s surface:
- Start with a clean car that has been washed thoroughly to remove loose dirt and debris.
- Divide your car into sections and work on one section at a time.
- Mist a lubricant spray onto a small area of your car (a 2 x 2-foot section is ideal). The lubricant spray will allow the clay bar to glide smoothly over the surface of your car and help prevent any scratching.
- Take a piece of the clay bar and mold it into a flat shape that can be held easily in your hand.
- Gently rub the clay bar over the lubricated area with light pressure. The clay bar will pick up any contaminants on the surface of your car.
- Fold the clay bar frequently to expose a clean surface, and remold it as necessary to maintain a flat surface.
- If the clay bar starts to stick, reapply the lubricant spray.
- Continue to work on small sections of your car at a time until the entire surface has been clayed.
- Once you have finished clay barring your car’s surface, wipe it down with a clean microfiber towel to remove any excess lubricant spray or residues.
Claying your car’s surface before polishing will help ensure that the surface is free from contaminants that may interfere with the polishing process. It can also help smooth out the surface and create a clean and shiny finish.
Fix Scratches and Swirl Marks
When it comes to fixing scratches and swirl marks on your car’s surface, there are several options available. Scratches and swirl marks are not only unsightly, but they can also affect the overall look and value of your car. Here are some ways to fix them before polishing:
| Method | Description |
|---|---|
| Scratch removal products | These products come in various forms- gels, liquids or pastes. They work by filling in the scratches to make them disappear. Some popular products include Turtle Wax Scratch & Swirl Remover and Meguiar’s ScratchX 2.0. |
| Wet sanding | This technique involves using sandpaper and water to sand down the surface of the car, effectively removing any scratches or imperfections. However, it can be a bit tricky and requires some experience to get the right results. |
| Polishing compounds | These compounds contain abrasives that help to remove scratches and other imperfections. Some popular products include 3M Super Duty Rubbing Compound and Meguiar’s Ultimate Compound. |
It’s important to note that fixing scratches and swirl marks can be a time-consuming process, and it’s important to take your time and follow the instructions carefully. Also, keep in mind that different products may work better for different types of scratches, so it’s worth experimenting to find the right solution for your particular situation.
Once you’ve fixed any existing imperfections, you can move on to polishing the surface. But before that, you must know how to use these products. It’s always better to go through dos and don’ts before polishing.
Use a Compounding Solution
When prepping your car before polishing, using a compounding solution can help to remove more stubborn scratches and blemishes from your car’s surface. This solution usually contains abrasive particles that can even out the surface of your car and leave it looking smooth and glossy.
Here are the steps for using a compounding solution:
- Identify areas on your car that have scratches, swirl marks or blemishes that have not been removed by polishing.
- Apply a small amount of compounding solution to a microfiber cloth or pad, and apply it to the affected area.
- Using a circular motion or back and forth motion, rub the solution into the surface of your car, applying moderate pressure.
- Be careful not to apply too much pressure or rub the solution in too aggressively, as this can cause more damage to your car.
- After a few minutes, wipe away the excess compounding solution with a clean microfiber cloth.
Using a compounding solution can be effective for removing scratches and blemishes, but it is important to use it only on areas of your car that really need it. Overuse can cause the clear coat to wear off, leaving your car vulnerable to damage.
Remember to always follow the manufacturer’s instructions when using any car polishing products, including compounding solutions. If you’re unsure about how to use a compounding solution or any other polishing product, read the label carefully or consult with a professional.
If you want to learn more about polishing your car, check out our article on polishing your car on a budget as a DIY project, or read up on top car polish brands to make sure you select the best products for your needs.
Sand the Surface
When prepping your car before polishing, sanding the surface is an important part of the process. Sanding helps to remove deeper scratches or imperfections that may not be removed through other methods, and it helps to create a smooth surface for polishing.
Here’s how to properly sand the surface of your car:
| Step | Instructions |
|---|---|
| 1 | Wash and dry your car to remove any surface dirt and debris. |
| 2 | Identify the areas that need sanding. Look for deep scratches or imperfections that are visible to the naked eye. |
| 3 | Choose the appropriate sandpaper grit. The grit you choose will depend on the severity of the scratches or imperfections. Generally, a 1200 or 1500-grit sandpaper is ideal for most surfaces. |
| 4 | Apply water or a lubricant to the sandpaper. This will help to prevent the sandpaper from scratching the surface and also helps to remove any debris from the surface as you sand. |
| 5 | Begin sanding with light pressure. Move the sandpaper in a circular motion until the scratch or imperfection is removed. Be sure to sand evenly to avoid creating waves or low spots in the surface. |
| 6 | Wipe the surface clean with a microfiber towel to remove any debris and inspect the surface. If necessary, repeat the sanding process with a finer grit sandpaper until the surface is smooth and all scratches or imperfections are removed. |
| 7 | Finish by polishing the surface with a high-quality polish to restore the shine. |
It’s important to note that sanding should be done with caution, as improper sanding may cause damage to the surface of your car. If you’re unsure about sanding, it may be best to seek professional help.
Pro Tip: Always use a dual-action polisher with a foam pad on the surface during sanding. This is essential to evenly distribute compound in the surface during the polishing process.
For more information on car polishing, check out our article on how to properly apply car polish.
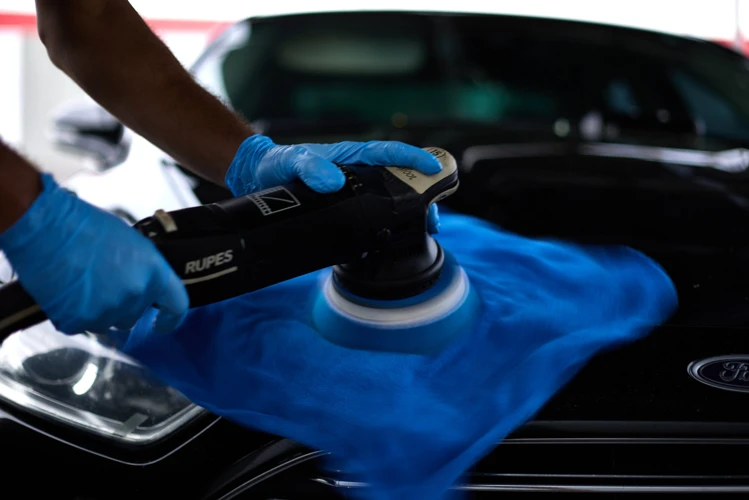
Polish the Surface
After completing the previous steps to prep your car for polishing, it’s time to actually polish the surface. This step involves using a specialized car polish to remove any remaining imperfections and bring out a high level of shine.
To polish the surface, follow these steps:
- Select the Right Polish: First, make sure you have the right type of car polish for your specific needs. There are different types of car polishes designed for different paint finishes and levels of damage. You can check out a guide to car polish ingredients on our website to learn more.
- Apply the Polish: Using a foam applicator pad, apply a small amount of polish directly onto the pad. Work in small, circular motions, applying light to medium pressure. Start with one section of the car at a time, working in 2×2 foot sections.
- Buff the Polish: After applying the polish, use a microfiber towel to buff off the excess polish. Use light pressure and a clean part of the towel for each pass. Repeat this step until the entire section is buffed and shiny.
- Repeat: Continue polishing and buffing each section of the car until the entire surface has been treated.
It’s important to note that how often you should polish your car depends on the frequency of use and other factors. You can learn more about the ideal frequency of car polish on our website. Additionally, it’s important to follow car polishing dos and don’ts in order to avoid causing damage to your car’s finish. Our website provides more information on this topic as well.
Use a Glaze or Sealant
Applying a glaze or sealant is the final step in prepping your car before polishing. These products provide an extra layer of protection for your paint and make it look shiny and new. Here are a few tips for using a glaze or sealant:
- Choose the right product: There are many different types of glazes and sealants available, so make sure you choose one that is compatible with your car’s paint and the polish you will be using. Check the manufacturer’s instructions before you buy.
- Apply in a thin, even layer: Use a foam applicator pad to apply the glaze or sealant to your car’s paint. Make sure the layer is very thin and even; too much product can actually harm your paint.
- Let it cure: After applying the glaze or sealant, give it time to cure. This can range from 30 minutes to several hours, depending on the product you are using. Check the instructions for guidance.
- Buff off gently: Once the glaze or sealant has cured, use a microfiber towel to buff it off gently. Again, be sure to follow the manufacturer’s instructions and avoid applying too much pressure, which can cause swirl marks.
Using a glaze or sealant as part of your car polishing routine can help protect your paint job and keep your car looking great for longer periods of time. If you want to learn more about the ingredients that go into car polishes, read our article on car polish ingredients. And for tips on how often you should polish your car, check out our guide to polishing your car. Don’t forget to avoid common mistakes with our article on car polishing dos and don’ts.
Tips for Prepping Your Car Before Polishing
As important as it is to prep your car before polishing, it’s equally important to do it right. Proper preparation can make all the difference in the world when it comes to achieving a high-quality finish on your vehicle. So, to help you get the best results, we’ve compiled some valuable tips and tricks that will help you prep your car like a pro. From working in the right environment to using the proper tools and products, these tips will help you achieve a showroom-worthy shine.
Do It Indoors or in Shade
When prepping your car before polishing, it is essential to choose the right location to work in. Doing it indoors or in the shade is highly recommended to prevent the cleaning agents and polishes from drying too quickly, leaving streaks and stains on your car’s surface. It also helps to maintain a consistent temperature that allows the products to work effectively.
Working indoors is a practical option for those living in apartments or urban areas without access to a garage. However, if you have a garage or a covered area, you can use it as well. Make sure the area is well-ventilated, as the fumes from the cleaning agents can be harmful if inhaled for prolonged periods.
On the other hand, working outdoors in direct sunlight should be avoided at all costs. The sun’s heat and UV rays can affect the chemicals and cause them to evaporate quickly, leaving your car’s surface uneven and unprotected. Additionally, direct sunlight can cause the cleaning agents and polishes to dry out too fast, making it more challenging to spread them evenly on the surface.
So, always choose a shaded area to work in. If you don’t have access to a garage or covered area, you can use a carport or create a makeshift tent using tarps or blankets. This will protect your car’s surface from direct sunlight, allowing you to work at your own pace.
Choosing the right location to work in is as important as the prepping process itself. By working indoors or in the shade, you can ensure that the cleaning agents and polishes do their job effectively, leaving your car’s surface smooth and shiny.
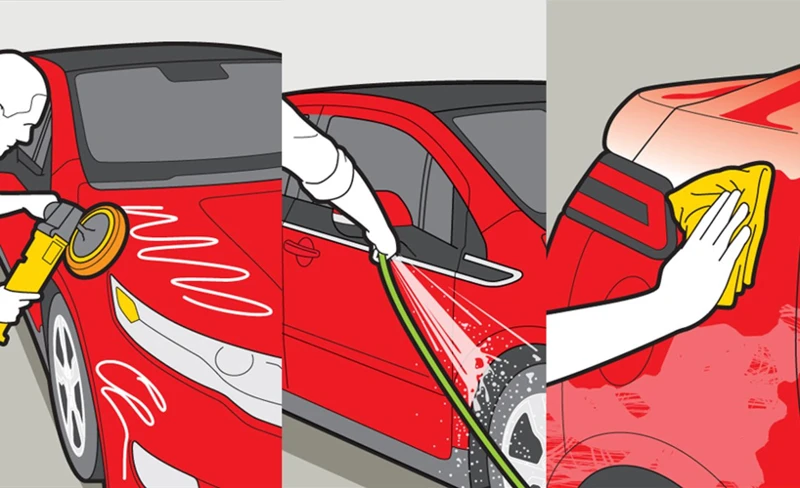
Work in Sections
When preparing your car for polishing, it is important to work in sections to ensure the best results. By doing so, you can focus on one area at a time, which helps you to be more thorough and efficient.
Why Work in Sections?
Working in sections allows you to concentrate your efforts on a smaller area, providing a more targeted and effective approach. This is especially useful when removing scratches, swirl marks or any other blemishes on the surface of the car. By working in sections, you can take the time to make sure each area is fully cleaned and polished before moving on to the next, which helps to ensure a consistent and uniform finish.
How to Work in Sections
When working in sections, it is important to divide your car into manageable sections. This can be done by using masking tape or chalk to mark out the areas that you want to work on. Ideally, these sections should be no more than two square feet in size.
| Step 1: | Choose the section you want to work on first. |
| Step 2: | Thoroughly clean the section using soapy water or a dedicated car cleaning product. |
| Step 3: | Remove any embedded contaminants using a clay bar or detailing clay. |
| Step 4: | Fix any noticeable scratches or swirl marks using a compounding solution or sanding the surface if necessary. |
| Step 5: | Apply your chosen polishing solution to the section using a foam applicator pad or machine polisher. |
| Step 6: | Use a microfiber towel or buffing pad to remove any excess polish and buff the surface to a high shine. |
| Step 7: | Move on to the next section using the same process until the entire car has been polished. |
Benefits of Working in Sections
Working in sections has several benefits, including:
- More targeted and thorough approach
- Ensures a consistent and uniform finish
- Prevents missed spots or areas
- Easier to manage and keep track of your progress
Conclusion
Working in sections is a crucial step in prepping your car for polishing. By dividing your car into manageable areas and following the steps outlined above, you can ensure a thorough and effective prep process that will result in a high-quality finish. Remember, taking the time to properly prep your car before polishing is the key to achieving the best possible results.
Use the Right Tools and Products
To prep your car properly, you must have the right tools and products. Using the wrong ones could end up damaging your car’s finish or making the job harder and more time-consuming. Here are some tools and products you need:
| Tools | Products |
|---|---|
|
|
Microfiber towels are essential for cleaning and polishing tasks. They are gentle on the car’s finish, preventing scratches and swirl marks. Soft-bristled brushes are another useful tool for cleaning debris from difficult-to-reach areas, such as wheels and bumper grills.
Using a clay bar helps to remove contaminants that stick to the surface of your car. It works by picking up microscopic particles that can’t be removed by washing alone. Polishing pads are designed to work with your polish or compound to maximize their effectiveness. Using an orbital buffer can speed up the polishing process, allowing you to work more efficiently.
If you’re dealing with scratches or swirl marks, a paint compound can help smooth out the surface. Follow up with a polishing compound and buff it with a microfiber towel to complete the process. If necessary, sanding the surface gently can help to remove deeper scratches.
After completing the polishing process, finishing it off with a glaze or sealant can help to prolong the shine and protect the paint against future contaminants.
It’s important to use high-quality tools and products that are designed for car detailing to avoid causing damage or leaving streaks on your car’s surface. Following these steps and using the right tools and products can ensure that a professional-grade finish is achieved.
Conclusion
In conclusion, prepping your car before polishing is an essential step to achieving a flawless finish. By removing contaminants, scratches, and swirl marks, and smoothing out the surface, you create a clean, even base for polishing. This ultimately leads to a more professional-looking finish that lasts for longer.
To prep your car before polishing, you will need to thoroughly clean your car, remove embedded contaminants, clay your car’s surface, fix scratches and swirl marks, use a compounding solution, sand the surface, polish the surface, and use a glaze or sealant. It’s important to follow these steps in order and use the right tools and products to achieve the best results.
When prepping your car for polishing, it’s also important to work in sections and do it indoors or in the shade to prevent the products from drying out too quickly. By taking your time and being patient, you can ensure that your car will look its best and the finish will be long-lasting.
In conclusion, taking the time to prep your car before polishing is a crucial step to achieving a stunning finish. Whether you’re a professional detailer or a car enthusiast, mastering this process will help you achieve consistent and professional results every time. So why not give it a try and see the difference it can make? Your car will thank you for it!
Frequently Asked Questions
What is the purpose of prepping a car before polishing?
The purpose of prepping a car before polishing is to remove any contaminants, scratches or swirl marks, and smooth out the surface to achieve the best possible finish.
How do contaminants affect the polishing process?
Contaminants on the car’s surface can cause scratches or swirl marks during the polishing process, and they can prevent the polisher from working effectively.
What is the difference between polishing and waxing a car?
Polishing is the process of using abrasives to remove the top layer of paint or clear coat to remove imperfections, while waxing adds a protective layer over the surface of the paint.
Can I skip prepping my car before polishing?
No, prepping your car before polishing is essential for achieving the best possible finish, and skipping this step can result in a subpar result.
What types of contaminants can be found on a car’s surface?
Contaminants can include dirt, grime, tree sap, bird droppings, and chemicals from the environment.
What is the purpose of claying a car?
Claying a car removes any embedded contaminants that cannot be removed through washing or drying, resulting in a smooth surface for polishing.
What are some common causes of scratches and swirl marks on a car?
Some common causes of scratches and swirl marks include improper washing techniques, using dirty towels or sponges, and contact with abrasive surfaces.
Can polishing a car damage the paint?
Polishing can damage the paint if not done correctly, which is why it’s important to prep the car properly and use the right tools and products for the job.
What tools and products do I need to prep my car for polishing?
You will need a microfiber towel, clay bar, compound, polishing pad, sandpaper, glaze or sealant, and a buffer or polisher.
Is it necessary to work in sections when prepping a car for polishing?
Yes, working in sections allows you to focus on one area at a time, ensuring that each section is properly prepped before moving on to the next.