Have you ever wondered what’s really in the polish you use to clean your furniture, metal fixtures, and windows? The ingredients are often a mystery, yet they can have a significant impact on the environment and your wallet. So why not consider making your own DIY polish? With just a few simple ingredients, you can create a variety of effective and customizable cleaning solutions that are both eco-friendly and budget-friendly. Let’s take a closer look at the benefits of DIY polish and some easy recipes you can try at home.
The Benefits of DIY Polish
When it comes to cleaning and maintaining surfaces in our homes, many of us reach for store-bought polish. However, did you know that making your own DIY polish not only helps avoid harsh chemicals, but it also has several benefits? In this section, we will explore the advantages of DIY polish, including its eco-friendliness, budget-friendliness, and the ability to customize the ingredients to your liking. Let’s dive in!
It’s Eco-Friendly
Using DIY polish is a great way to reduce the environmental impact of cleaning products. Instead of using store-bought polishes that may contain harsh chemicals and leave a larger carbon footprint, DIY polish recipes use simple, natural ingredients that are often found in the kitchen pantry. This means that DIY polish is not only effective but also eco-friendly.
DIY polish recipes can be made using ingredients such as vinegar, lemon juice, and baking soda- all of which are biodegradable and safe for the environment. These natural ingredients are a healthy alternative to synthetic products, which can harm both the environment and the user. By incorporating DIY polish into your cleaning routine, you are reducing the number of toxic chemicals that end up in our water supply and soil.
Making your own polish also means that you can control the ingredients that go into the cleaning product. This is important because it allows you to avoid using harmful chemicals that may cause skin irritation or breathing difficulties, among other health concerns. By using natural and organic ingredients, you can maintain a toxin-free environment in your home.
Not only is DIY polish better for the environment, but it is also a great way to save money. Most store-bought cleaning products are expensive, and the cost can add up, especially if you need to clean frequently. However, with DIY polish recipes, you can achieve the same or better results for a fraction of the cost, making this a budget-friendly option.
In addition to being eco and budget friendly, DIY recipes are also very customizable. By tweaking the recipes, you can create your own unique blends that work best for your household’s cleaning needs. Some recipes may work well for certain surfaces, while others work better on specific stains. DIY polish recipes are versatile, and you are free to experiment with ingredients until you find the perfect mix.
To further understand the science behind DIY polish, studies have shown that natural ingredients, such as vinegar and lemon juice, can effectively clean and shine surfaces. Using natural ingredients helps avoid the need for excessive packaging and the generation of more waste, which can harm the environment.
Using DIY polish is an excellent eco-friendly and budget-friendly way to keep your home clean without harming the environment. Some additional benefits can be derived from specific types of polish such as furniture polish or wooden surface polish, which work differently depending on the surface. The next section will provide step-by-step recipes for different types of DIY polish.
It’s Budget-Friendly
One of the most significant benefits of DIY polish is that it’s budget-friendly. Making your polish at home can save you a lot of money in the long run, as you won’t have to keep purchasing expensive commercial cleaning products. Plus, most of the ingredients used in these recipes are budget-friendly and readily available in your pantry or local grocery store.
Here’s a comparison table to show how much money you can save by making your own DIY polish:
| Type of Polish | Store-bought Product | DIY Recipe | Savings |
|---|---|---|---|
| All-Purpose Polish | $6 for 16 oz | $2.50 for 16 oz | $3.50 |
| Furniture Polish | $8 for 16 oz | $4 for 16 oz | $4 |
| Metal Polish | $10 for 8 oz | $3 for 8 oz | $7 |
| Glass Cleaner | $5 for 32 oz | $1 for 32 oz | $4 |
| Wood Cleaner | $9 for 16 oz | $2.50 for 16 oz | $6.50 |
As you can see, the savings are substantial across all categories. By making your polish at home, you can save up to 70% of the cost compared to buying commercial products. Not only will this save you money, but it is also an excellent way to reduce waste and be more environmentally friendly by using ingredients found in your household.
Budget-conscious consumers should not overlook the savings that come from using DIY polish. It’s a small change that can make a significant difference in your household budget. Plus, by making your own cleaning products, you can have peace of mind knowing that you’re using natural and safe ingredients to clean and protect your home.
It’s Customizable
Customizability is one of the biggest advantages of DIY polish. With store-bought polish, you usually have a limited range of scents, cleaning power, and application methods. However, with homemade polish recipes, you have the flexibility to customize different aspects of your polish to suit your needs and preferences.
Here are some examples of how you can customize your DIY polish:
- Change the scent: You can add a few drops of your favorite essential oils to your polish recipe to give it a unique scent. Lemon and lavender are popular options for furniture and all-purpose polish.
- Adjust the cleaning power: Depending on how dirty your surfaces are, you may want to increase or decrease the cleaning power of your polish. For instance, you can add more vinegar or lemon juice for a stronger cleaning solution, or dilute it with water for a gentler clean.
- Choose the consistency: Some people prefer a thicker polish that applies more evenly, while others prefer a thinner, sprayable consistency. You can adjust your recipe by adding more or less oil and wax to achieve your desired consistency.
- Customize for different surfaces: Certain surfaces require specific cleaners and polishes. For example, you can make a separate metal polish or glass cleaner for those surfaces that require extra care. You can find many homemade polish recipes online and in books.
Customizing your DIY polish might take some time and trial and error, but it is worth it in the end. Not only will you have a cleaner home or office, but you’ll also be able to reduce your environmental impact and save money on cleaning products.
If you want to learn more about the benefits of using polish over wax for enhancing shine and resilience, check out our article on polish vs wax.
DIY Polish Recipes
Are you tired of using conventional cleaning products that are loaded with harmful chemicals, expensive, and not eco-friendly? Fortunately, there are simple and affordable alternatives to keep your home looking sparkling clean while also being kind to the environment. Creating your very own homemade polish recipes is a great way to achieve an eco-friendly and budget-friendly clean. Using a few simple and natural ingredients, you can make your own all-purpose polish, furniture polish, metal polish, glass cleaner, and wood cleaner. Let’s dive into these recipes and start cleaning in a sustainable way.
All-Purpose Polish
One of the most versatile DIY polish recipes is the one for an all-purpose polish. This is a great option for those who want to minimize the number of cleaning products they use in their home. Here is a simple recipe for making your own all-purpose polish:
- Ingredients:
- 1/4 cup white vinegar
- 1/4 cup olive oil
- 10-15 drops of your favorite essential oil (optional)
- Instructions:
- Mix the white vinegar and olive oil in a bowl.
- Add 10-15 drops of your favorite essential oil (optional) to the mixture and stir well.
- Transfer the mixture to a spray bottle or an airtight container, and your all-purpose polish is ready to use!
This DIY all-purpose polish is great for cleaning a variety of surfaces around your home, including countertops, appliances, and floors. The white vinegar helps to disinfect and remove stains, while the olive oil provides a natural shine and protects the surface. Additionally, you can add your favorite essential oil to leave a fresh, natural scent.
Using this all-purpose polish is easy. Simply spray or apply a small amount of the mixture onto the surface you want to clean and wipe it down with a microfiber cloth. It’s important to note that this polish should not be used on unfinished or porous surfaces, such as marble or granite, as the oil can soak into the surface and cause damage.
This all-purpose polish is a budget-friendly and eco-friendly alternative to store-bought cleaning products. Plus, it’s customizable with different essential oils, making it a great option for those who prefer natural cleaning solutions.
Furniture Polish
To make a homemade furniture polish, you’ll need a few simple ingredients that you may already have in your kitchen. Not only will this DIY polish clean and shine your furniture, but it will also help protect it from future damage.
Ingredients:
| Ingredient | Measurement |
| Olive oil | 1/4 cup |
| Vinegar | 1/4 cup |
| Lemon essential oil | 4-5 drops |
Instructions:
1. In a small bowl, mix together the olive oil and vinegar.
2. Add in the lemon essential oil and stir to combine.
3. Dip a microfiber cloth into the mixture and wring out any excess liquid.
4. Gently polish your furniture, using circular motions to buff away any dirt or grime.
5. Use a clean microfiber cloth to buff the furniture to a shine.
This DIY furniture polish is an excellent alternative to store-bought polishes that are often full of harsh chemicals. It’s gentle enough to use on most types of wood furniture, but it’s always a good idea to test it on an inconspicuous area first. And because it contains natural ingredients, it’s also safe to use around children and pets.
By making your own furniture polish, you can also customize it to your liking. You can adjust the amount of essential oil you use to create a scent that you love, or you can use different oils altogether. For example, you could swap out the lemon essential oil for orange or grapefruit essential oil for a fresh, citrusy scent.
Remember to store any leftover furniture polish in an airtight container to keep it fresh. And be sure to label it so that you know what’s inside. With a little bit of effort, you can make your own furniture polish that’s both eco-friendly and budget-friendly.
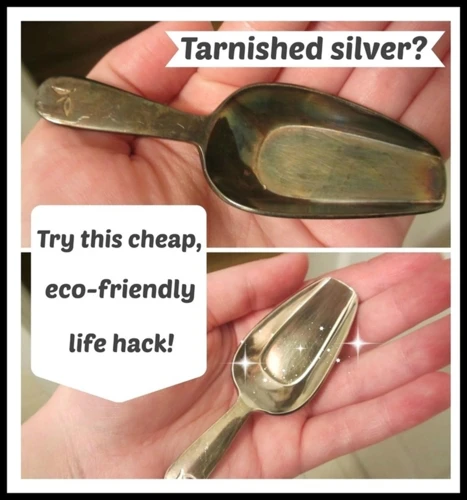
Metal Polish
Polishing metal surfaces can be tricky, but with this DIY recipe, you can make sure your metal items stay shiny and clean!
What you’ll need:
- 1/2 cup white vinegar
- 2 tablespoons baking soda
- 1 tablespoon lemon juice
- 1/2 cup warm water
- Mixing bowl
- Soft cloth
Instructions:
- Mix together the white vinegar, baking soda, and lemon juice in a bowl.
- Slowly add in the warm water and mix well to form a paste.
- Apply the paste to the metal surface you want to clean and polish.
- Use a soft cloth to buff the surface gently in circular motions.
- Rinse the surface with warm water and dry with a clean cloth.
Using this DIY metal polish recipe not only saves you money, but it’s also eco-friendly and avoids the use of harsh chemicals. Just be sure to test it on a small, inconspicuous area first to avoid any damage to the metal surface.
Glass Cleaner
One of the most common places we tend to use store-bought cleaners is on glass surfaces. However, many of these cleaners contain harsh chemicals that are not only harmful to the environment but also to our health. Thankfully, making your own glass cleaner is incredibly easy and can be just as effective as store-bought alternatives. Here is a simple recipe for a DIY glass cleaner using only a few ingredients:
- Ingredients:
- 1 cup of water
- 1/4 cup of white vinegar
- 2 to 3 drops of dish soap
- Optional: a few drops of essential oils for fragrance (such as lemon or lavender)
- Instructions:
- Mix all ingredients in a spray bottle and shake well to combine.
- Spray the mixture onto the glass surface you wish to clean.
- Use a clean microfiber cloth to wipe away the solution from the glass.
- For streak-free results, make sure to wipe in a circular motion.
- Repeat as necessary.
This DIY glass cleaner recipe is not only eco-friendly and budget-friendly, but it’s also customizable as you can adjust the amount of soap and vinegar depending on your needs. Plus, with the added benefit of essential oils, you can create a natural fragrance that is unique to your liking.
When using this or any DIY polish on glass surfaces, it’s important to keep in mind a few helpful tips. First, be sure to test the solution on an inconspicuous area first to make sure it doesn’t damage or discolor the glass. Second, always use a clean microfiber cloth to avoid streaks or scratches. Third, store the solution in an airtight container to prevent evaporation or contamination. Finally, label the container with the ingredients and date of creation to ensure you can easily identify it in the future.
Switching to DIY glass cleaner is not only better for your health and the environment, but it’s also a simple change that can save you money in the long run.
Wood Cleaner
If you’re looking for a natural way to clean your wooden furniture, floors, or other items, a DIY wood cleaner might be just what you need. Not only is it effective, but it’s also eco-friendly and budget-friendly. Here’s a simple recipe to try:
- Ingredients:
- 1/4 cup of white vinegar
- 1/4 cup of olive oil
- 10-15 drops of lemon essential oil
- Instructions:
- Mix the white vinegar and olive oil in a spray bottle.
- Add the lemon essential oil and shake the bottle well to mix.
- Spray the mixture onto a clean cloth or directly onto the wood.
- Wipe the wood in the direction of the grain until it’s clean and shiny.
This wood cleaner recipe is not only effective in cleaning your wooden goods, but it also nourishes and moisturizes the wood, preventing it from drying out and cracking over time. The white vinegar helps to break down dirt and grime, while the olive oil helps to condition and protect the wood. The lemon essential oil adds a refreshing scent and also helps to cut through grease.
However, before you use this wood cleaner, it’s important to keep a few tips in mind. Always test the cleaner on a small, inconspicuous area first to make sure it doesn’t cause any damage or discoloration. When applying the cleaner, it’s best to use a microfiber cloth that won’t scratch the wood surface. And after you’re done, be sure to store the cleaner in an airtight container and label it properly for future use.
Making your own wood cleaner is a great way to keep your wooden goods clean, shiny, and well-protected, without using any harsh chemicals or spending a lot of money. Give it a try and see the difference it makes!
Tips for Using DIY Polish
Now that you have created your own budget-friendly and eco-friendly DIY polish, it’s important to keep a few things in mind when using them. These tips will help you get the most out of your homemade cleaning solutions and ensure that your surfaces are properly cleaned and protected. Remember, with a little care and attention, your DIY polish will help your home shine like new for years to come. Let’s take a look at some helpful tips for using your DIY polish.
Test on an Inconspicuous Area First
Before using any DIY polish recipe, it’s important to test it on an inconspicuous area first to ensure that it doesn’t cause any damage or discoloration to the surface. This is especially important for delicate or expensive materials such as wood, leather, or glass.
To do this, choose a small and unnoticeable spot on the surface to apply the polish. For example, if you’re testing a wood cleaner recipe, select a small area on the underside or back of the furniture piece. Then apply a small amount of the polish with a clean cloth and wait for a few minutes before wiping it off.
After the test, inspect the area for any signs of damage or discoloration. If there is no damage, you can proceed to use the polish on the rest of the surface, but if you notice any adverse effects, do not use the polish on that surface.
Testing on an inconspicuous area allows you to avoid any costly mistakes that may potentially damage your surfaces, especially if you’re dealing with antiques or heirloom items. Keep in mind that although DIY polishes are generally safe and eco-friendly, they may not be suitable for all materials or finishes.
By taking the time to test the polish first, you can ensure that your cleaning process is both safe and effective. It’s always better to be cautious and take small steps in order to protect your cherished possessions.
Use a Microfiber Cloth
When using DIY polish recipes, it’s important to consider the type of cloth you use for application. A microfiber cloth is the best option as it is gentle on surfaces, doesn’t leave behind any lint or residue, and is reusable.
Benefits of Using Microfiber Cloth
| Benefit | Explanation |
|---|---|
| Gentle on surfaces | Microfiber cloths have smaller fibers compared to traditional cloths, making them less abrasive and gentler on surfaces. |
| Doesn’t leave behind lint or residue | Microfiber cloths are made of tightly woven fibers that don’t shed or leave behind any residue, resulting in a streak-free and smooth finish. |
| Reusable | Microfiber cloths can be washed and reused multiple times, making them a more eco-friendly option compared to disposable cloths. |
How to Use Microfiber Cloth with DIY Polish
When using a DIY polish recipe, it’s important to follow the instructions and apply the polish evenly on the surface. Use the microfiber cloth to buff the surface gently in a circular motion, using a clean part of the cloth for each area to avoid spreading dirt or debris.
It’s also important to wash the microfiber cloth before and after using it with the polish to avoid any cross-contamination. Simply toss the cloth in the washing machine with other towels or rags and avoid using fabric softener, which can reduce its effectiveness.
By using a microfiber cloth with your DIY polish recipe, you can ensure a cleaner and greener home without damaging your furniture or leaving behind any residue.
Store in an Airtight Container
It is important to store your DIY polish in an airtight container in order to maximize its shelf life and prevent it from drying out. When it comes to choosing a container, opt for a glass or plastic container with a tight-fitting lid. Here are some helpful tips for storing your homemade polish:
- Avoid exposing your polish to light or heat. Both light and heat can cause your polish to break down and lose effectiveness. Keep your containers in a cool, dark place, such as a cabinet or pantry.
- Make sure your containers are clean and dry. This will prevent any bacteria or mold from growing in your polish. Before storing your polish, give your containers a good rinse with hot water and let them air dry completely.
- Store your polish away from children and pets. While DIY polish is generally safe to use, it’s important to keep it out of reach of curious hands and paws. Store your containers on a high shelf or in a locked cabinet to ensure everyone’s safety.
- Label your containers clearly. Be sure to label your containers with the name of the polish and the date you made it. This will help you keep track of its shelf life and ensure that you’re using the freshest product possible.
By following these simple tips, you can extend the lifespan of your DIY polish and keep it smelling and working great for longer.
Label Your Containers
One important tip when using DIY polish is to label your containers to keep track of what’s inside. It may seem like an obvious step, but it can save you time and frustration in the long run. By clearly labeling your containers, you’ll know exactly what you’re grabbing when you need to clean a specific surface.
To ensure that your labels are easily visible and will withstand the test of time, use a water-resistant marker or adhesive labels. Write the name of the polish and the date you made it, to keep track of how long it’s been sitting on your shelf.
One simple way to keep your labels organized is to create a chart or table that lists each of your DIY polish recipes, their ingredients, and the type of surface they are best suited for. This will not only help you easily find the polish you need, but also allow you to track which recipes you prefer and which ones may need some tweaking.
Investing a few minutes in labeling your DIY polish containers can go a long way in helping you stay organized and making the most of your eco-friendly and budget-friendly cleaning products.
| Polish Type | Ingredients | Best Suited for |
|---|---|---|
| All-Purpose Polish | Vinegar, Water, Essential Oils | All Surfaces |
| Furniture Polish | Olive Oil, Lemon Juice, Vinegar | Wooden Furniture |
| Metal Polish | Baking Soda, Water | Metal Surfaces |
| Glass Cleaner | Vinegar, Water, Rubbing Alcohol | Glass Surfaces |
| Wood Cleaner | Vinegar, Olive Oil | Wooden Surfaces |
Conclusion
In conclusion, making your own polish using simple ingredients can be a game-changer for those looking for an eco-friendly and budget-friendly cleaning solution. By using DIY polish, you not only reduce your environmental impact but also save money while having the flexibility to customize your polish to your preference.
The Benefits of DIY Polish
One of the major perks of DIY polish is that it’s eco-friendly, as most store-bought cleaning supplies come in plastic packaging and contain chemicals that harm the environment. By choosing to make your own polish, you have control over the ingredients, preventing the use of harsh chemicals and reducing plastic waste.
DIY Polish Recipes
There are different DIY polish recipes for different cleaning purposes, such as all-purpose polish, furniture polish, metal polish, glass cleaner, and wood cleaner. These recipes are easy to follow and involve simple ingredients that you may even have in your pantry already.
Tips for Using DIY Polish
Before using any DIY polish, it is important to test it on an inconspicuous area of the surface you intend to clean. This ensures that the polish does not damage the surface and gives you an idea of how much polish to use. When cleaning, use a microfiber cloth to prevent scratching and achieving a streak-free shine. After using, store the polish in an airtight container to prevent moisture from affecting its quality, and don’t forget to label the container to avoid confusing it with other cleaning supplies.
In summary, DIY polish is an excellent option for individuals looking for a more sustainable and cost-effective cleaning solution. By making your own polish, you can contribute to a greener environment while keeping your home sparkling clean.
Frequently Asked Questions
What are the benefits of using DIY polish?
Using DIY polish is eco-friendly, budget-friendly, and customizable.
What are the ingredients commonly used in DIY polish recipes?
Common ingredients include vinegar, olive oil, lemon juice, baking soda, and essential oils.
Can DIY polish be used on any surface?
No, it’s important to test on an inconspicuous area first to ensure it won’t damage the surface.
Is DIY polish safe for pets and children?
Yes, most DIY polish recipes use natural ingredients that are safe for pets and children.
How effective is DIY polish compared to store-bought polish?
It may take more effort to achieve desired results with DIY polish, but it’s an effective alternative to store-bought polish.
How do I store DIY polish?
DIY polish should be stored in an airtight container to prevent it from drying out and losing its effectiveness.
Can DIY polish be used on painted surfaces?
It’s best to test on an inconspicuous area first as some DIY recipes can potentially damage painted surfaces.
Can DIY polish be customized for different scents?
Yes, essential oils can be added to DIY polish recipes to create different scents.
Can DIY polish be used as a disinfectant?
No, most DIY polish recipes are not strong enough to disinfect surfaces.
Can DIY polish be used on outdoor surfaces?
DIY polish may not be effective on outdoor surfaces as it’s designed for indoor cleaning.