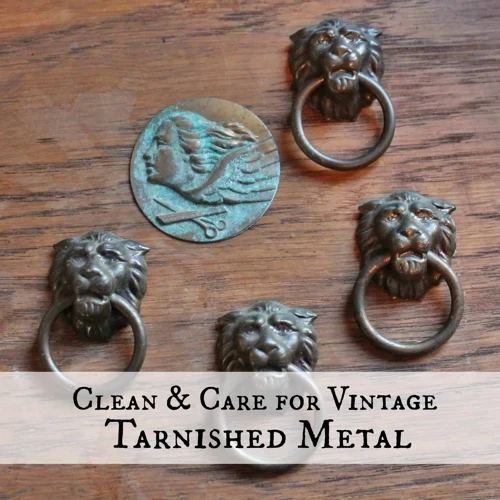
As we accumulate more and more metal items in our homes, it’s inevitable that some will start to show signs of wear and tear over time. Whether it’s a beloved family heirloom or a newer addition to your collection, restoring old and tarnished metal to its former glory can seem like a daunting task. But fear not, with a bit of patience and the right supplies, you can make even the most damaged metal shine like new again. So, where do you start? Let’s explore the steps you need to take in order to give your metal items a new lease on life.
Assess the Condition of Your Metal
When it comes to restoring old and tarnished metal, the first step is to assess the condition of the metal. This will help you determine the best method for cleaning, polishing, and repairing any damage. To properly assess your metal, you’ll want to consider a few key factors, including the type of metal and finish, the presence of any cracks or dents, as well as any dirt or grime buildup. Once you have a good understanding of the state of your metal, you can gather the necessary supplies and begin the restoration process. But before we dive into the details of how to bring your metal back to life, let’s take a closer look at how to assess its condition.
Determine the Type of Metal and Finish
When restoring old and tarnished metal, it is crucial to determine the type of metal and finish you are working with to avoid causing any damage. Metal comes in many different types and finishes, each with its own unique cleaning and polishing requirements. Here are some steps to help you determine the type of metal and finish:
- Check for any manufacturer tags or stamps: If the metal is stamped with the manufacturer’s name or has a tag, it can be a good indication of the type of metal you are working with.
- Look for any discoloration or oxidation: Certain metals, such as copper and bronze, may develop a green or reddish-brown tone due to oxidation. Stainless steel, on the other hand, should be a consistent silver color.
- Identify the finish: The finish of the metal refers to the protective coating or layer over the metal. Common finishes include chrome, nickel, brass, and silver. Each finish requires a different product for cleaning and polishing.
- Consult a professional: If you are unsure about the type of metal or finish, consider consulting a professional who specializes in metal restoration. They can help identify the type of metal and provide recommendations for the best cleaning and polishing products to use.
Once you have determined the type of metal and finish, you can move on to selecting the appropriate cleaning and polishing products. Be sure to read product labels carefully, and consider using environmentally-friendly options where possible. For more information on choosing the right metal polish, consider checking out our guide on choosing the right metal polish.
Check for Cracks or Dents
When restoring old and tarnished metal, it’s important to carefully assess the condition of the metal before beginning any cleaning or polishing. One crucial step in the assessment process is to check for cracks or dents. This is important because these imperfections can affect the overall appearance and structural integrity of the metal.
To check for cracks or dents, you’ll want to closely inspect the metal surface. Look for any visible cracks or dents, no matter how small they may seem. Use your fingers to carefully run along the surface of the metal and feel for any imperfections that may not be visible to the naked eye.
If you do find cracks or dents:
- Don’t attempt to polish the metal until these imperfections have been repaired.
- Depending on the severity of the damage, it may be necessary to take the metal to a professional for repair.
- If the damage is minor, it may be possible to repair it yourself using epoxy or metal filler. However, be sure to follow the manufacturer’s instructions carefully.
- After repairing the metal, be sure to sand down any rough spots and polish the area to restore a smooth appearance.
By checking for cracks or dents before beginning any cleaning or polishing, you can ensure that you’re not exacerbating any existing damage or compromising the structural integrity of the metal.
Remember, restoring old and tarnished metal is a delicate process that requires careful attention to detail. Taking the time to properly assess the condition of the metal before beginning any cleaning or polishing will help ensure the best possible outcome for your restoration project.
Internal link: For tips on polishing metal surfaces, check out our DIY Metal Polishing Guide.
Remove Any Loose Dirt or Grime
When restoring old and tarnished metal to its former glory, it is important to start by removing any loose dirt or grime. This step is crucial in ensuring that the metal is properly cleaned and prepared for further restoration.
Here are some ways to remove loose dirt or grime from the metal:
- Use a soft-bristled brush or cloth to gently wipe away any loose dirt or debris from the surface of the metal. This will help prevent scratching or damaging the metal while cleaning.
- If the metal is particularly dirty, you can also use a mild soap and water solution to help remove any stubborn dirt or grime. Be sure to rinse the metal thoroughly with clean water and dry it completely before moving on to the next step.
- Another option is to use a specialized metal cleaner or polish, which can help break down and remove tough stains or dirt. However, it’s important to choose a product that is safe for the specific type of metal and finish you are working with. Refer to a guide on safe metal polishes for more information on choosing the right product.
By removing any loose dirt or grime from the metal, you can ensure that the surface is properly prepped for further restoration. This will ultimately help to achieve a more polished and long-lasting result.
Gather Your Supplies
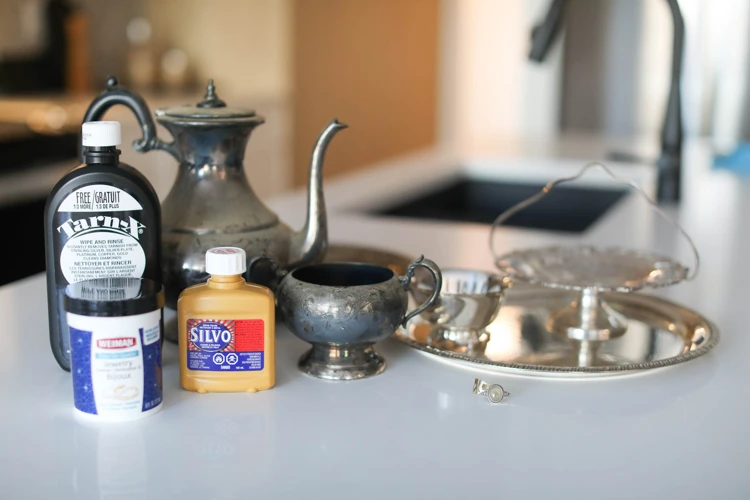
Now that you have assessed the metal’s condition and identified any repairs needed, it’s time to gather the necessary supplies to begin the restoration process. It’s important to have the proper tools and materials before starting to ensure a successful outcome. Here are some items you should consider having on hand:
Soft Bristle Brush or Cloth: You will need a soft-bristled brush or a cotton cloth to help remove dirt and grime from the surface of your metal.
Metal Polish or Cleaner: Choose a metal polish or cleaner that is appropriate for the type of metal you are restoring. If you are unsure which product to use, do some research or consult with a professional.
Protective Gloves: To protect your hands from harsh chemicals or rough surfaces, it’s recommended that you wear gloves during the restoration process.
Steel Wool or Sandpaper: If the metal has deep stains, scratches or rust spots, you can use steel wool or sandpaper to help remove them. Be careful not to overdo it, as you can damage the metal.
Before choosing your supplies, read up on the benefits, impacts of multi-purpose polish and it’s ingredients to better understand what you should avoid when selecting a cleaner. You can also check out this DIY Metal Polishing Guide for more tips and tricks.
Soft Bristle Brush or Cloth
When it comes to cleaning and restoring metal, having the right tools on hand is crucial. A soft bristle brush or cloth is one essential item you will need. It is important to choose a gentle brush or cloth that will not scratch or damage the surface of the metal. Using a brush with hard bristles, or a rough cloth, can cause scratches and remove the finish, making it more difficult to restore the metal to its former beauty.
Soft Bristle Brush: A soft bristle brush is ideal for cleaning metal surfaces that have intricate details, such as metal jewelry or decorative metalwork. A brush with synthetic bristles is recommended, as it will not damage the metal surface. When using a brush, it is important to be gentle and avoid applying too much pressure.
Soft Cloth: A soft cloth is a great alternative to a brush for cleaning metal surfaces. Look for a cloth made of a gentle material, such as microfiber, that will not scratch or damage the metal. You can also use an old t-shirt or cloth diaper that is no longer in use. Whatever type of cloth you choose, make sure it is clean and free of any debris that could scratch the metal.
Using a soft bristle brush or cloth is a crucial step in the metal restoration process. It will help to remove dirt and grime from the surface of the metal without causing damage. Remember to be gentle and use a light touch when applying pressure to the metal. Taking care with your tools will ensure that your metal items are restored to their former glory.
Link: /polish-metal-jewelry-tips/
Metal Polish or Cleaner
One of the essential supplies needed for restoring old and tarnished metal is metal polish or cleaner. This will help remove any built-up grime and tarnish on the metal’s surface, allowing it to shine like new once again.
Before choosing a metal polish or cleaner, it’s important to consider the type of metal being cleaned. Certain metals may require a specific type of cleaner, such as copper or brass. It’s also crucial to avoid any harsh chemicals or abrasive ingredients that could further damage the metal’s surface.
There are many different types of metal polishes and cleaners available, each with its own unique benefits. For example, a multi-purpose metal polish can be used on various types of metals, eliminating the need for multiple cleaners. On the other hand, a specialized cleaner may be required for particularly delicate metals.
It’s also important to consider the frequency of metal polishing. Over-polishing can actually be damaging to certain types of metal, causing it to lose its natural patina and character. It’s recommended to only polish metal when necessary, rather than on a regular basis.
Choosing the right metal polish or cleaner is crucial for restoring old and tarnished metal to its former glory. Take the time to assess the metal’s condition and research different products to find the best option for your specific needs. And remember, cleaning and polishing are two different processes, so be sure to clean the metal thoroughly before applying any polish or cleaner.
Protective Gloves
When restoring old and tarnished metal, it’s important to protect yourself from potential harm. To do so, it’s essential to wear protective gloves. Not just any gloves will do, however. Here are some factors to consider when selecting gloves for metal restoration:
- Type of gloves:You will want gloves that are made of a material that can protect your hands from chemicals, dirt, grime, and possible sharp edges.
- Size:Choose gloves that fit snugly but not too tightly on your hands. Gloves that are too big can be uncomfortable and less effective.
- Disposable or reusable:Depending on the extent of the restoration work, you might choose disposable or reusable gloves. Disposable gloves are suitable for one-off jobs, while reusable gloves are more sustainable and cost-effective in the long run.
- Thickness:You will want gloves that are not too thin as you can get cut easily, but not too thick that you can’t handle small parts. Consider intermediate thicknesses that balance protection with agility.
Whether you opt for disposable or reusable gloves, be sure to dispose of used gloves properly after the restoration process is complete. Proper disposal of gloves helps protect others and the environment. By taking adequate care and protecting yourself, you are sure to have a successful metal restoration experience.
Steel Wool or Sandpaper
When restoring old and tarnished metal to its former glory, steel wool or sandpaper can be a necessary tool to have on hand. They are useful for removing any remaining dirt or grime on the metal and preparing it for polishing. Here are some details about each option:
- Steel Wool: This is a versatile option that is available in varying coarseness levels, from extra fine to coarse. Extra fine steel wool is perfect for removing fingerprints or light tarnish without leaving scratches or marks on the metal’s surface. If the tarnish is more stubborn, it may be necessary to use a coarser steel wool. However, be careful not to use steel wool that is too coarse, as it can easily scratch the metal’s surface if not used correctly.
- Sandpaper: This option is also available in varying grit levels, which determines how rough or smooth the paper is. Like steel wool, the lower the number, the rougher the paper will be. Sandpaper can be effective in removing rust or corrosion spots. However, be cautious when using sandpaper, especially if the metal has a thin coating, as it can easily remove this layer and potentially damage the metal’s surface.
When using either option, it’s important to always test on a small, inconspicuous area first to ensure that it won’t damage the metal. Additionally, when using steel wool or sandpaper, it’s recommended to wear protective gloves to avoid any injury and to avoid transferring oils from your hands onto the metal’s surface. Both steel wool and sandpaper can be effective tools for restoring old and tarnished metal, but it’s important to use each with care and consideration for the metal’s finish and condition.
Clean and Polish the Metal
Now that you have assessed the condition of your metal and gathered the necessary supplies, it’s time to clean and polish the metal. This step is crucial in restoring your metal to its former glory, as it will remove any dirt or grime that has built up on the surface over time. By following these steps, you can achieve a shiny and beautiful finish that will make your metal look as good as new. So, grab your soft-bristled brush or cloth and metal polish or cleaner, put on your protective gloves, and let’s get started!
Test the Cleaner on a Small Area First
Before applying any cleaner to the entire metal surface, it’s important to test it on a small area first. This will help you determine whether or not the cleaner is safe to use on your specific type of metal and finish. Testing on a small area first will also help you avoid any potential damage to the metal.
To perform a test, choose a small, inconspicuous spot on the metal and apply a small amount of the cleaner. Let it sit for a few minutes, then rinse it off with water and dry the area with a cloth. Check the spot for any discoloration, warping, or other damage.
If the metal passes the test and doesn’t appear to be damaged, you can proceed with cleaning the rest of the surface. If there is any damage or discoloration, try a different cleaner or contact a professional for advice.
It’s crucial to wear protective gloves during the cleaning process to avoid skin irritation or other adverse effects from the chemicals in the cleaner. Once you’ve tested the cleaner, you’re ready to move on to the next step of the restoration process.
Below is a table summarizing the steps for testing the cleaner:
| Step 1: | Choose a small, inconspicuous spot on the metal |
| Step 2: | Apply a small amount of cleaner to the spot |
| Step 3: | Let the cleaner sit for a few minutes |
| Step 4: | Rinse the spot with water and dry it with a cloth |
| Step 5: | Check the spot for any damage or discoloration |
Apply the Cleaner to the Metal
Before applying the cleaner to the metal, make sure it is a suitable type for your specific metal and finish. Refer to the cleaner’s instructions or do some research ahead of time. Once you have the correct cleaner, follow these steps to apply it:
- Put on protective gloves: Before handling the cleaner, it’s important to protect your skin from any potentially harmful chemicals that may be present.
- Apply the cleaner to a small area: Start with a small area to test the cleaner and ensure that it doesn’t damage or discolor the metal. This area should also be inconspicuous in case any damage does occur.
- Apply the cleaner to the metal: Once you’ve tested the cleaner on a small area and are confident in its safety, apply it liberally to the metal.
- Let the cleaner sit for a few minutes: The cleaner may need some time to break down any dirt or grime on the metal’s surface. Follow the instructions on the cleaner for how long to let it sit.
- Gently scrub the metal: Using a soft-bristle brush or cloth, gently scrub the metal in circular motions to work the cleaner into the surface and remove any dirt or grime.
By following these steps, you can ensure that the cleaner is safely and effectively applied to your metal. Remember to always check the instructions on the cleaner and test it on a small area first to avoid any damage.
Use a Soft Bristle Brush or Cloth to Clean the Metal
When it’s time to clean the metal, it’s important to use a soft bristle brush or cloth to avoid scratching or damaging the surface. A hard-bristled brush or rough cloth can leave behind tiny scratches that will dull the metal’s shine.
To begin, start with a dry cloth or brush to remove any loose dirt or debris. Then, dampen the cloth or brush with water and add a small amount of metal cleaner or polish.
Using a circular motion, gently scrub the metal, being careful not to press too hard. Pay special attention to any areas with built-up grime or tarnish.
If you encounter any stubborn dirt or stains, try using a gentle abrasive like steel wool or fine-grit sandpaper. Be sure to test the abrasive on a small, inconspicuous area first to make sure it doesn’t scratch the surface.
Once you’ve finished cleaning the metal, rinse it thoroughly with water and dry it with a clean, soft cloth. Make sure to remove all excess polish or cleaner, as this can leave behind a dull film.
By taking care to use a soft bristle brush or cloth during the cleaning process, you’ll help restore your metal to its former glory without causing any damage.
Remove Any Remaining Dirt or Grime with Steel Wool or Sandpaper
After using a soft bristle brush or cloth to clean the metal, there may still be some stubborn dirt or grime that refuses to come off. In such cases, steel wool or sandpaper can be used to get rid of the remaining dirt and grime. Here are some steps to follow:
- Choose a fine-grade steel wool or sandpaper to avoid scratching the metal surface.
- Apply some metal polish or cleaner on the steel wool or sandpaper.
- Gently rub the steel wool or sandpaper on the metal surface in a circular motion.
- Be careful not to apply too much pressure, as this can scratch or damage the metal surface.
- Rinse the metal with water to remove any cleaner residue.
- Dry the metal thoroughly with a clean cloth.
After completing this step, the metal should be free of any dirt or grime and ready for the next step of applying a metal polish or wax to restore the shine. It is important to handle the steel wool or sandpaper with care as it can cause injury if not handled properly. Always wear protective gloves while using these materials.
Rinse the Metal with Water and Dry Thoroughly
After using the steel wool or sandpaper to remove any remaining dirt or grime, it’s important to rinse the metal with water and dry it thoroughly before moving on to the next step of the restoration process.
To rinse the metal, use a soft bristle brush or cloth and gently wash it with cool water. Be sure to remove all traces of the metal cleaner or polish from the surface.
Once the metal is rinsed, dry it thoroughly using a clean cloth or towel. It’s important to remove all moisture from the metal to prevent water spots from forming on the surface.
If the metal item is small enough, you can dry it with a hair dryer to ensure that all excess moisture is removed. This step is crucial as any remaining moisture can lead to rust or tarnish, which would undo all the hard work done to restore the metal to its former glory.
Rinsing the metal with water and drying it thoroughly is a crucial step in the restoration process. A clean and dry surface is essential for the next step of applying metal polish or wax to restore the shine.
Apply a Metal Polish or Wax to Restore the Shine
Once the metal has been thoroughly cleaned and dried, it’s time to restore its shine with a metal polish or wax. This step is essential to bring the metal back to its former glory and protect it from future tarnishing.
To apply the metal polish or wax, you’ll need a soft cloth or applicator pad. There are many types of metal polishes and waxes available on the market, so it’s important to choose the one that is best suited for your specific type of metal and finish.
Table:
| Type of Metal | Type of Polish/Wax |
|---|---|
| Brass | Brass polish or wax |
| Silver | Silver polish or wax |
| Copper | Copper polish or wax |
| Chrome | Chrome polish or wax |
| Stainless Steel | Stainless steel polish or wax |
Tip: If you’re unsure about which polish or wax to use, check the manufacturer’s instructions or do a small patch test on an inconspicuous area of the metal to ensure that it won’t cause any damage or discoloration.
Once you’ve selected the appropriate polish or wax, apply a small amount onto the soft cloth or applicator pad. Gently rub the polish onto the metal in circular motions, making sure to cover the entire surface area evenly.
Caution: Be careful not to use too much polish or wax as it can leave a sticky residue on the metal.
After applying the polish, allow it to sit on the metal for a few minutes or as directed by the manufacturer’s instructions. Then, using a clean, dry cloth, buff the metal in circular motions until it shines.
Tip: For best results, use a microfiber cloth for buffing the metal as it won’t scratch the surface.
Caution: Avoid touching the metal with your bare hands after polishing it as the oils from your skin can leave fingerprints and dull the shine.
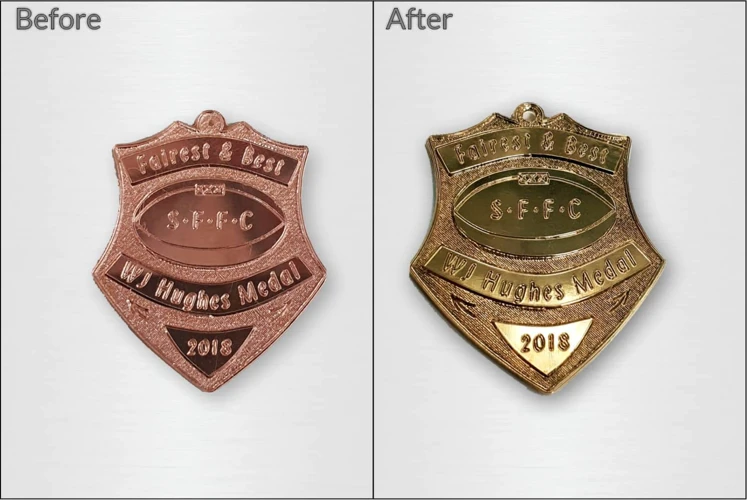
Applying a metal polish or wax is the final step in restoring old and tarnished metal to its former glory. By following these simple steps, your metal will shine like new and be protected from future tarnishing.
Repair Any Damage
Once you’ve assessed and cleaned your metal, it’s time to examine it for any damage. Unfortunately, old and tarnished metal may have dents, scratches, or even cracks that need to be addressed before it can truly shine again. Don’t worry, with some patience and the right tools, you can repair most damage yourself. In this section of the article, we will guide you through the steps to repair any damage to the metal and bring it closer to its former glory. So, let’s roll up our sleeves and get to work!
Sand Down Any Rough Spots or Dents
Before repairing any damage on your metal, it’s important to prepare the surface by sanding down any rough spots or dents. This will ensure a smooth and even finish once the repairs are complete. Here’s a step-by-step guide on how to sand down rough spots and dents on your metal:
| Step 1: | Identify the rough spots and dents on the metal surface. |
| Step 2: | Choose the appropriate sandpaper according to the severity of the rough spot or dent. A coarse-grit sandpaper, like 60 or 80-grit, will work for deep scratches, heavy rust or stubborn spots. A fine-grit sandpaper, such as 220 or 320-grit, is well-suited for light scratches or minor imperfections. |
| Step 3: | Cut the sandpaper to the appropriate size. |
| Step 4: | Wear protective gloves to avoid injuring your hands while sanding. |
| Step 5: | Sand down the rough spot or dent in a circular motion, using moderate pressure. Avoid applying too much pressure, as it can damage the metal further. |
| Step 6: | Inspect the spot frequently to ensure the imperfection is being sanded away evenly. |
| Step 7: | Repeat this process until the rough spot or dent has been sanded down to the surrounding surface level. |
Once you have sanded down the rough spots and dents, the metal surface should be smooth and ready for the next step in the restoration process. Remember to take your time with this step and be patient in order to achieve the best results.
Fill in Cracks or Holes with Epoxy or Metal Filler
Fill in Cracks or Holes with Epoxy or Metal Filler
If you have determined that your metal piece has cracks or holes that need to be repaired, you can fill them in with either epoxy or metal filler. Here is a comparison table to help you choose which material to use:
| Material | Pros | Cons |
|---|---|---|
| Epoxy | Easy to mix and apply | Takes longer to dry and harden |
| Metal Filler | Dries and hardens quickly | Can be more difficult to apply and shape |
Both epoxy and metal filler can effectively fill in cracks and holes, though their application processes and drying times differ. Epoxy is a two-part adhesive that must be mixed together and applied carefully to the damaged area. It usually takes several hours to dry and harden before it can be sanded or painted over. Metal filler, on the other hand, is a pliable material that can be applied by hand, often with a putty knife. It typically dries and hardens within a matter of minutes.
Ultimately, the choice between epoxy and metal filler depends on the size and location of the damage, as well as personal preference. If the damage is small and in an inconspicuous location, epoxy may be the preferable choice due to its ease of use. However, if the damage is larger or in a more visible location, metal filler may provide a stronger and more seamless repair.
Sand the Repaired Area Smooth
After filling in any cracks or holes with epoxy or metal filler, the repaired area may look rough and uneven. To ensure a smooth and even surface, it is important to sand it down.
Here are the steps to sand the repaired area smooth:
- Step 1: Use a fine-grit sandpaper, such as 220-grit, to gently sand down the repaired area. Be careful not to sand too hard or too much, as this could damage the surrounding metal.
- Step 2: Continue sanding until the surface of the repair is flush with the surrounding metal. Run your fingers over the area to feel for any bumps or rough spots.
- Step 3: Once the repair is smooth, switch to a finer grit sandpaper, such as 400-grit, and sand the area again. This will help to remove any remaining scratches or roughness from the previous sanding.
- Step 4: Wipe the area down with a clean, damp cloth to remove any dust or debris from sanding.
- Step 5: Inspect the repaired area to ensure it is smooth and even. If there are still any rough spots, repeat the sanding process with a finer grit sandpaper until the area is completely smooth.
By following these steps, you can ensure that the repaired area is smooth and properly prepped for the next stage of the restoration process.
Clean and Polish the Repaired Area
Once you have repaired any damage to your metal, it’s important to clean and polish the repaired area to ensure a seamless finish. Here are the steps to follow:
- Clean the Area: Before polishing, make sure to remove any dust or debris from the repaired area by wiping it down with a soft cloth or brush.
- Choose the Right Polish: There are many metal polishes available on the market, each formulated for specific types of metal and finishes. Choose a polish that is appropriate for your metal and follow the manufacturer’s instructions.
- Apply the Polish: Using a clean cloth, apply a small amount of the polish to the repaired area. Be sure to apply the polish evenly and in a circular motion.
- Buff the Area: After applying the polish, use a clean, dry cloth to buff the repaired area until it shines. Be sure to use a light touch and avoid rubbing too hard, as this can cause scratches or damage to the metal.
- Inspect the Area: Once you’ve finished buffing, inspect the repaired area for any remaining scratches or damage. If necessary, repeat the process until you achieve the desired finish.
Remember, cleaning and polishing metal is a delicate process, and it’s important to take your time and work carefully to avoid damaging the metal. With patience and the right supplies, you can restore your old and tarnished metal to its former glory.
Conclusion
As you finish restoring your old and tarnished metal to its former glory, you may feel a sense of accomplishment and excitement to show it off. However, it’s important to remember that proper maintenance is crucial in maintaining its shine and preventing further damage. Take the time to appreciate the hard work you’ve put in, but also consider incorporating regular maintenance into your routine to keep your metal looking like-new for years to come. With these simple steps and the right supplies, your metal can shine like it did years ago.
Enjoy Your Like-New Metal
After following the steps outlined above, your old and tarnished metal should be restored to its former glory. You can now enjoy using or displaying your metal piece without any embarrassment caused by its previous dull appearance.
In order to keep the shine and like-new condition of the metal for as long as possible, regular maintenance is recommended. This includes gentle cleaning with a soft cloth or bristle brush to remove any dirt or dust that may accumulate over time.
It is also important to be mindful of any harsh chemicals or abrasive materials that may cause damage to the metal surface. Protective gloves should be worn when handling any metal polish or cleaner to prevent any skin irritation.
By taking good care of your restored metal, you can ensure that it will continue to look like-new for years to come. Consider incorporating regular metal maintenance into your cleaning routine to keep your metal pieces shining bright.
Consider Regular Maintenance to Keep the Shine
One of the most important things to keep in mind when restoring old metal is that regular maintenance is key to keeping it looking like new. Here are a few tips to help ensure your metal stays shiny and beautiful for years to come:
- Clean it regularly: Regular cleaning will prevent dirt and grime from building up on the metal’s surface. Use a soft bristle brush or cloth to gently wipe it down and remove any debris. Avoid using harsh chemicals or abrasive materials that could scratch the surface.
- Protect it from the elements: Exposure to the elements can cause metal to tarnish and corrode over time. If possible, keep your metal objects stored indoors or under cover. Consider using a protective wax or sealant to help prevent rust and other types of damage.
- Be careful when using it: Metal objects can be easily scratched or dented. Avoid exposing them to sharp or heavy objects, and be mindful of how you handle and store them.
- Inspect it regularly: Keep an eye out for any signs of damage or wear and tear, such as cracks or rust spots. Address these issues as soon as possible to prevent them from getting worse.
By following these simple maintenance tips, you can help ensure that your restored metal objects stay looking beautiful for many years to come. Remember that proper care and maintenance can go a long way in preserving the original shine and beauty of your treasured metal items.
Frequently Asked Questions
Can all types of metal be restored?
Most types of metal can be restored, but it’s important to identify the type of metal and choose the appropriate cleaning method.
What should I do if my metal has cracks or dents?
You can sand down rough spots and fill in cracks or holes with epoxy or metal filler to repair the damage.
Do I need to wear gloves when cleaning and polishing metal?
Yes, it’s recommended to wear protective gloves to prevent skin irritation and exposure to harmful chemicals in metal cleaners or polishes.
Can I use regular household cleaners to clean metal?
No, regular household cleaners can be too harsh and damage the metal. You should use a metal polish or cleaner specifically designed for the type of metal you are cleaning.
How do I restore tarnished brass?
You can use a mixture of vinegar and salt to remove tarnish from brass, followed by polishing with a brass polish or wax.
Can I use sandpaper to clean metal?
Yes, fine-grit sandpaper or steel wool can be used to remove stubborn dirt or grime from metal, but be gentle and use with caution to avoid scratching the metal surface.
How often should I polish my metal to maintain its shine?
It depends on the type and condition of the metal, but polishing every few months will help maintain its shine.
What should I do if my metal has rust?
You can use a rust remover to dissolve the rust and then polish the metal surface to remove any remaining stains. Prevent future rust by storing metal in a dry place or applying a protective coating.
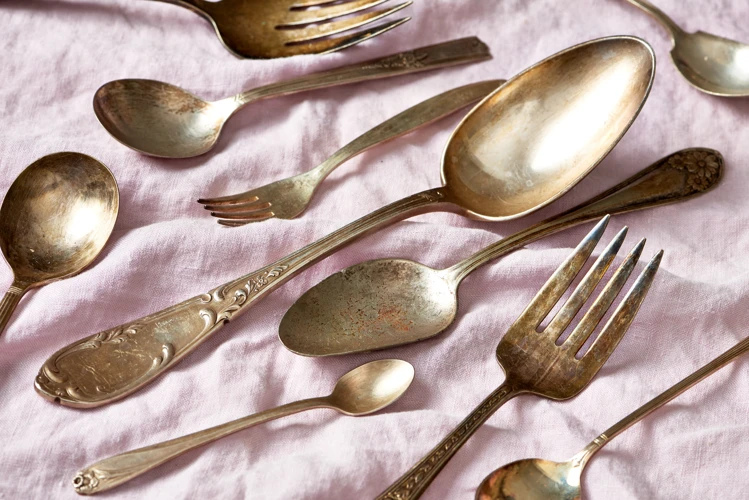
How do I restore old silverware?
You can use a silver polish or cream to remove tarnish from silverware and restore its shine. Be careful not to use too much pressure or abrasive tools that can damage the delicate silver surface.
What is the best way to protect metal from future damage?
Applying a protective coating or wax can help protect metal from further damage caused by air, water, or UV rays. Store metal in a dry place and avoid exposure to harsh chemicals and extreme temperatures.